6 Advanced iPhone Camera Controls For Jaw-Dropping Photography
Do you want to take jaw-dropping iPhone photos that look like they were shot on a DSLR camera? If so, you need to use the manual iPhone camera controls! This might sound difficult and technical… but it’s easier than you think. In this tutorial, we’ll guide you step-by-step through the advanced iPhone camera controls. Read on to start shooting incredible photos that no one will believe were taken with an iPhone!
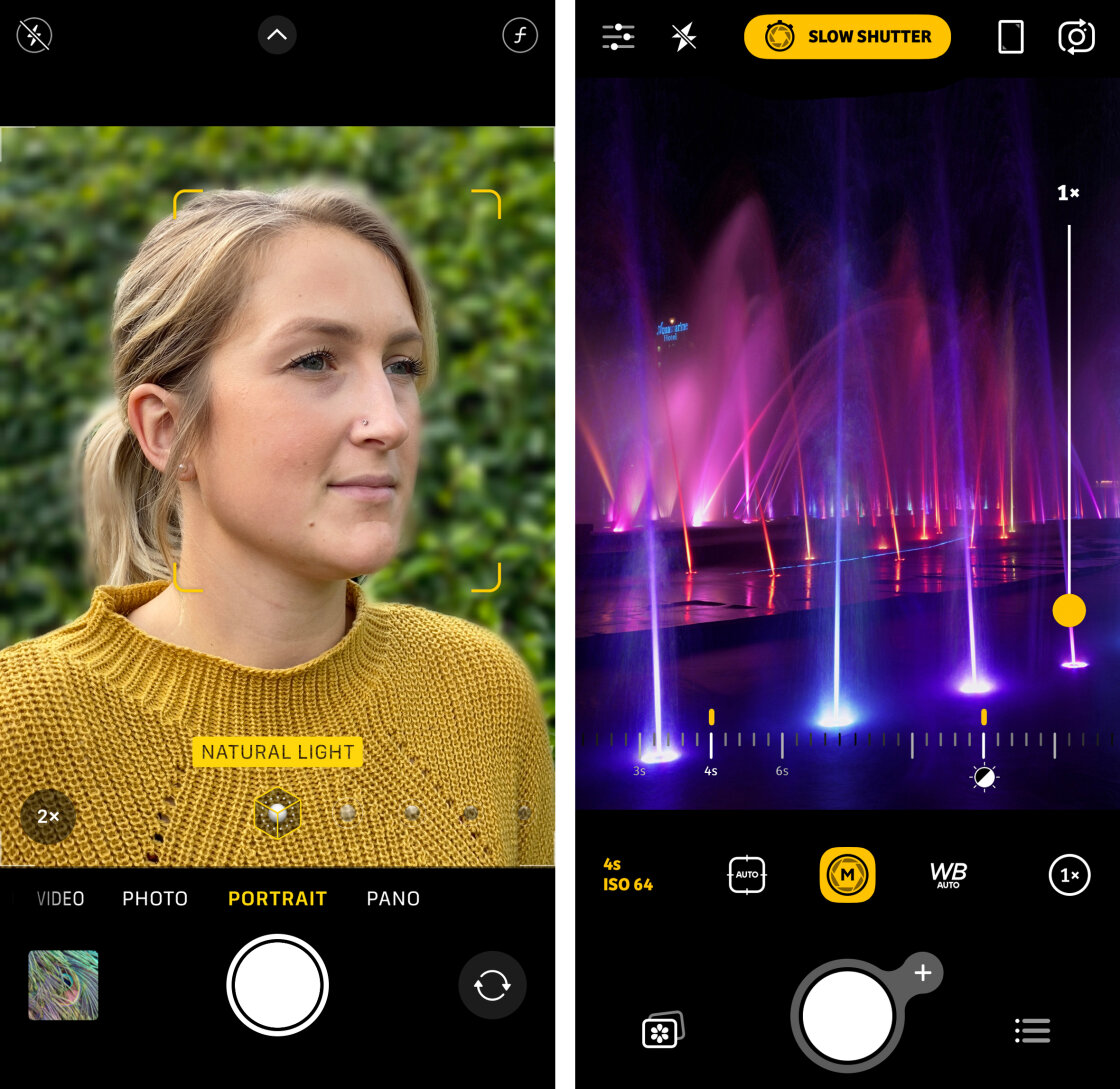
Table Of Contents: Advanced iPhone Camera Controls
Click any title link below to go straight to that section of the article:
1. Depth Of Field: How To Blur The Background In Your Photos
1.1 Use Portrait Mode To Blur The Background In Your Photos
1.2 Get Close To Your Subject To Create A Shallow Depth Of Field
2. Focus: How To Set Focus For Pin-Sharp Images
2.1 Tap To Set The Focus Point
2.2 Lock The Focus With AE/AF Lock
2.3 Use Manual Focus For More Precise Focusing
3. Exposure: How To Get Perfect Brightness Levels In Your Pictures
3.1 Adjust Exposure Manually
3.2 Use Exposure To Change The Mood Of A Photo
3.3 Switch On HDR For Better Exposure In High Contrast Scenes
4. Shutter Speed: How To Change Shutter Speed On iPhone
4.1 What Is Shutter Speed?
4.2 How To Change Shutter Speed On iPhone
4.3 Use A Slow Shutter Speed For Stunning Long Exposure Photos
5. ISO: How To Use ISO To Capture Grain-Free Shots In Low Light
5.1 What Is ISO?
5.2 How To Change The ISO iPhone Camera Setting
5.3 Balance Shutter Speed & ISO
6. White Balance: How To Capture Perfect Colors In Your Photos
6.1 What Is White Balance?
6.2 How To Change White Balance On iPhone
6.3 Use White Balance For Creative Effect
1. Depth Of Field: How To Blur The Background In Your Photos
Do you want to shoot professional-looking iPhone photos with beautiful out-of-focus backgrounds?
Creating a shallow depth of field (where only part of the scene is in focus) is a great way to make your subject stand out. And it’s perfect for blurring out a distracting background.
Shallow depth of field photos are typically associated with DSLR cameras. But did you know it’s easy to blur the background in your iPhone photos?
On a DSLR camera, you control the depth of field by adjusting the aperture (the size of the opening in the lens). However, the iPhone aperture can’t be changed.
So how do you blur the background in your iPhone photos?
Read on, and discover two easy ways to shoot stunning images with beautifully blurred backgrounds.
1.1 Use Portrait Mode To Blur The Background In Your Photos
Does your iPhone camera have Portrait mode? If so, you can use it to shoot stunning photos with dreamy, blurred backgrounds.
You’ll find Portrait mode in the built-in Camera app on the following iPhones: iPhone 12, iPhone 12 Mini, iPhone 12 Pro and 12 Pro Max, iPhone 11, iPhone 11 Pro and 11 Pro Max, iPhone XS, iPhone XS Max, iPhone XR, iPhone X, iPhone 8 Plus, and iPhone 7 Plus.
Portrait mode uses clever depth-effect software to blur the background. All you have to do is point the camera at your subject, and the iPhone will do the rest!
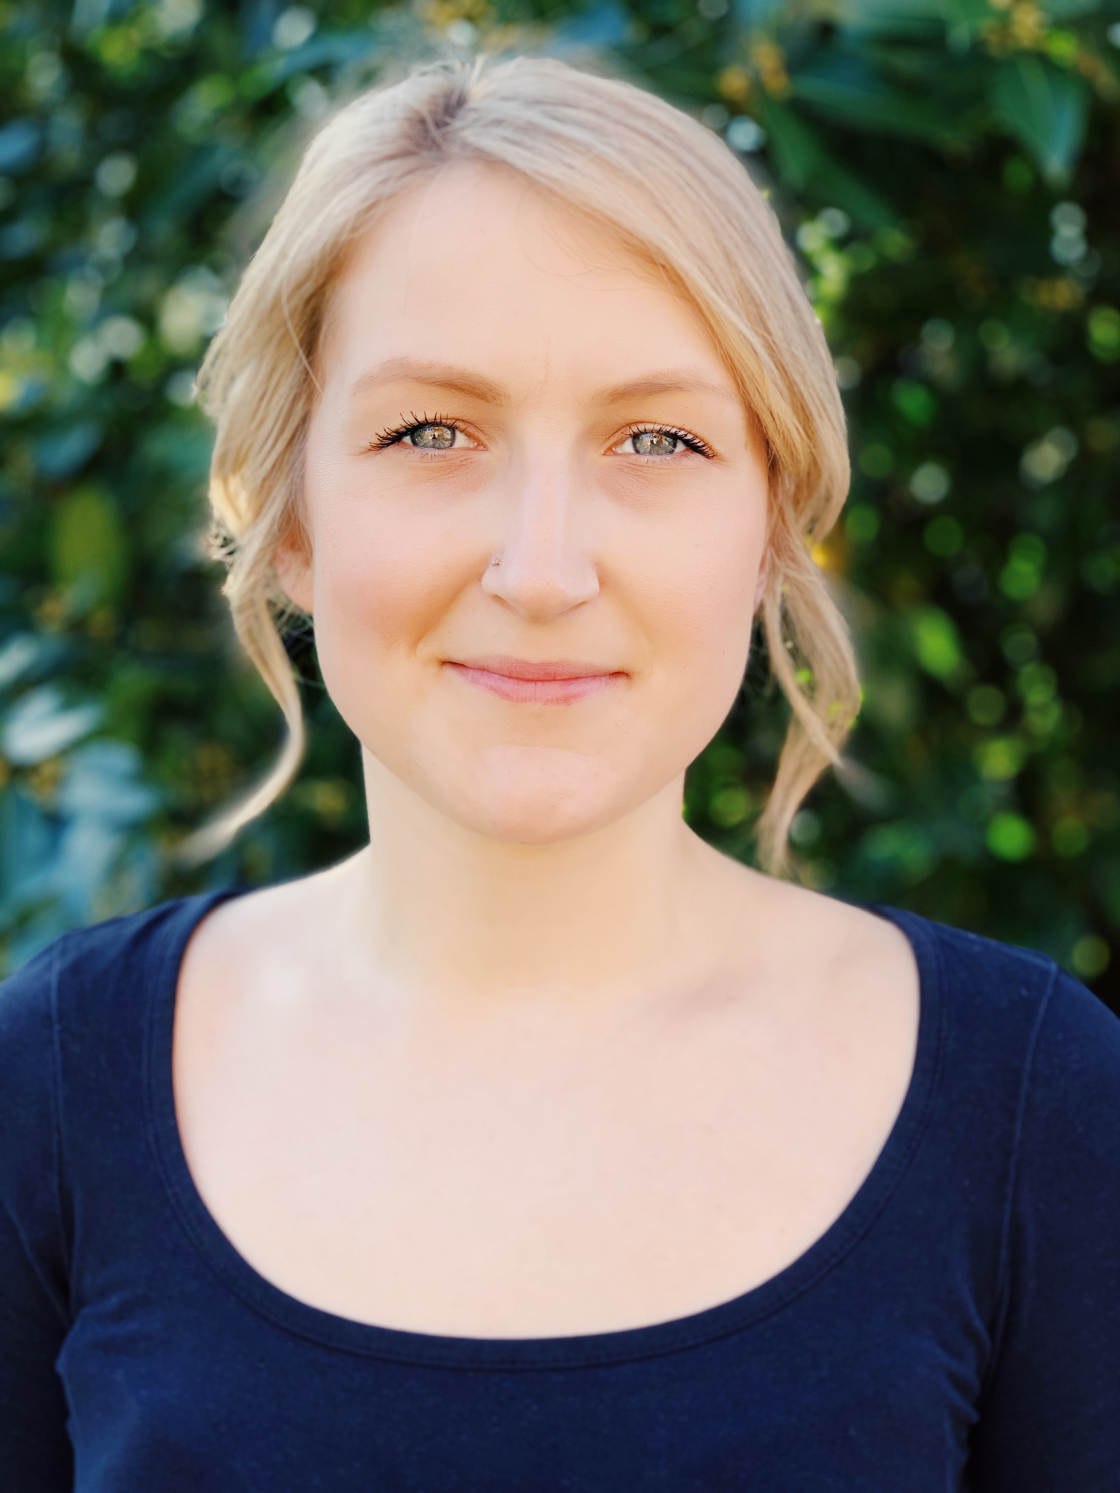
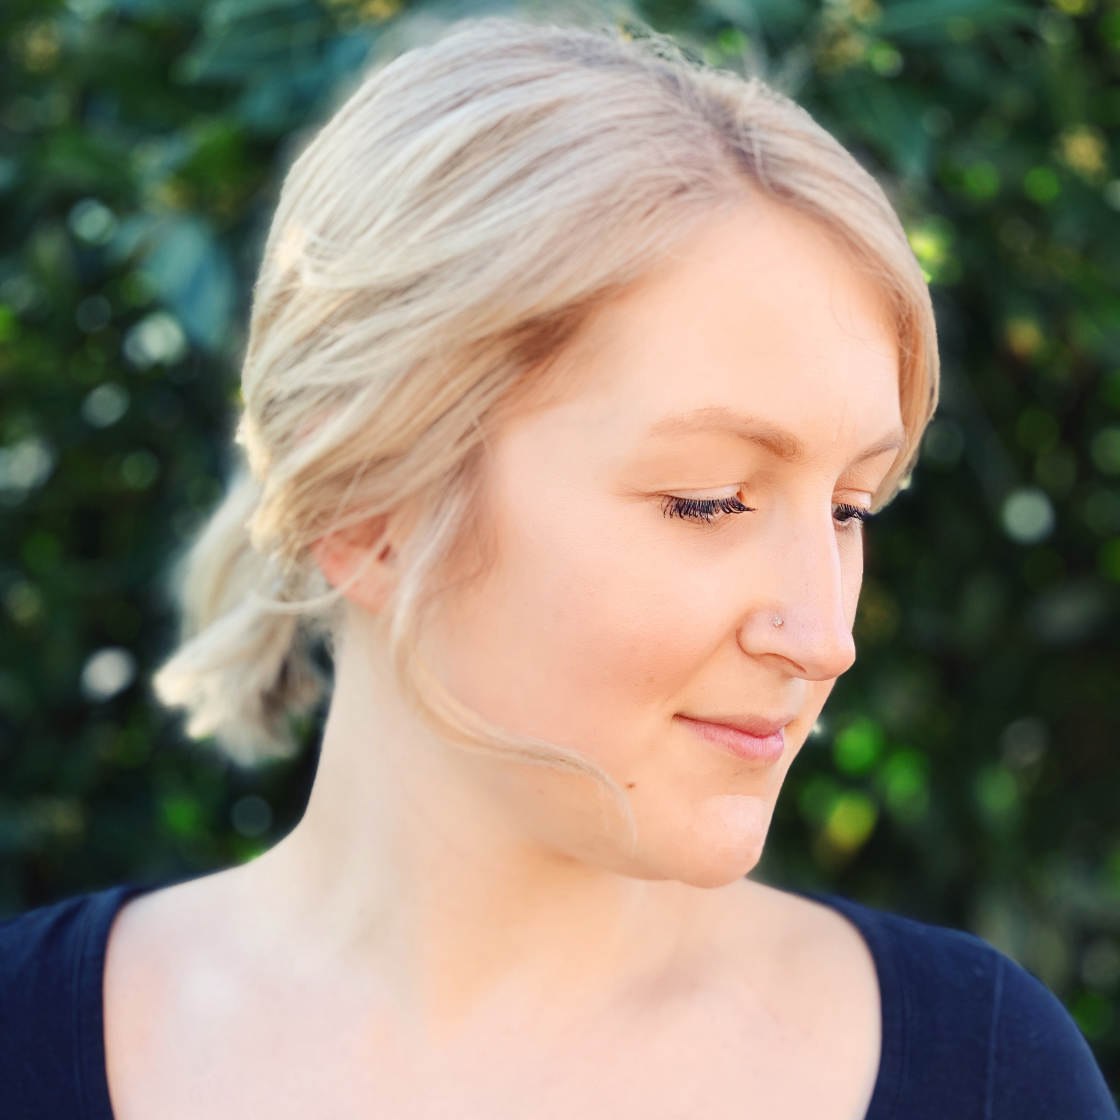
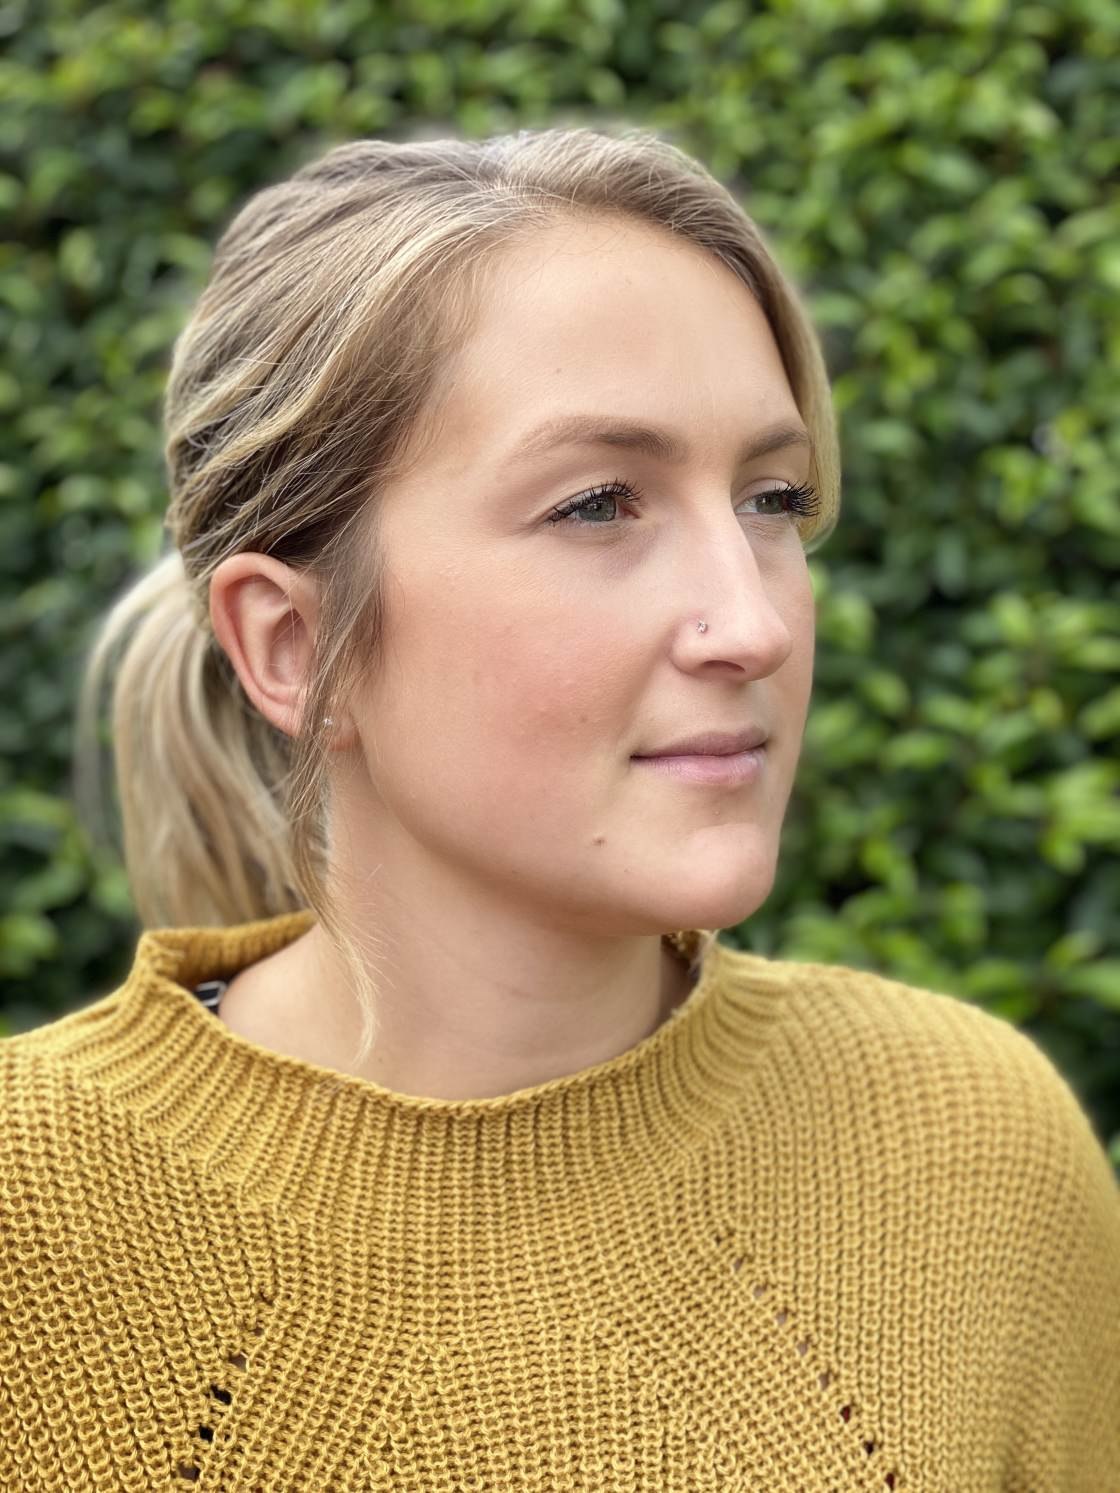
Portrait mode is perfect for shooting professional-looking portrait photos.
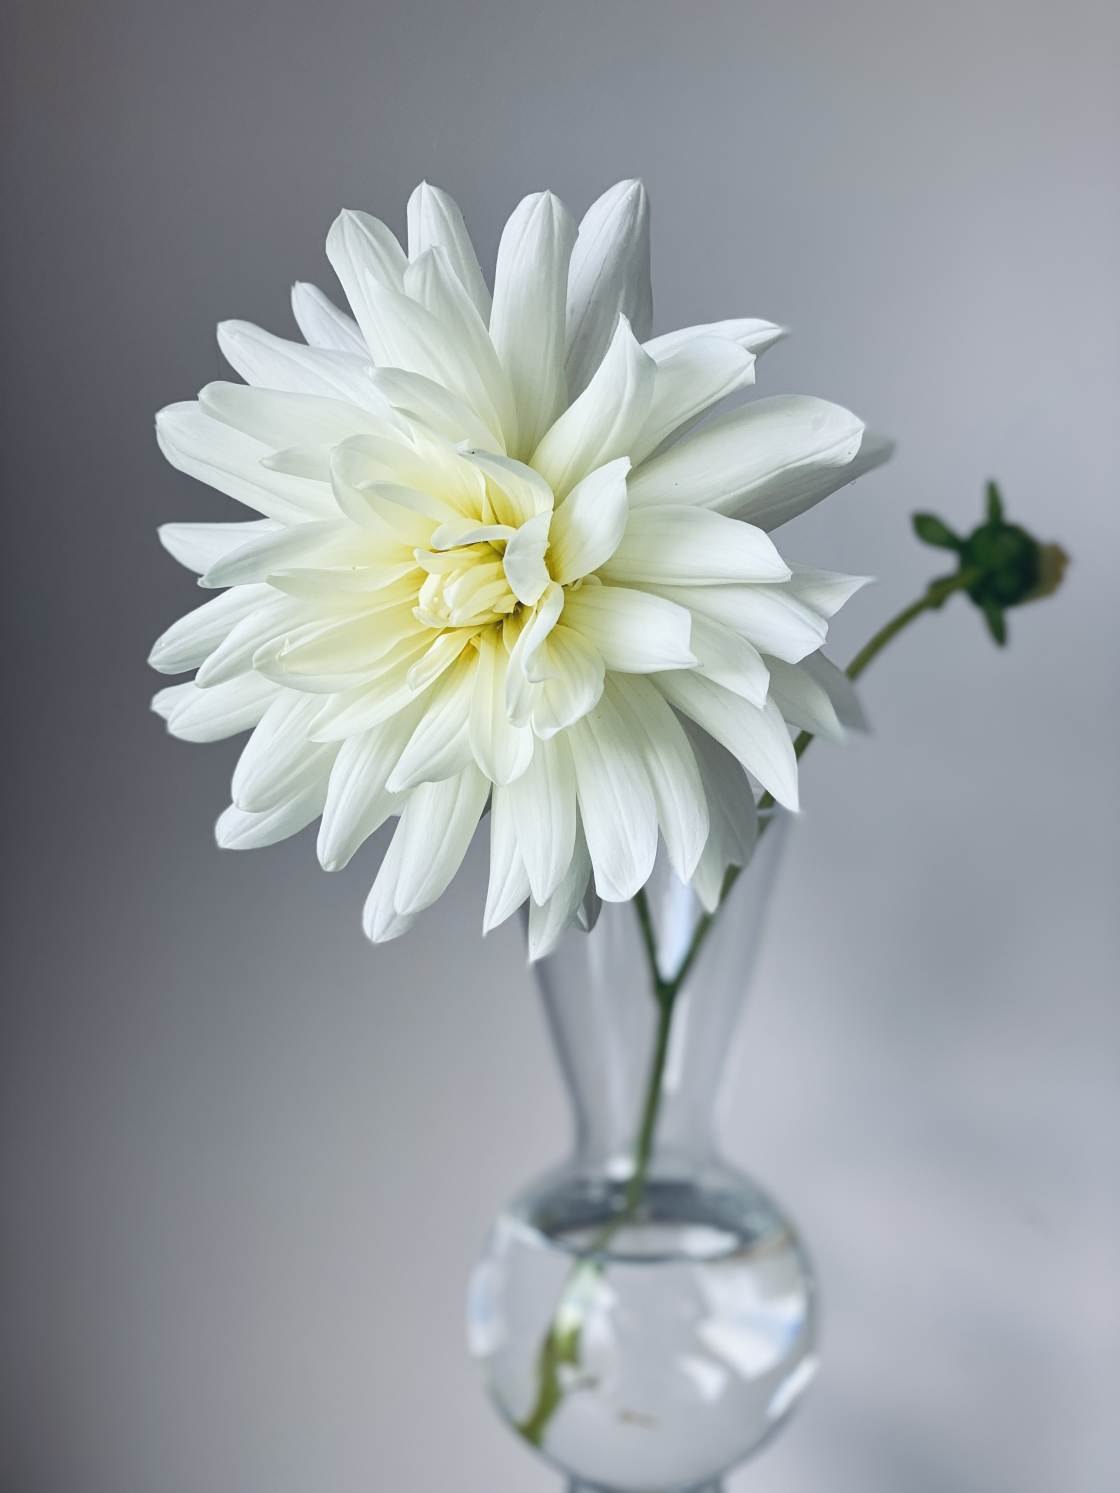
But you can also use it to blur the background behind other subjects.
Here’s how to capture beautifully blurred backgrounds with Portrait mode:
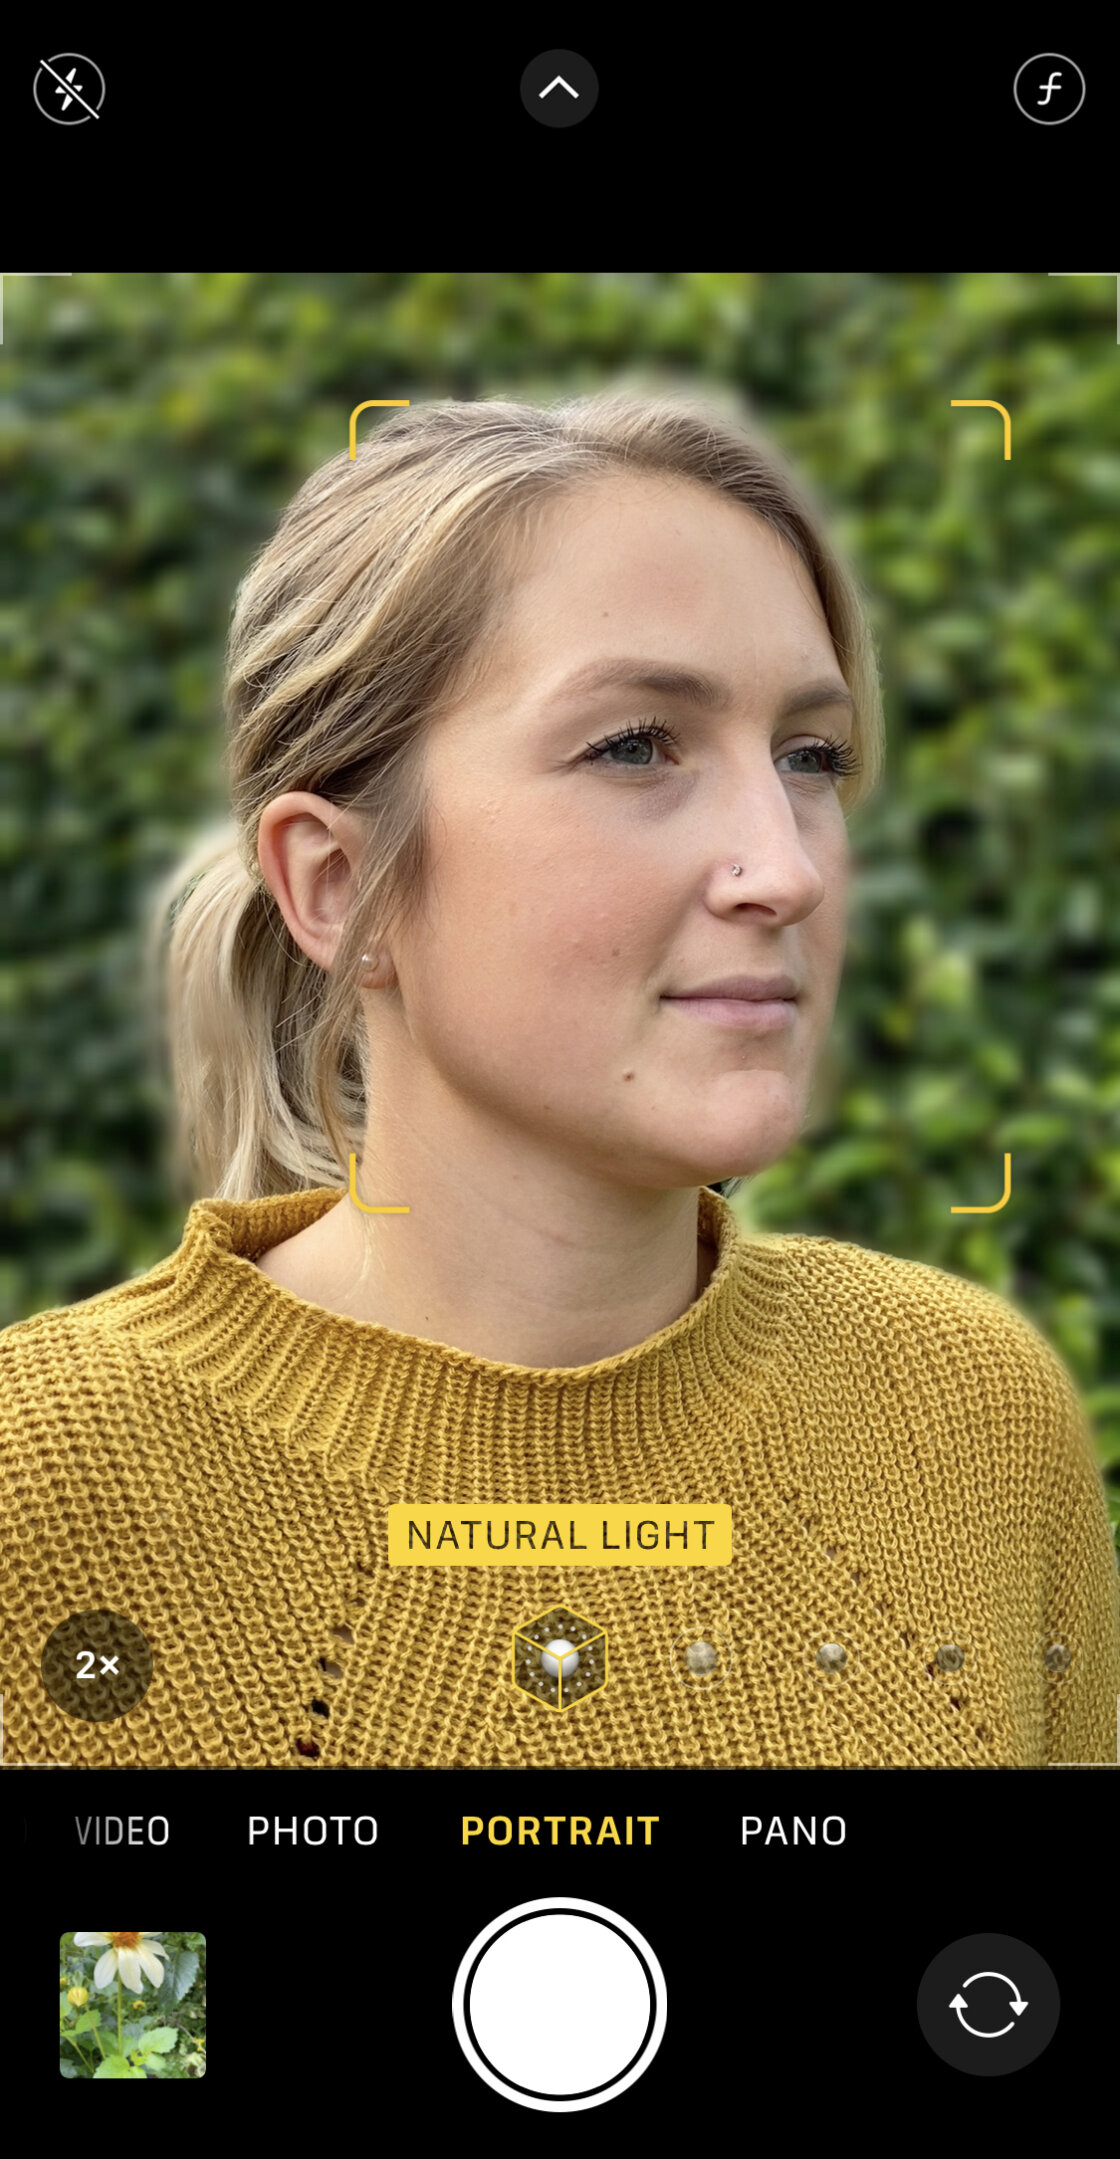
Open the built-in iPhone Camera app, then select Portrait mode at the bottom of the screen.

Ensure the subject is between two and eight feet from the camera. If you’re too close or too far away, you’ll see a message telling you to change your distance.
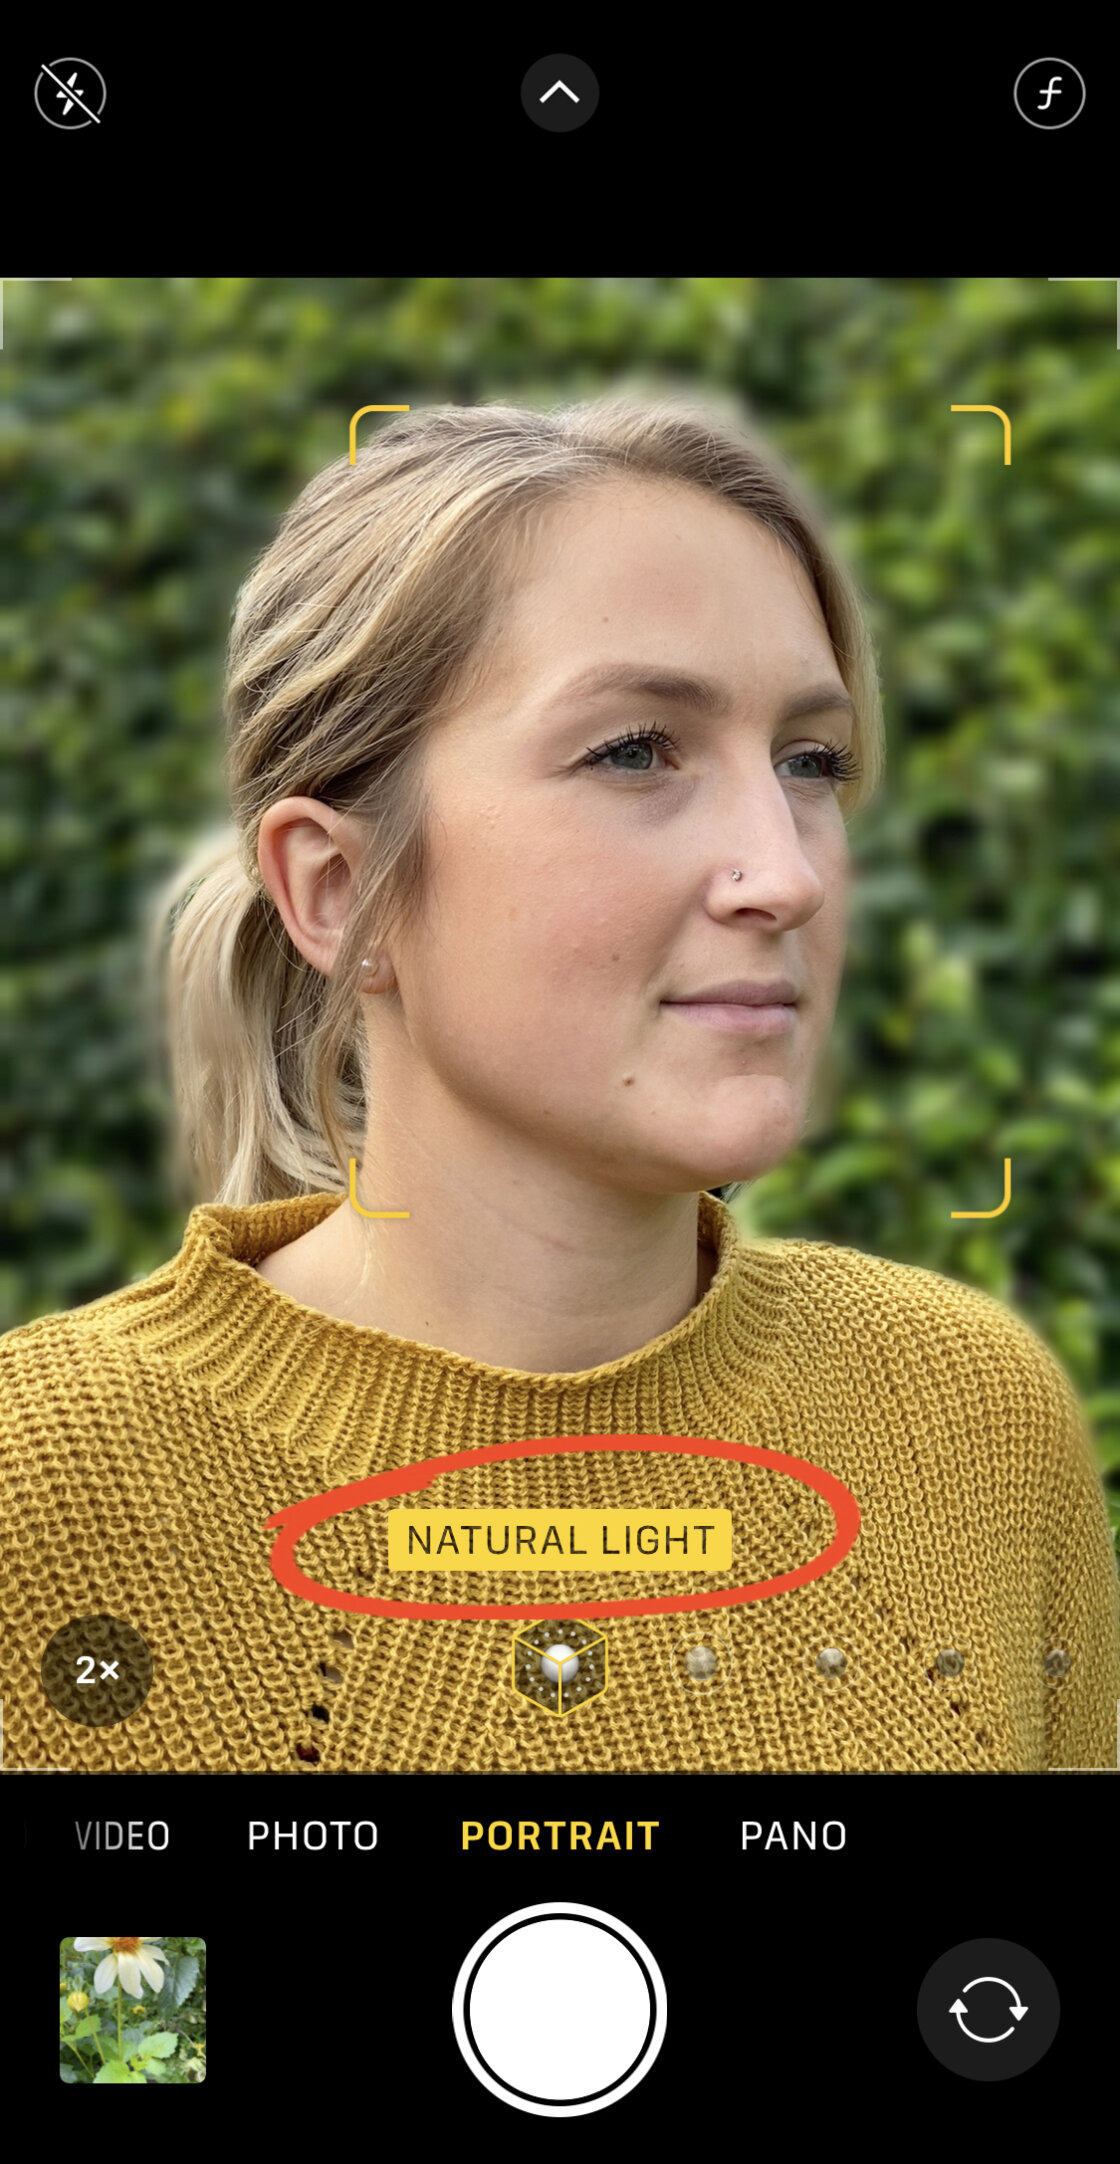
When the camera has focused on the subject and blurred the background, you’ll see the words Natural Light in yellow. (On iPhone 7 Plus, you’ll see Depth Effect instead.)
Now, tap the shutter button to take a beautiful photo with a soft, blurred background. It really is that easy!
If you have one of the newer iPhones (all iPhone 12 models, all iPhone 11 models, iPhone XS, XS Max, or XR), you can do even more with Portrait mode.
These iPhones allow you to adjust the strength of the background blur after taking your photo.
This offers a huge amount of creative control.
To adjust the blur strength, open your portrait photo in the Photos app, then tap Edit.
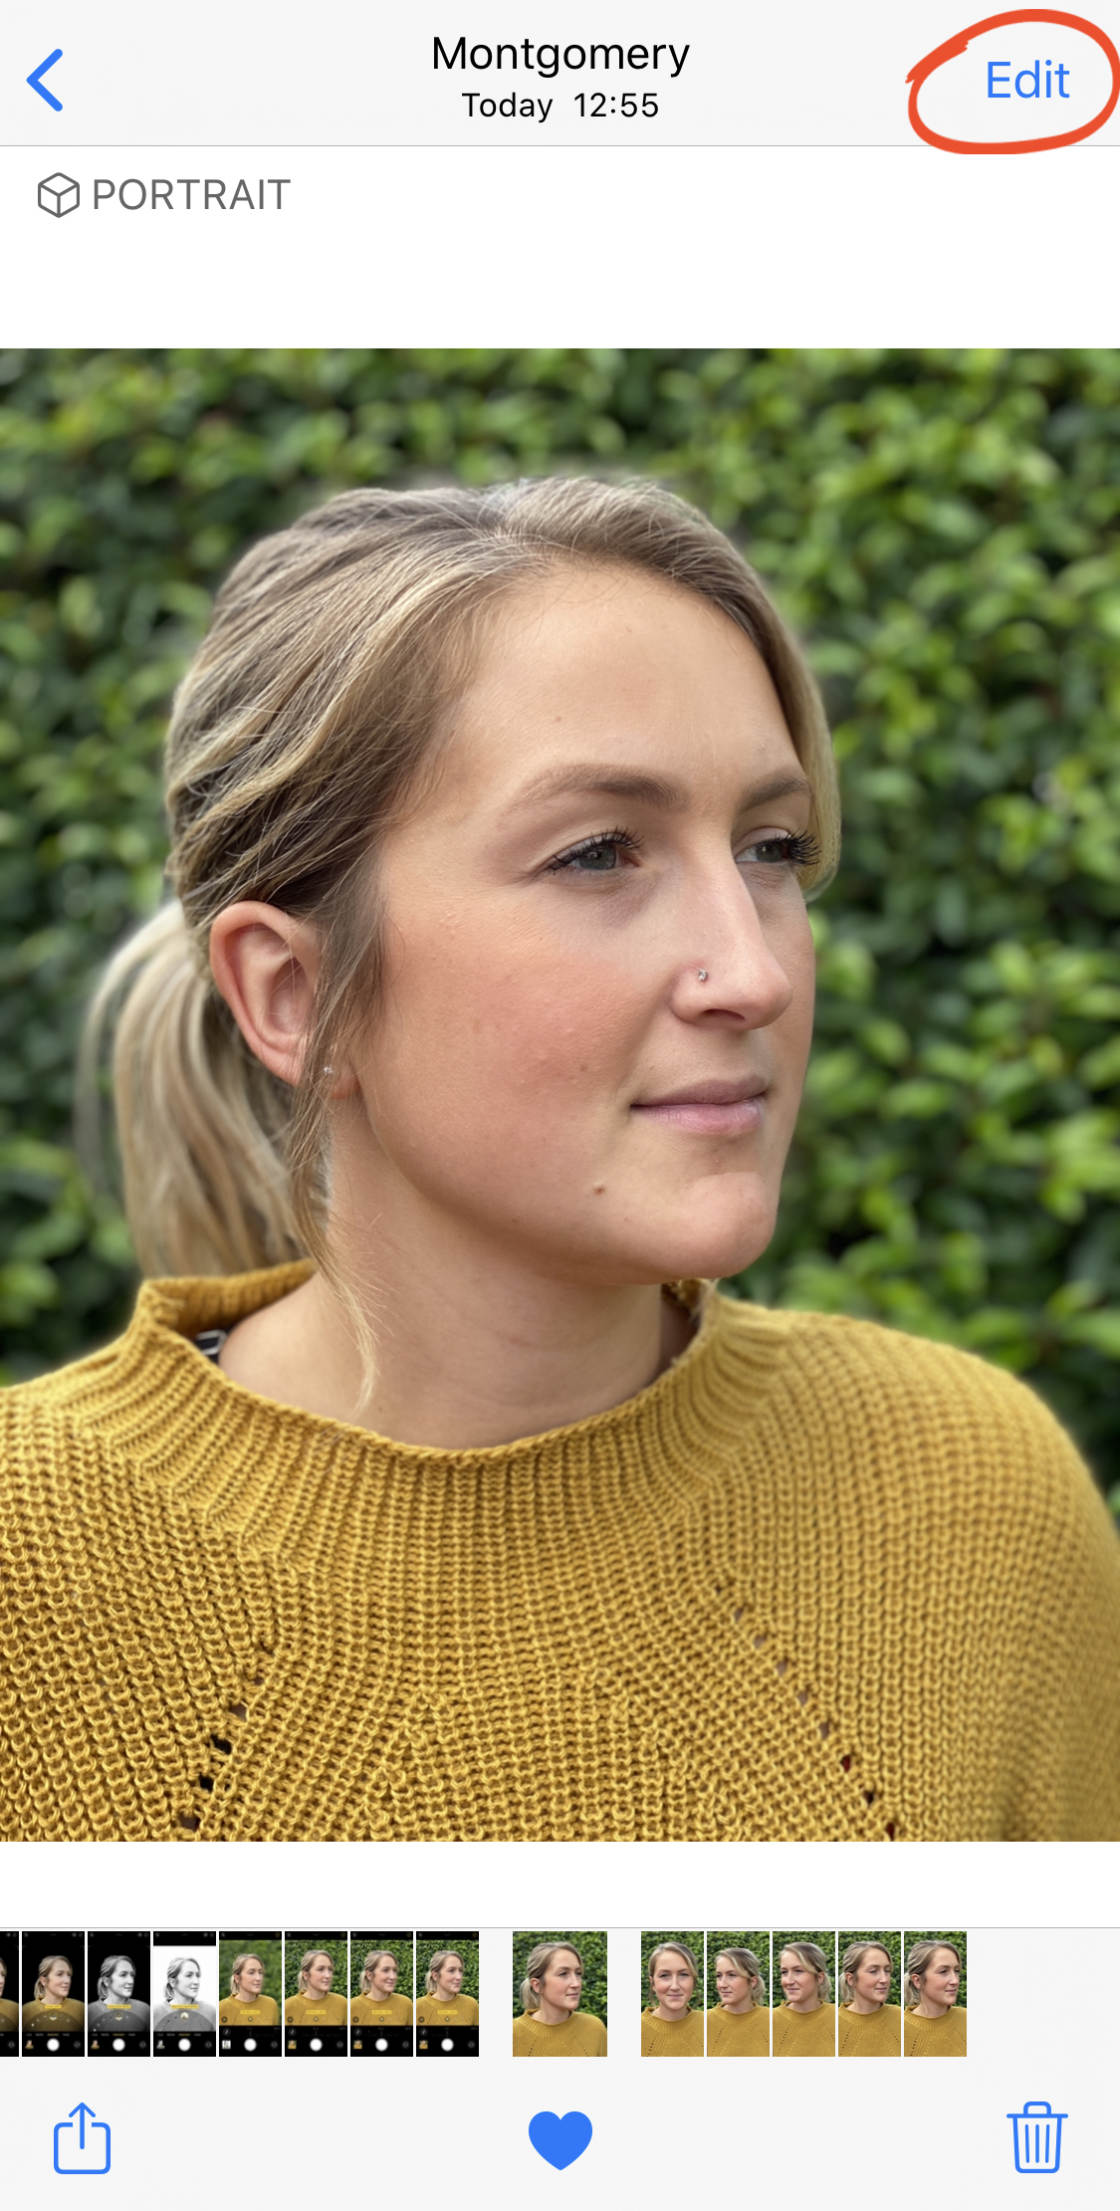
Tap the f/number icon at the top left of the screen.
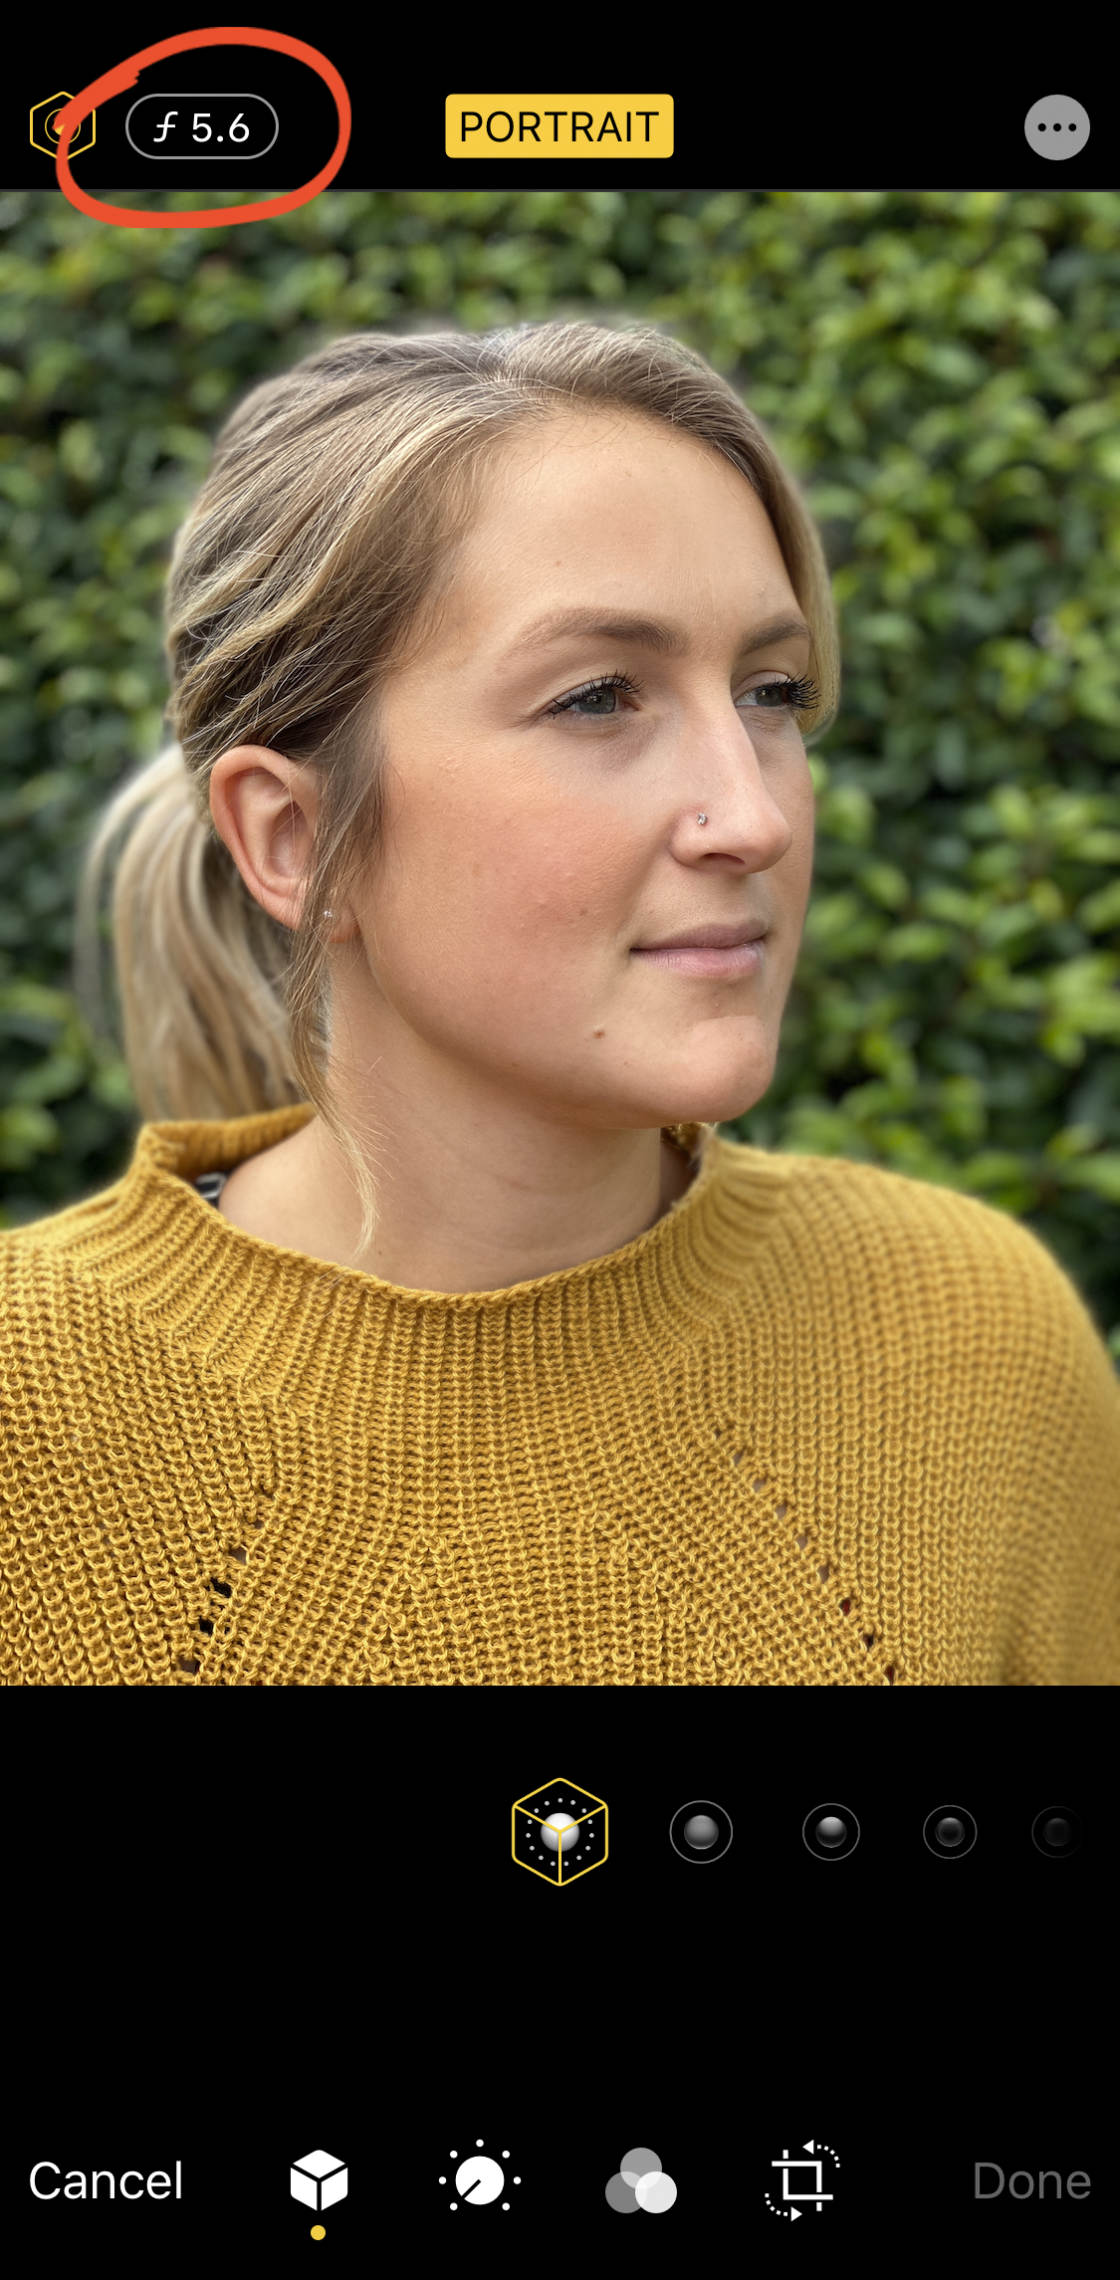
You’ll now see the Depth slider beneath your photo. Drag the slider left or right to adjust the strength of the background blur.
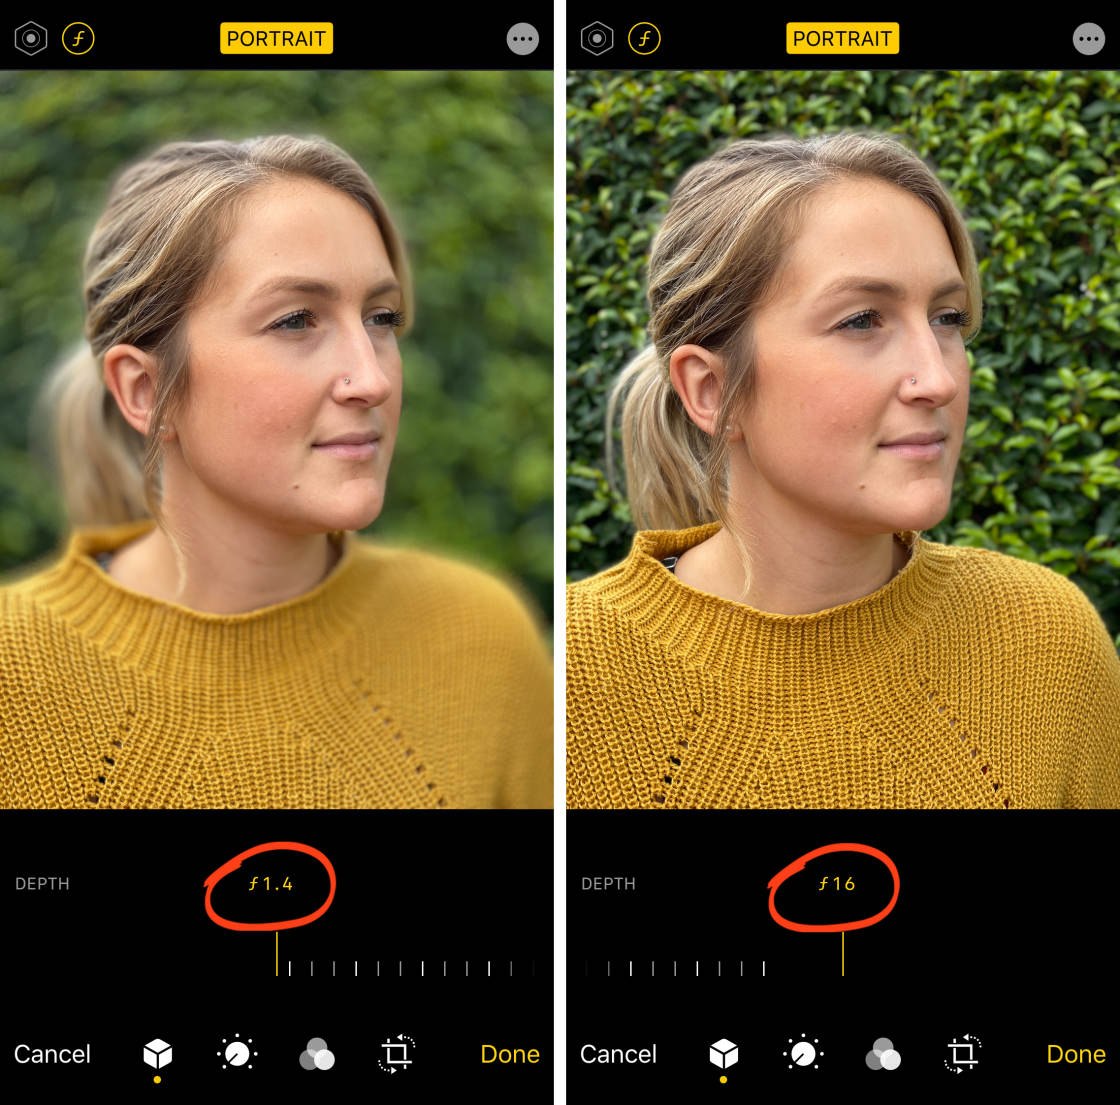
Tap Done to save the changes.
As you can see, Portrait mode offers an easy way to create a shallow depth of field in your photos.
But what if you don’t have Portrait mode on your iPhone?
Well, there’s another simple way to blur the background in your photos. And this technique works on any iPhone model!
Here’s what you need to do:
1.2 Get Close To Your Subject To Create A Shallow Depth Of Field
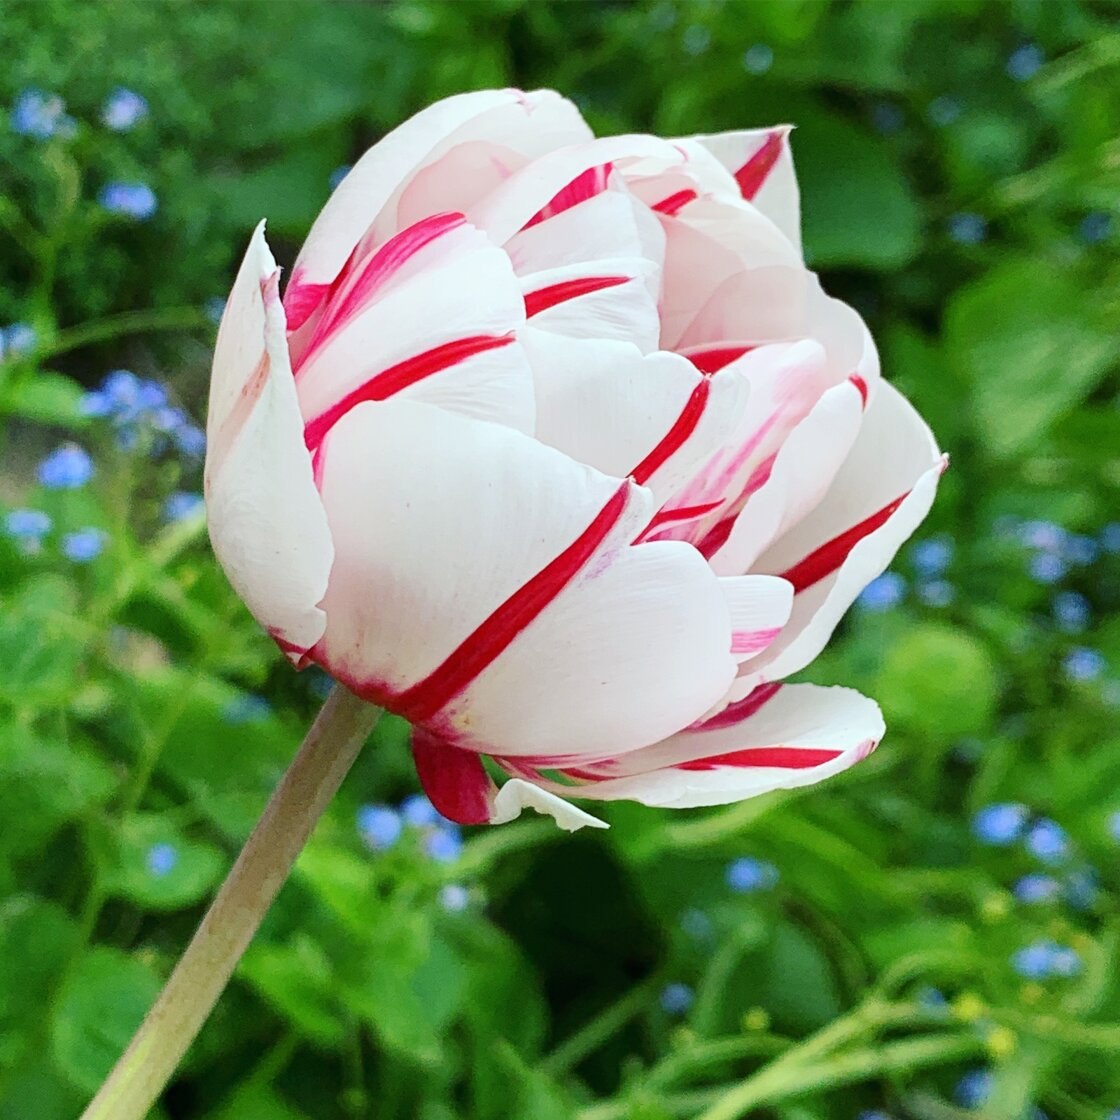
Do you want to know a great trick for blurring the background in your iPhone photos?
Get closer to your subject.
The closer the lens is to the subject, the blurrier the background will appear.
It’s that simple!
This technique works on any iPhone (or indeed any camera)… even if you don’t have Portrait mode.
When shooting close-ups, it’s important that the subject (not the background) is in sharp focus. You’ll learn how to set focus in section 2 below.
Just be careful not to get too close to the subject. If you’re too close, the camera won’t be able to focus at all.
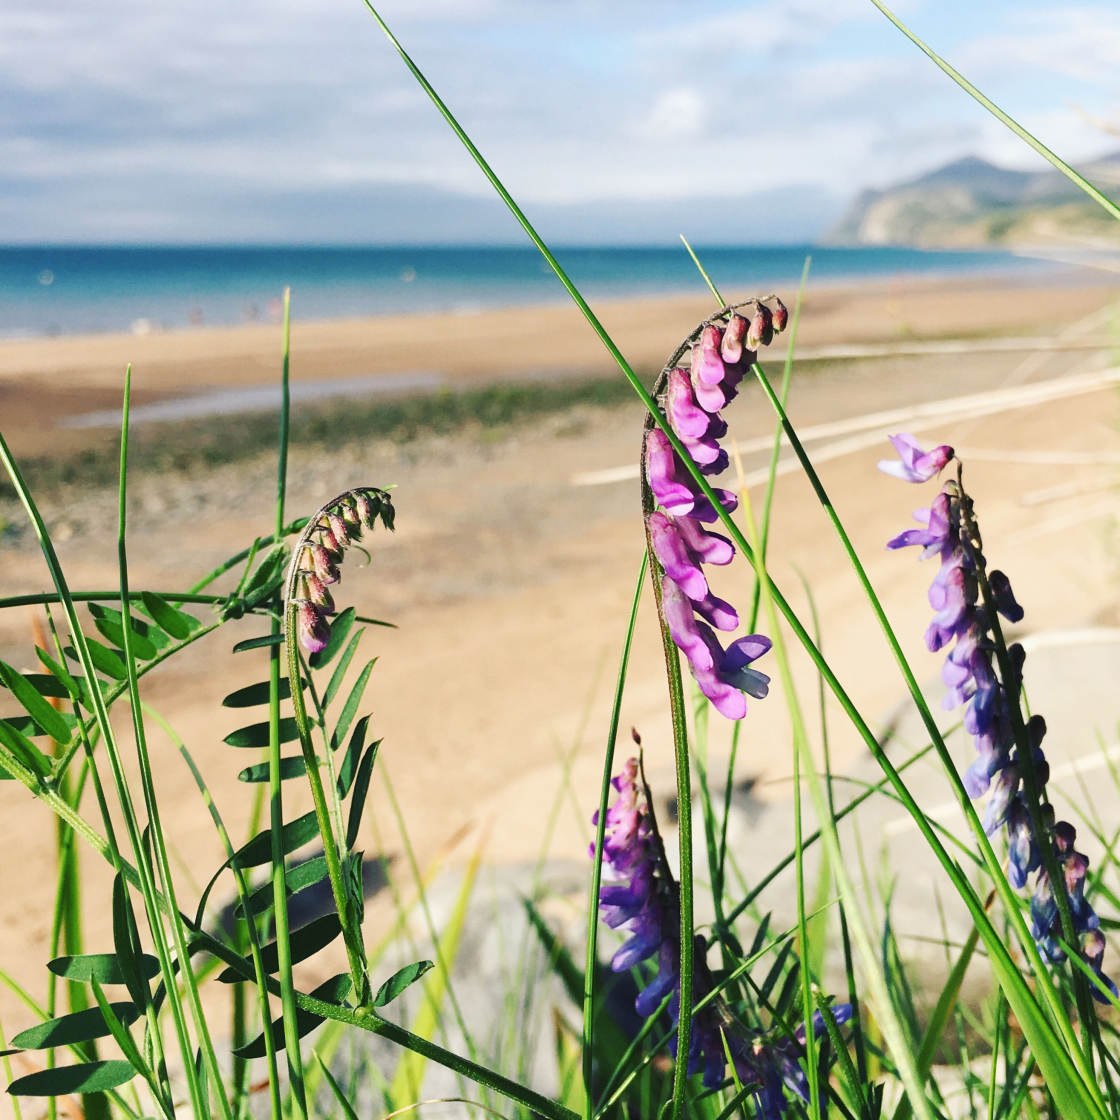
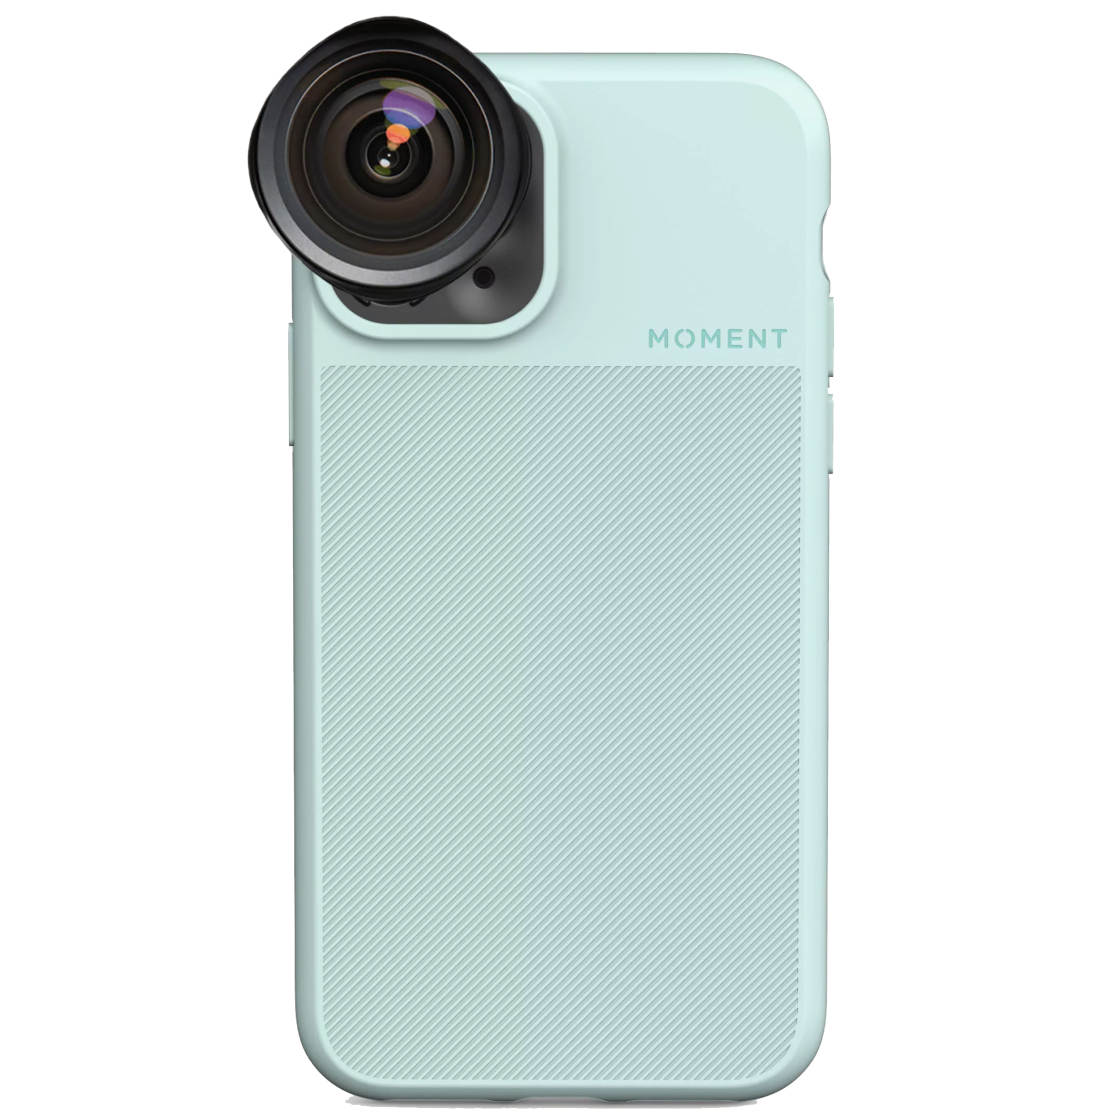
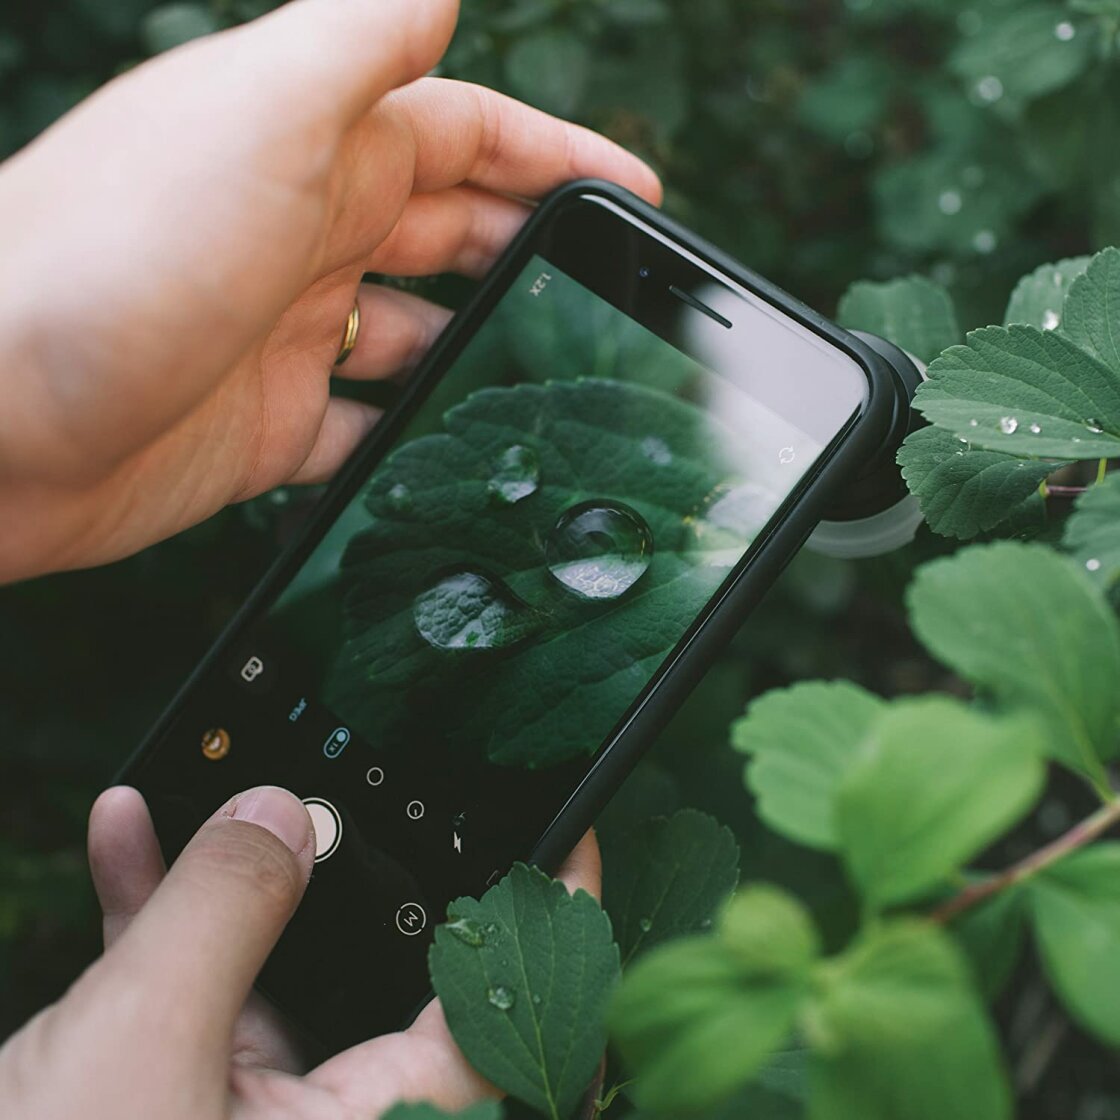
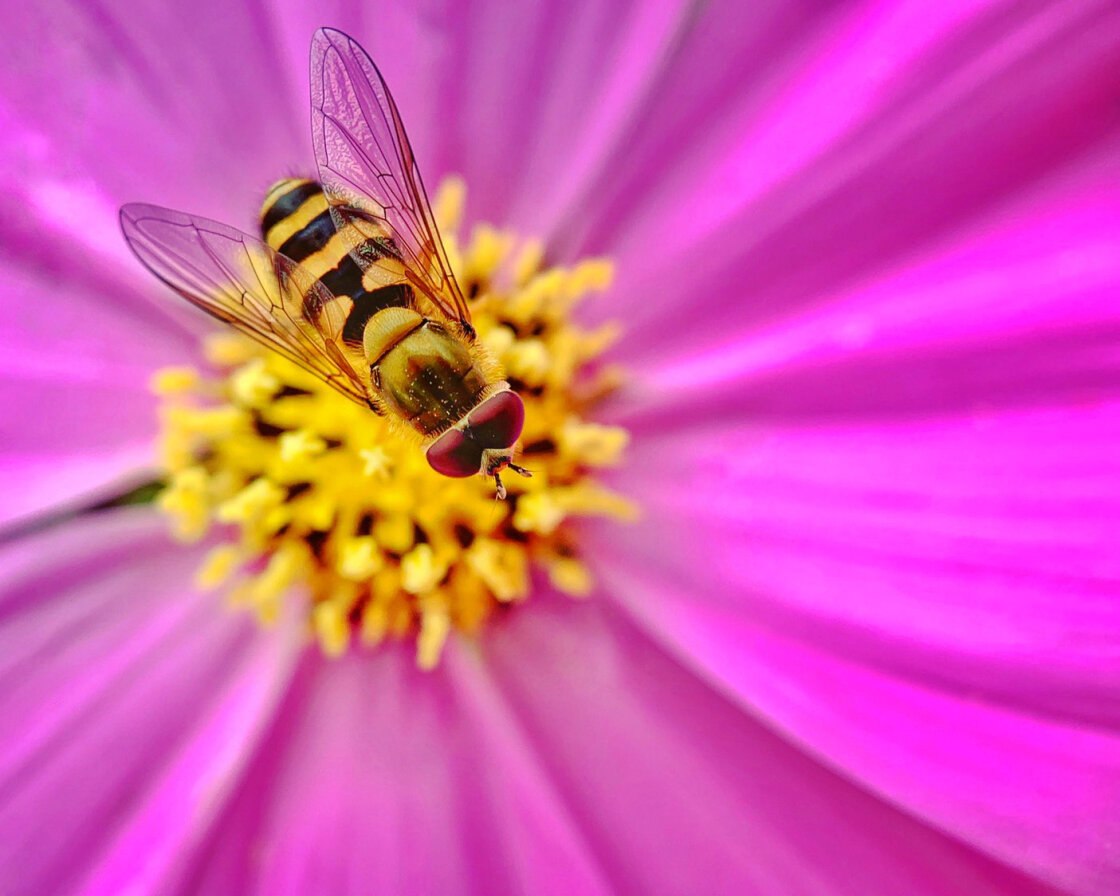
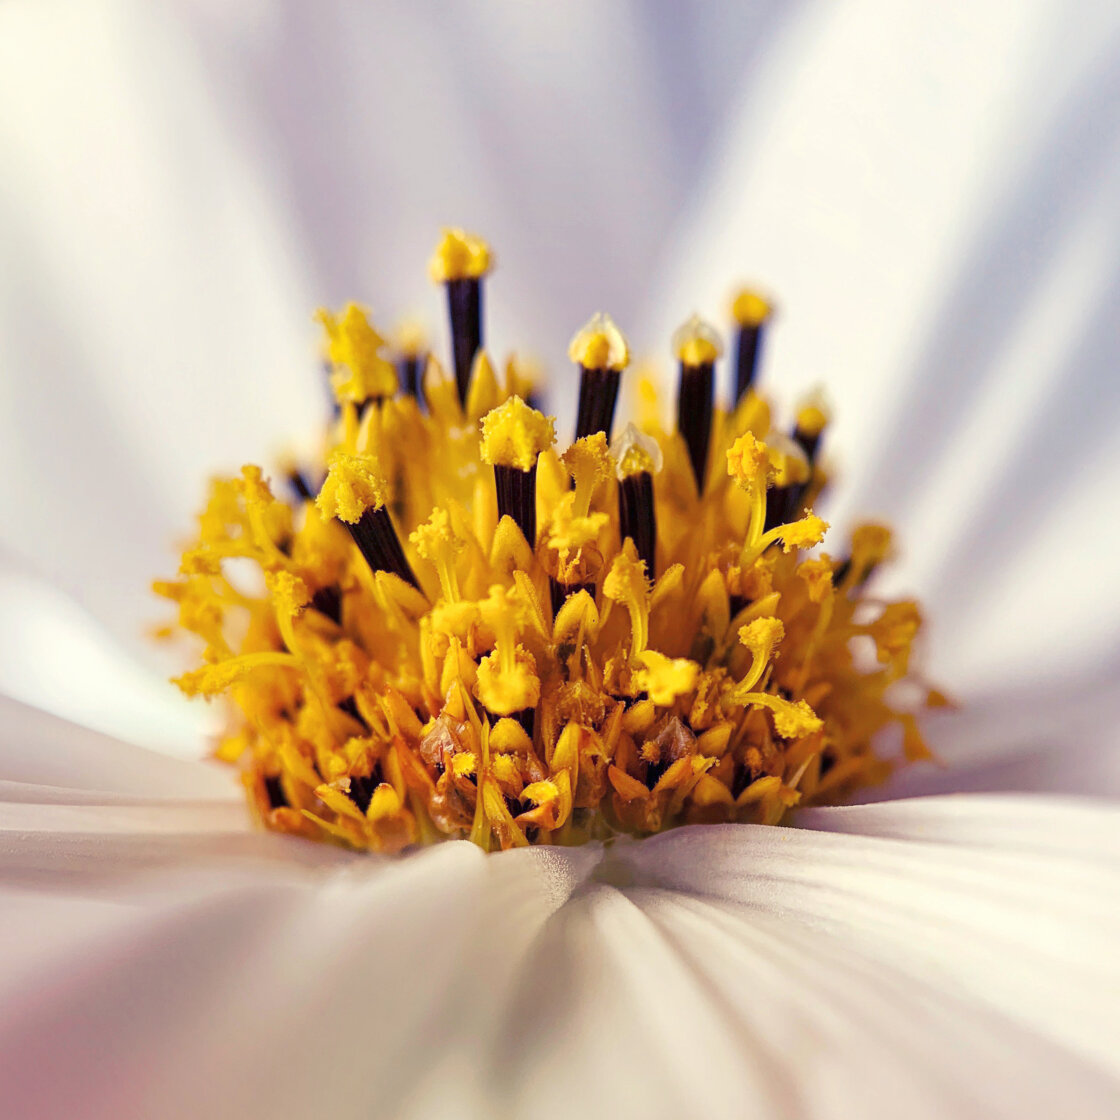
If you want to shoot extreme close-up photos with a very shallow depth of field, you’ll need an add-on macro lens. One of the best macro lenses is the Moment Macro Lens.
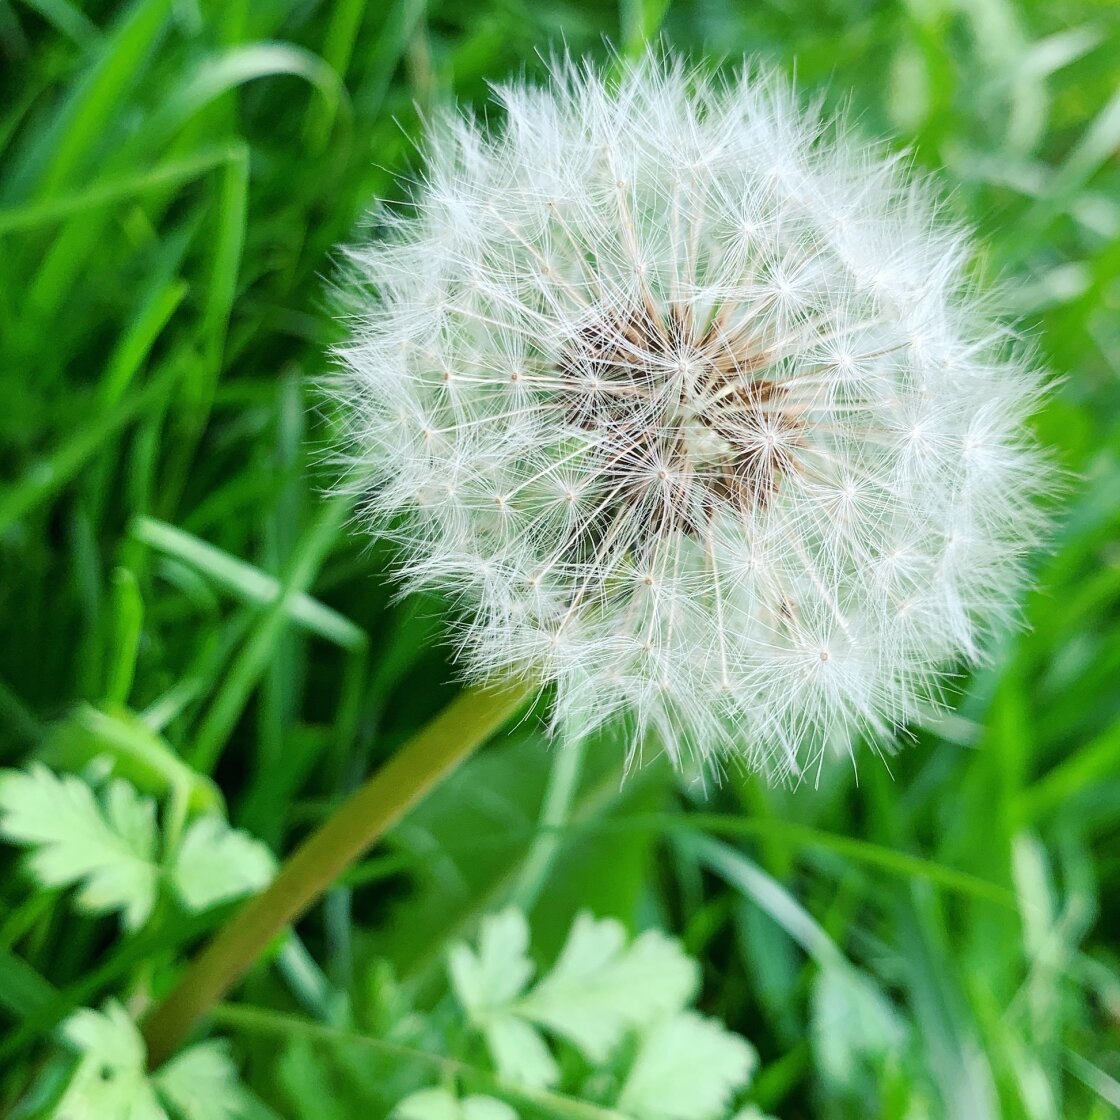
With a macro lens, you can capture fascinating close-up photos of nature, flowers, and insects.
2. Focus: How To Set Focus For Pin-Sharp Images
Getting your subject in sharp focus is essential for creating high-quality photos with superb detail.
This is especially important when shooting close-up photos.
Why?
Because the depth of field will be very shallow, with only a small portion of the image in focus. If the focus isn’t set correctly, your subject may end up blurred.
Luckily, the iPhone makes it easy to set the focus accurately on your subject. Here’s how to do it:
2.1 Tap To Set The Focus Point
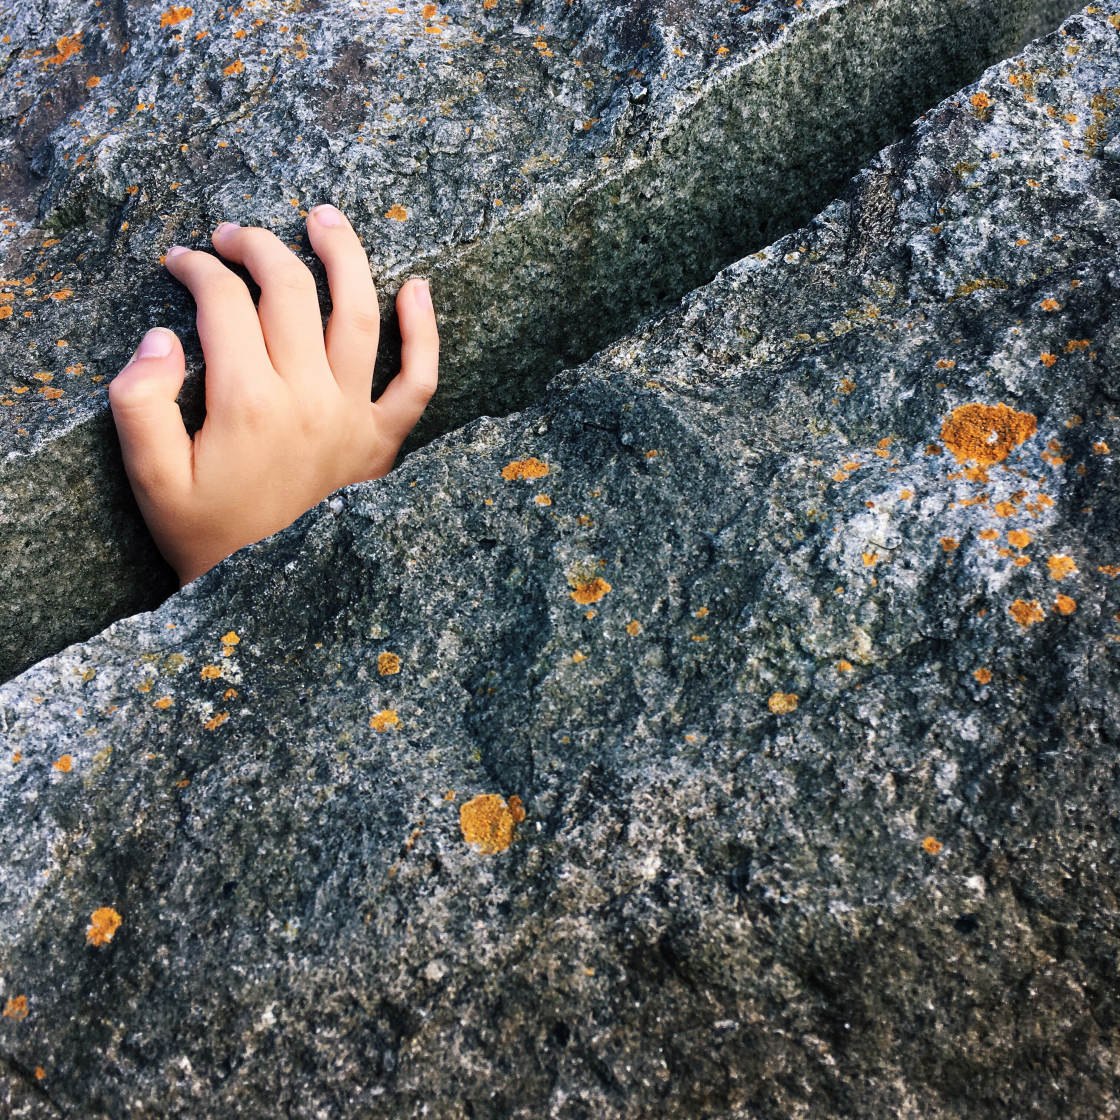
In the built-in Camera app, simply tap the screen where you want to set focus. A yellow square indicates your focus point.
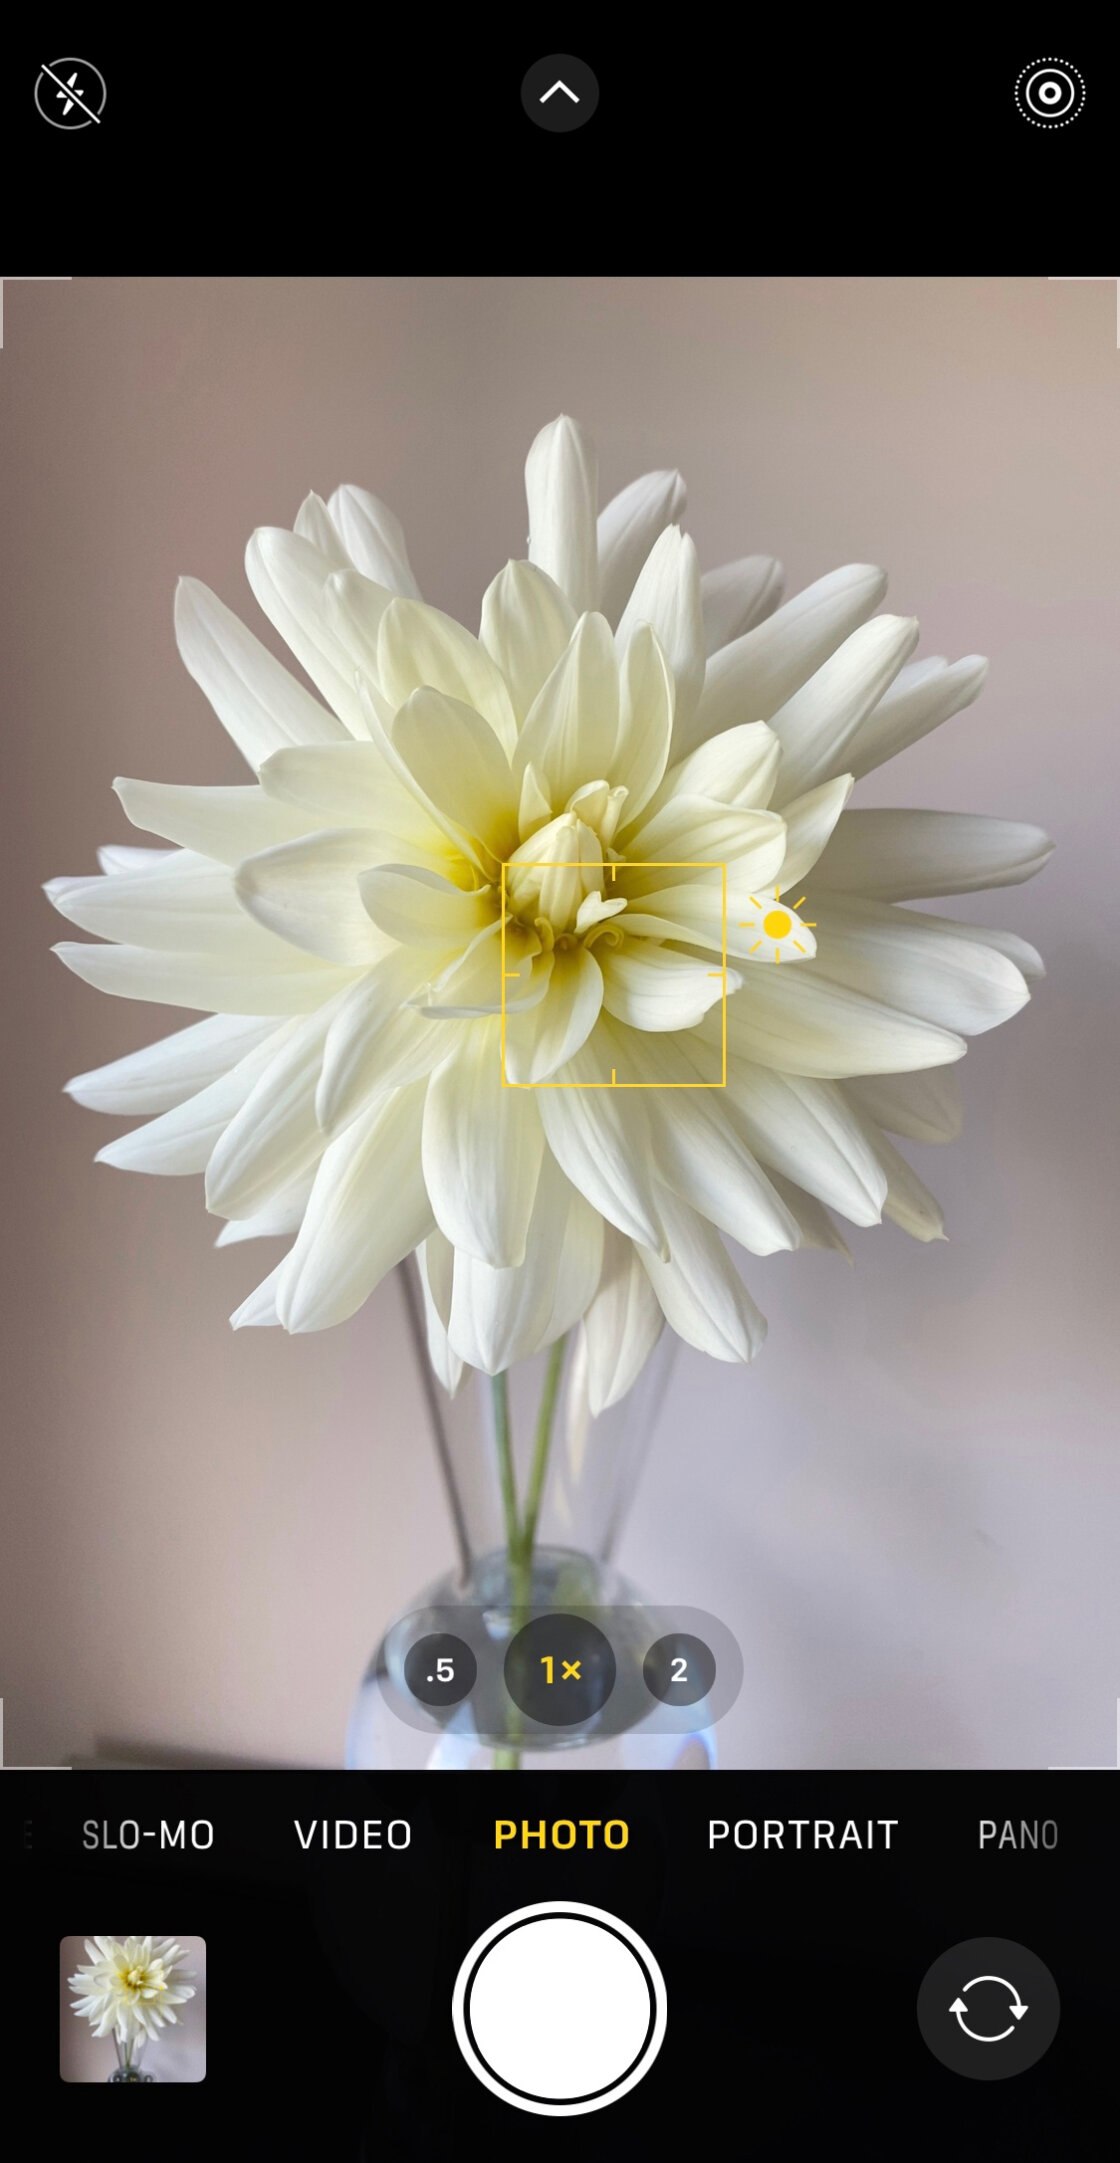
When you take the photo, the area you tapped on will be in sharp focus.
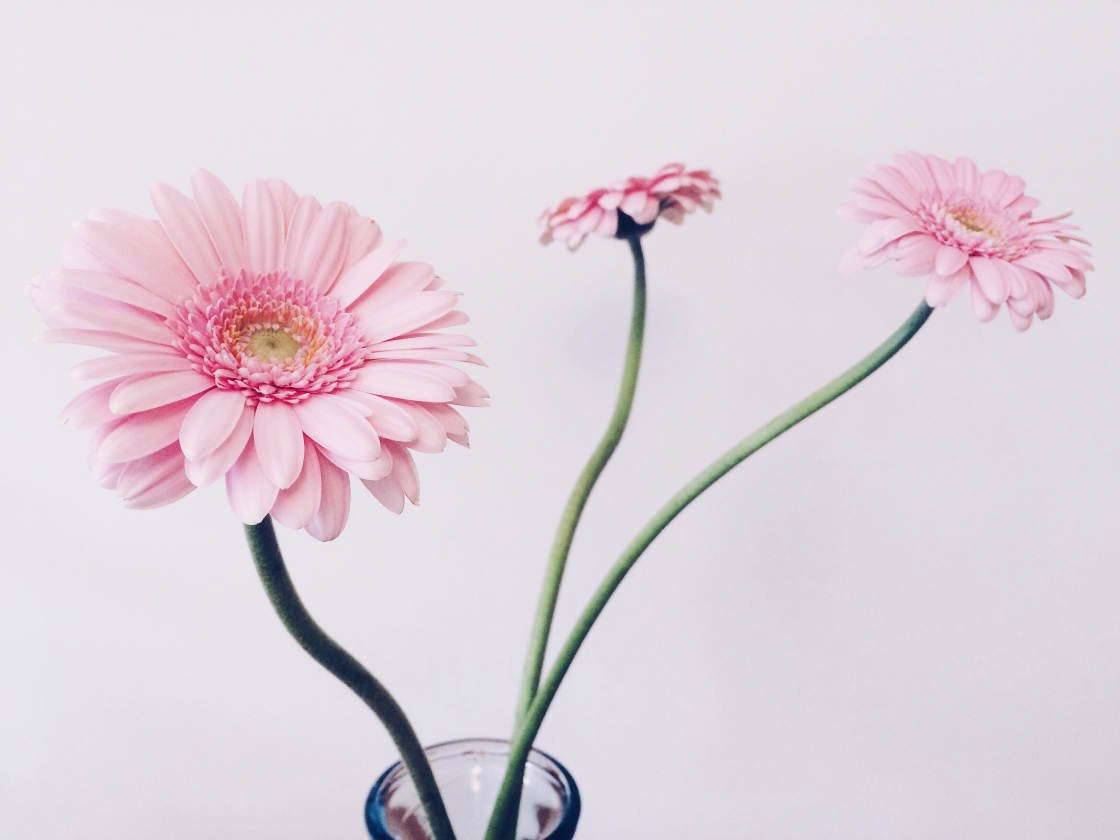
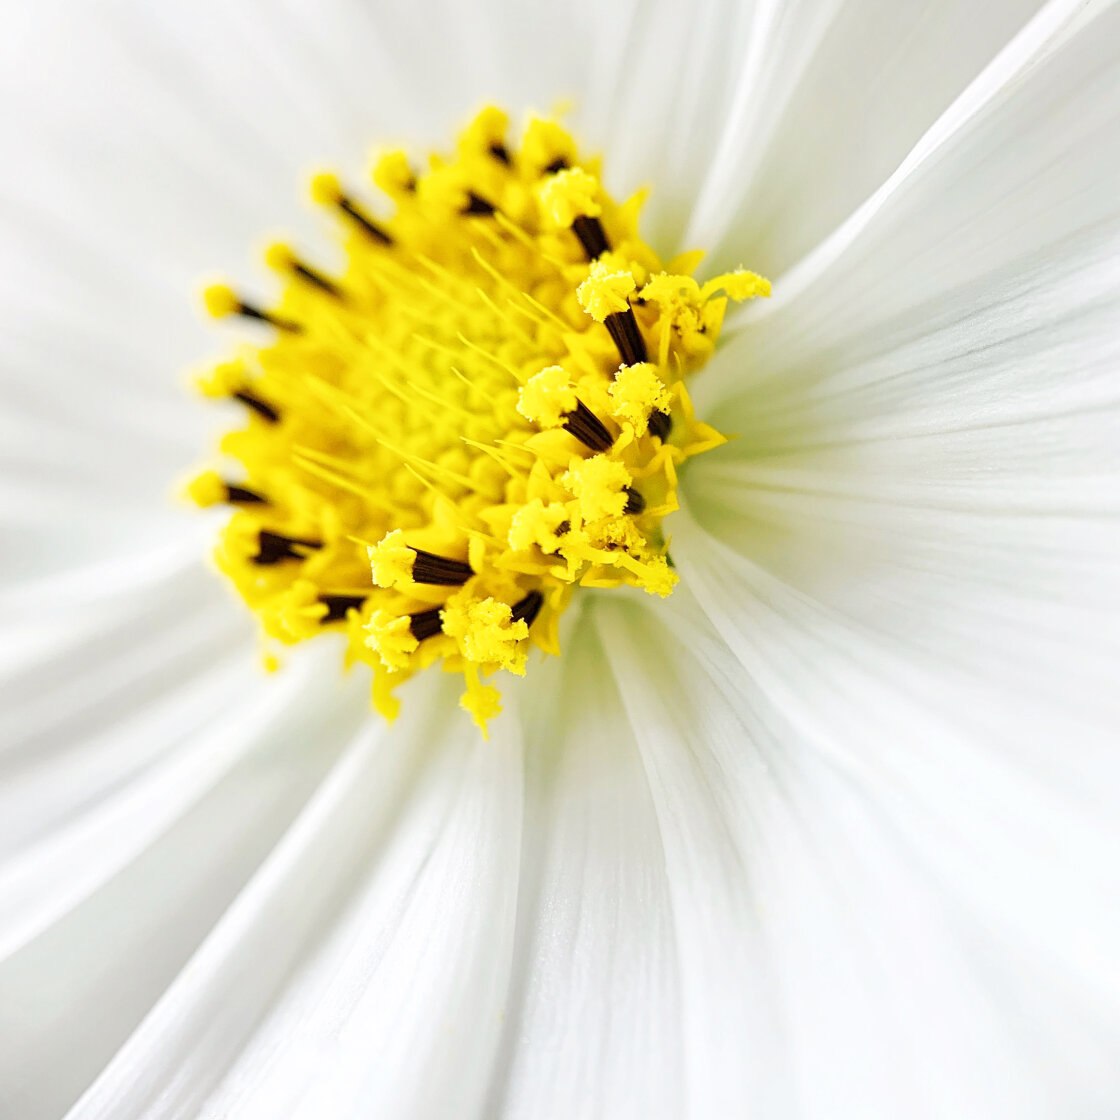
In the photo below, focus was set on the flower on the left. Notice how this flower is perfectly sharp, but the others are out of focus.
2.2 Lock The Focus With AE/AF Lock
Another useful feature is AE/AF Lock. This iPhone camera setting lets you lock the focus point on a certain area.
To activate AE/AF Lock, tap and hold the screen for a couple of seconds until you see AE/AF LOCK in yellow.

The focus point will now remain locked, even after taking a photo.
This is perfect for situations where you want to take several pictures of the same scene. You can take as many photos as you want without having to set the focus point for each new shot.
It’s also great for scenes where there’s movement, such as people walking past. If you don’t lock the focus, the camera’s autofocus might readjust the focus point onto the moving subject.
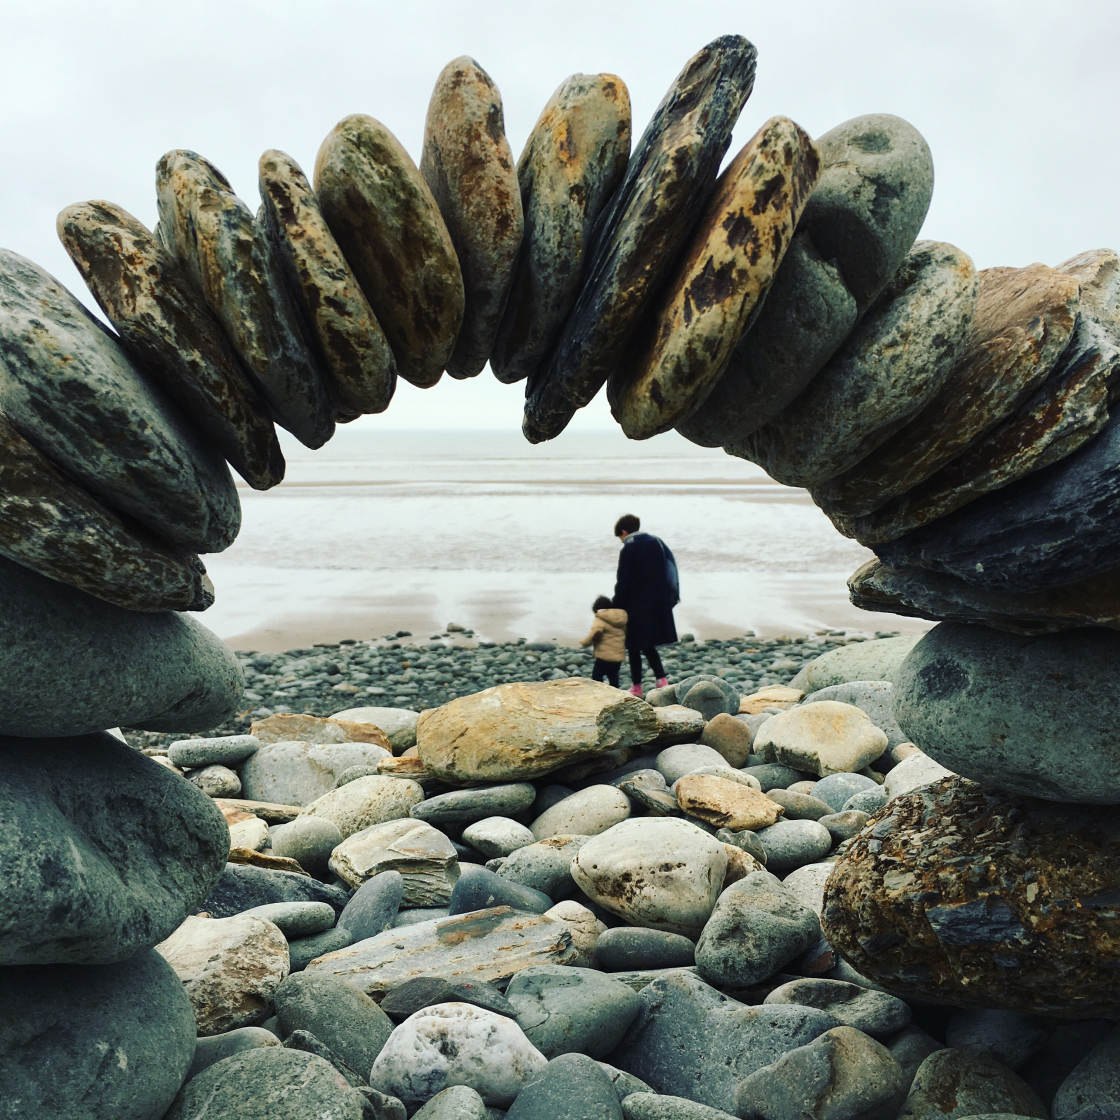
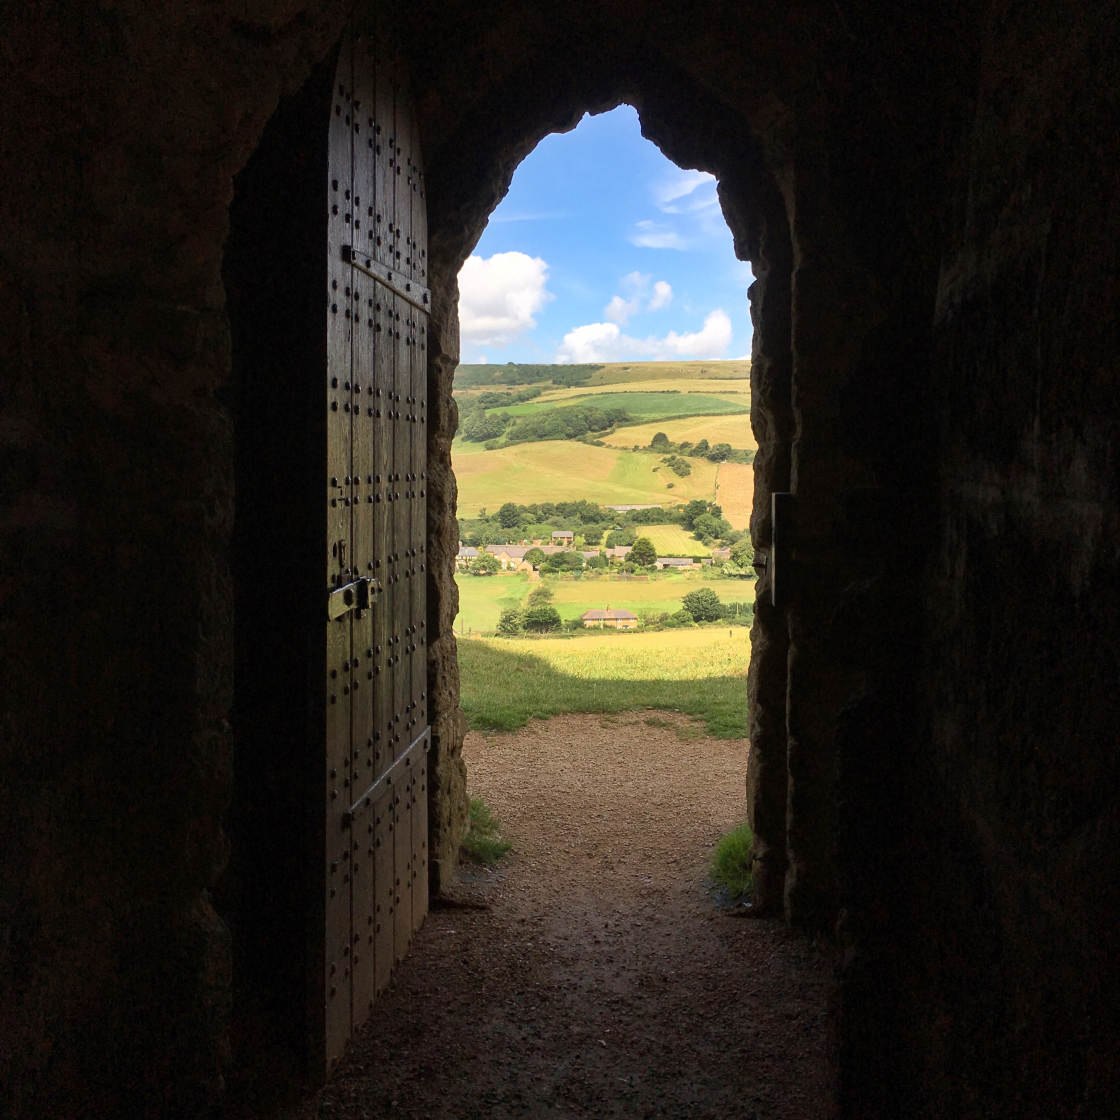
In the example above, I locked focus on the stone arch. If I hadn’t done this, the camera might have focused on the people in the background when they walked into the scene.
2.3 Use Manual Focus For More Precise Focusing
In certain situations, the tap-to-focus method might not give you enough control over your focus point.
Imagine you’re taking a close-up photo of a flower with water droplets. The depth of field will be very shallow, so only a small area of the scene will be in sharp focus.
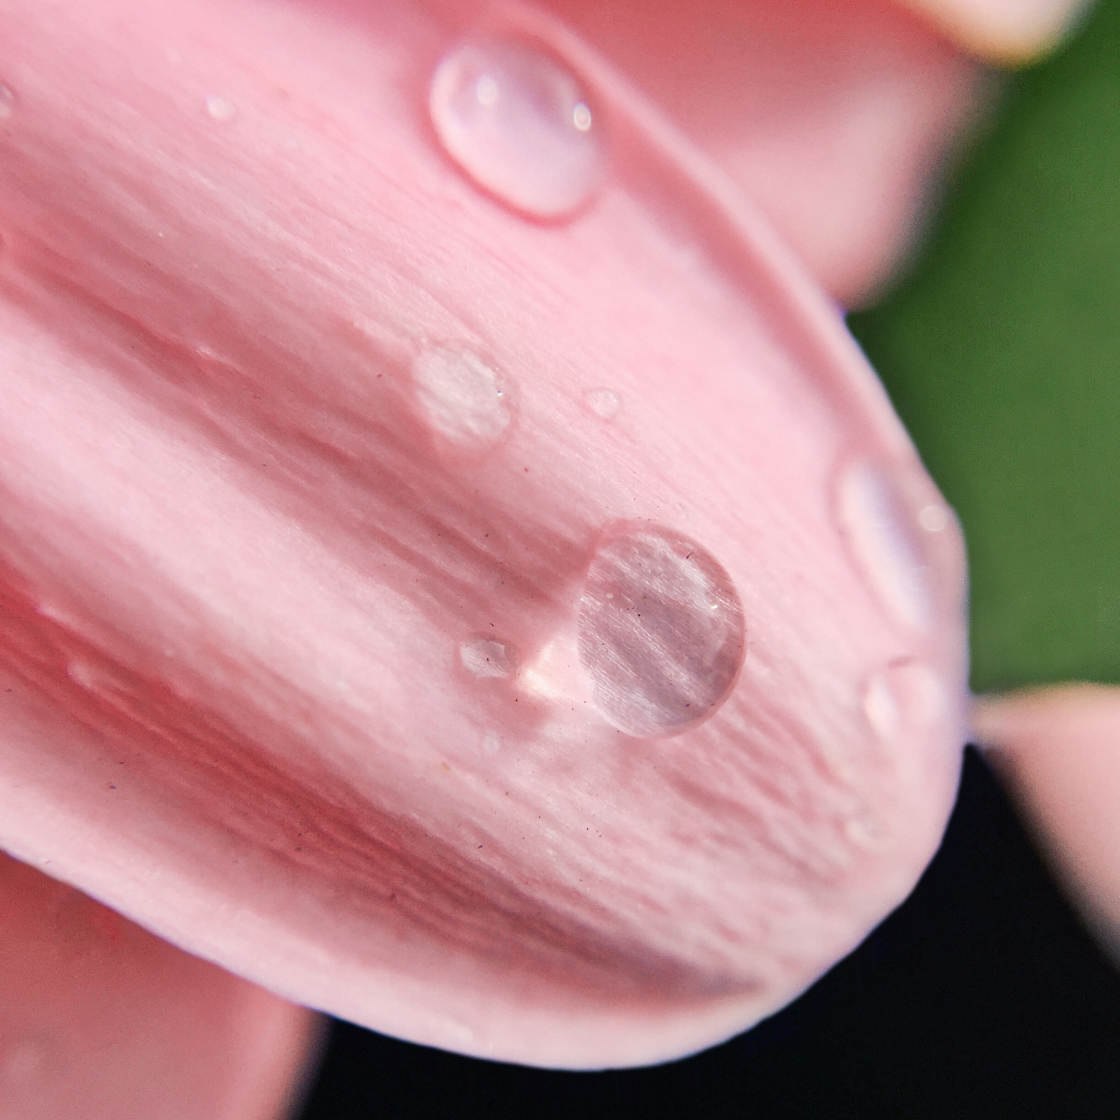
Tapping on a single tiny water droplet to ensure it’s in focus may prove tricky.
So, how can you set the focus point more accurately?
You’ll need to use a third-party camera app that has a manual focus control.
Camera+ 2 ($7.99) is a DSLR camera app for iPhone. It has advanced iPhone camera controls, including manual focus.
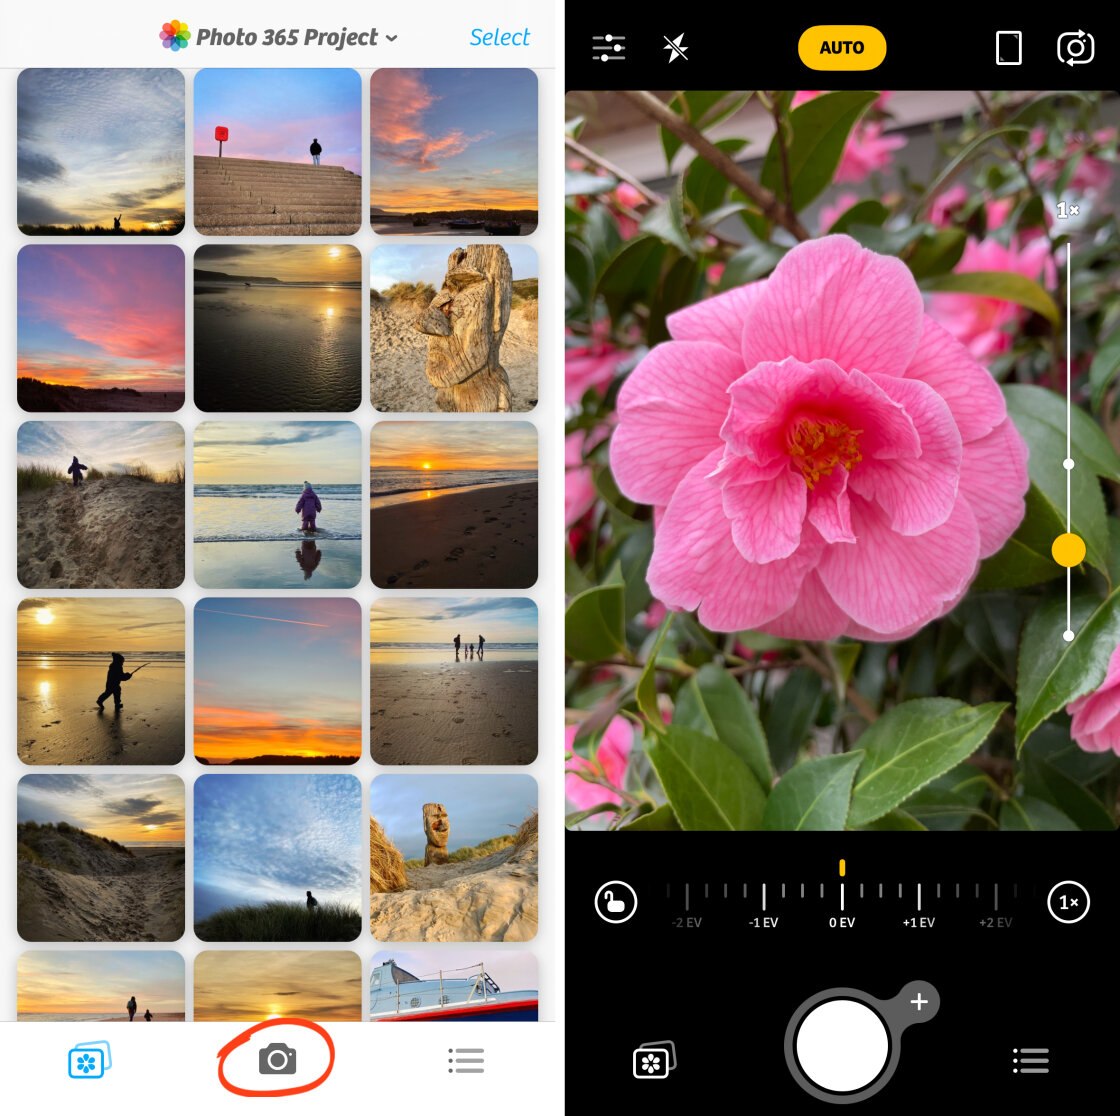
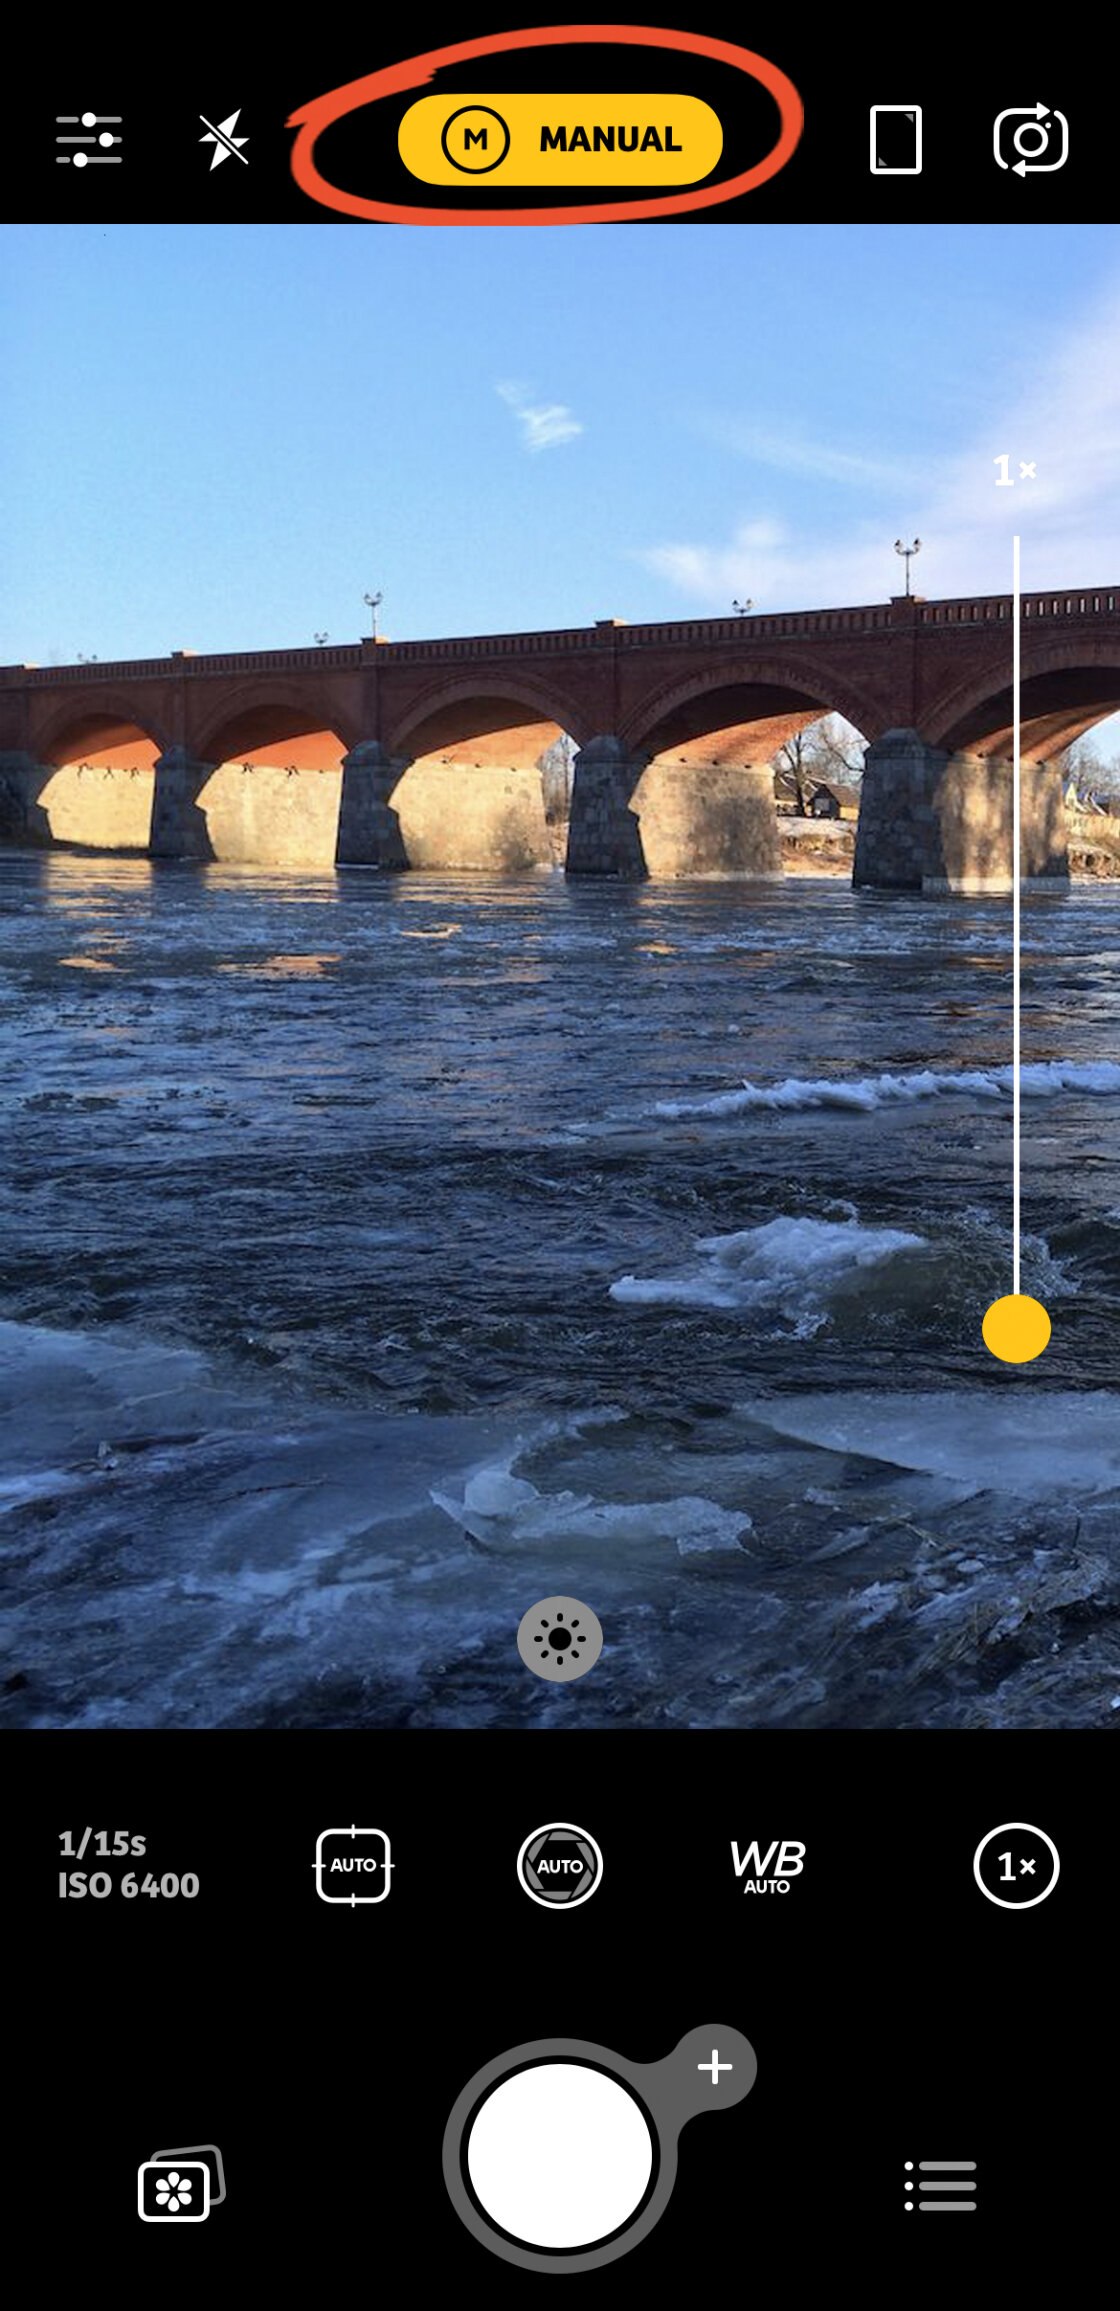
When you open Camera+ 2, make sure you’re in Camera mode. If you’re not in Camera mode, just tap the Camera icon at the bottom of the screen and the viewfinder will appear.
Next, ensure you’re shooting in Manual mode. The current shooting mode is shown in yellow at the top of the screen. Tap the yellow icon and select Manual.
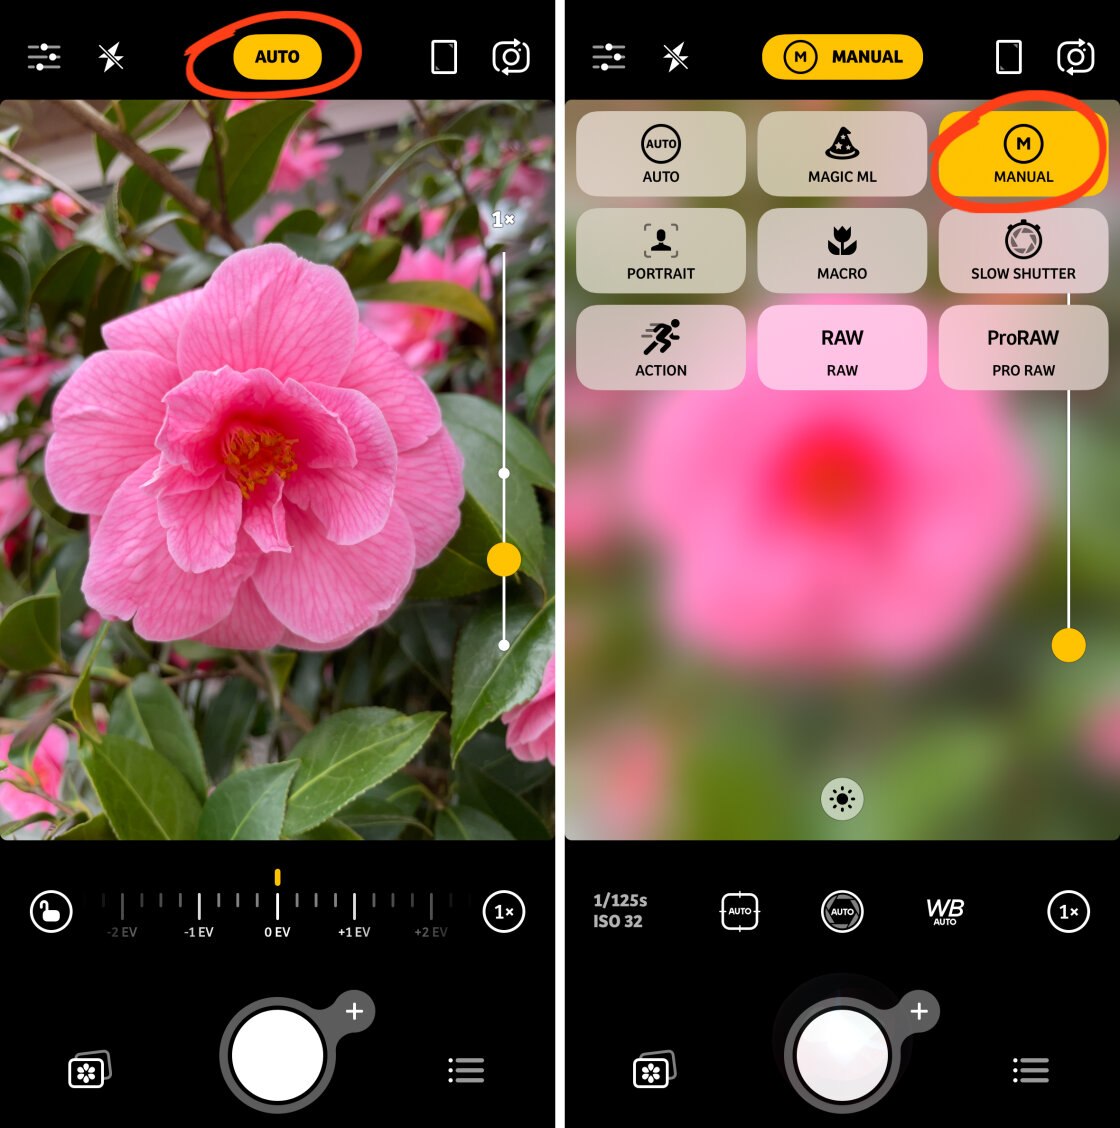
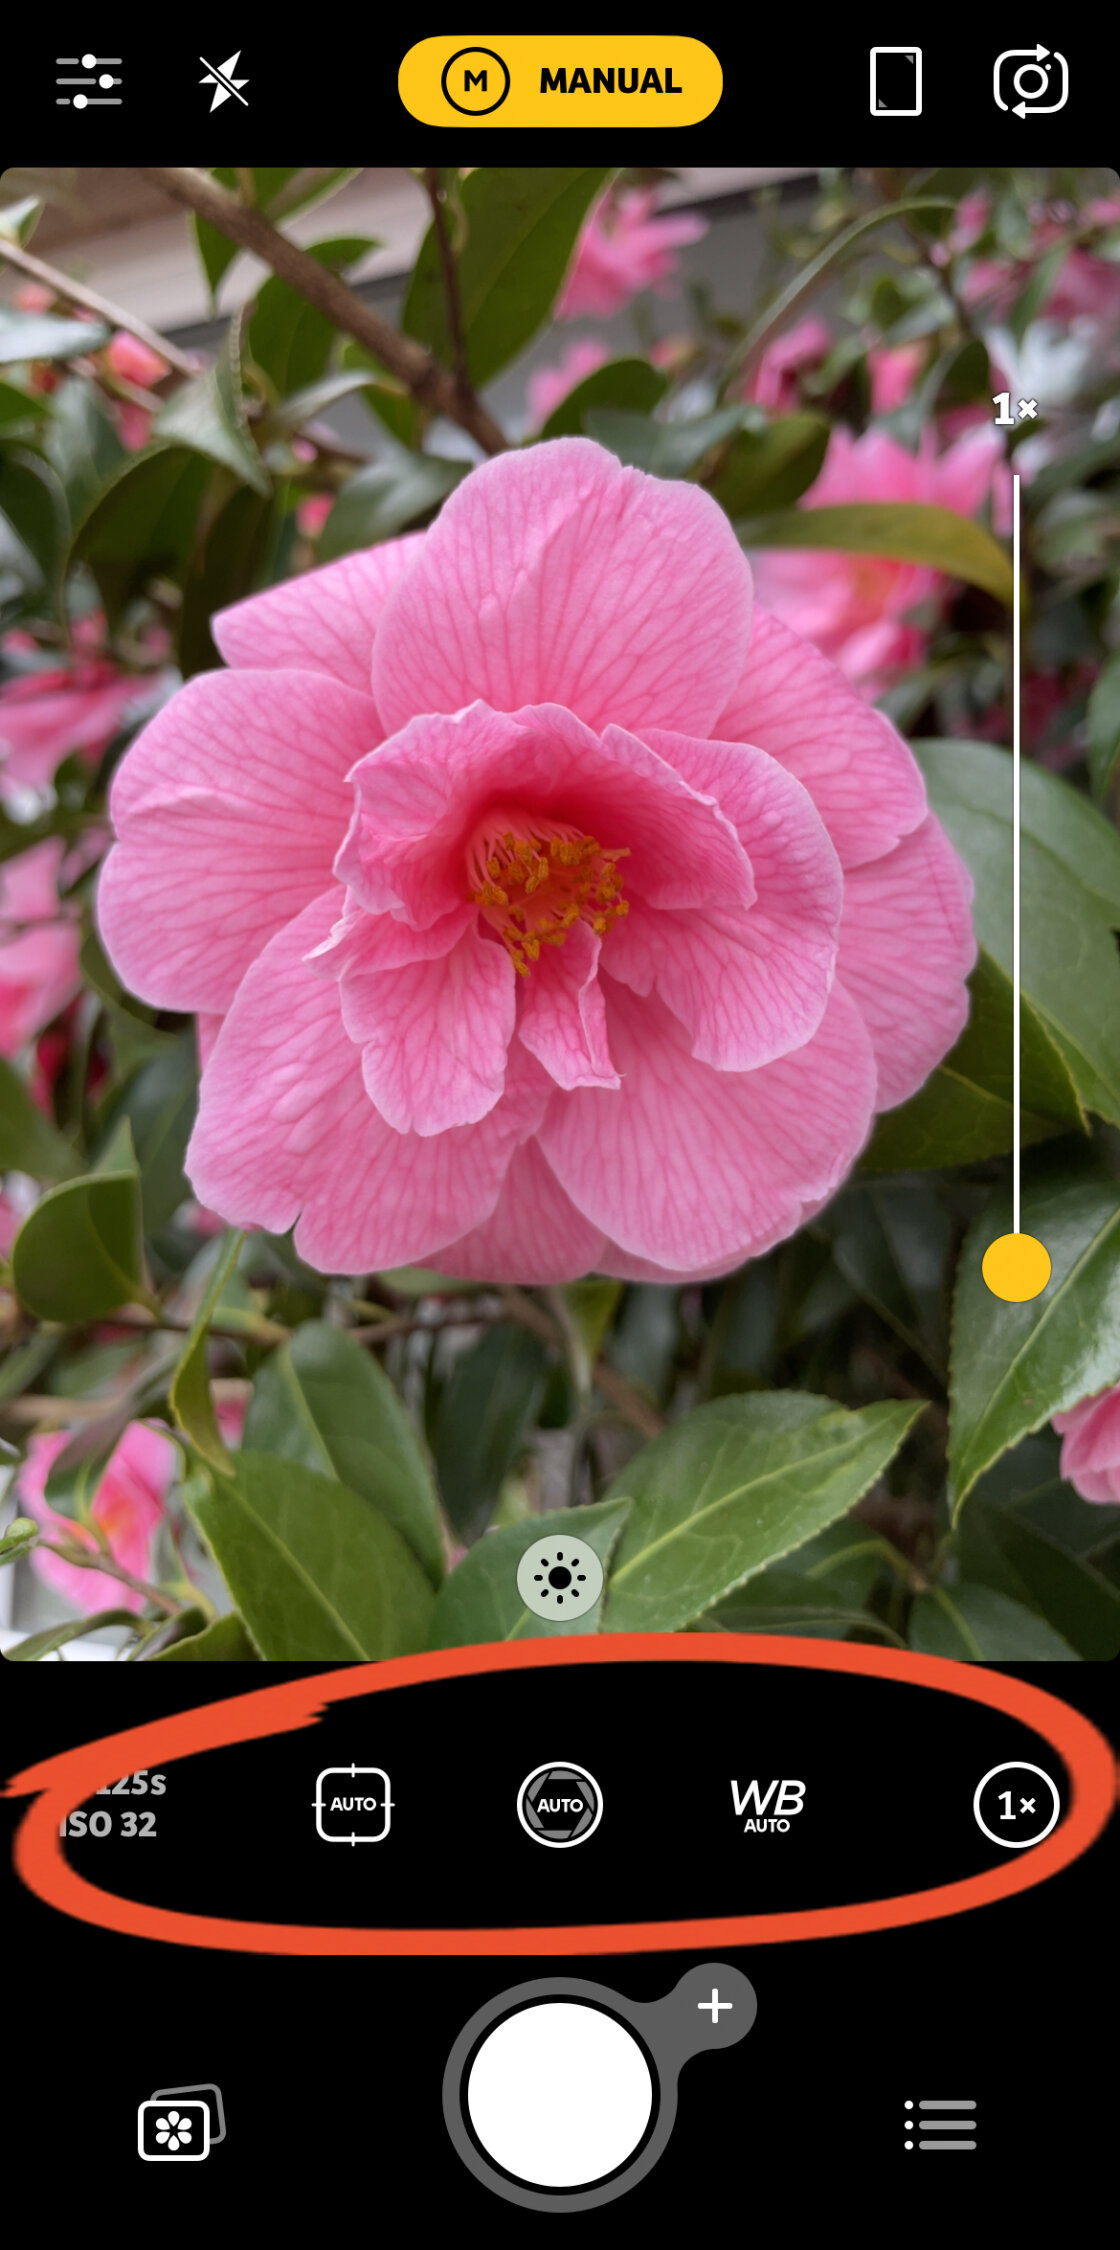
In Manual mode, you’ll see a row of icons above the shutter button. These are the advanced iPhone camera controls.
Tap the Focus icon (second icon from the left). The Manual Focus slider will appear above the shutter button.
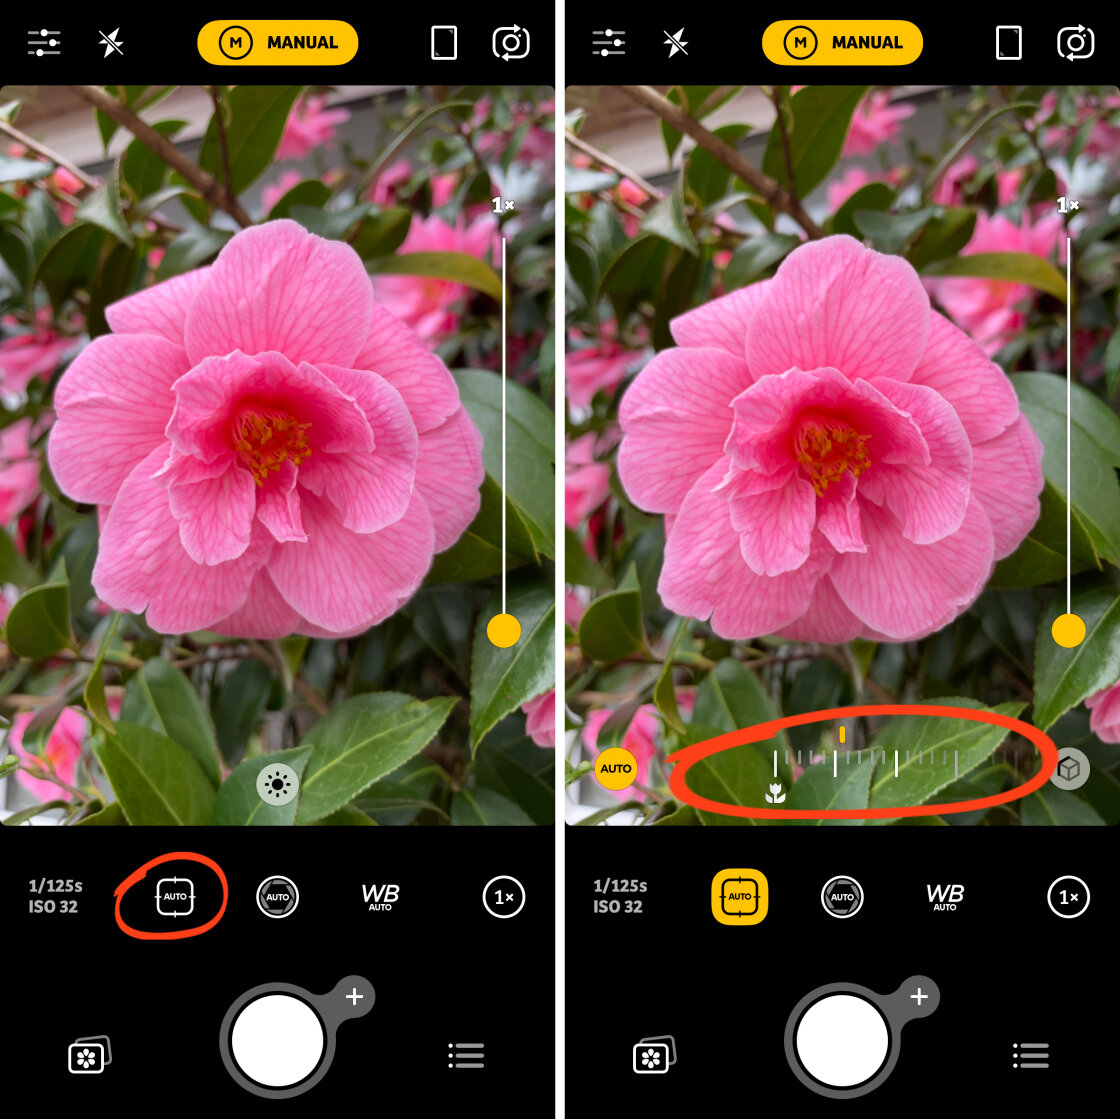
Drag the Manual Focus slider left or right to adjust the focus. As you drag the slider, the focus point will gradually change from foreground to background.
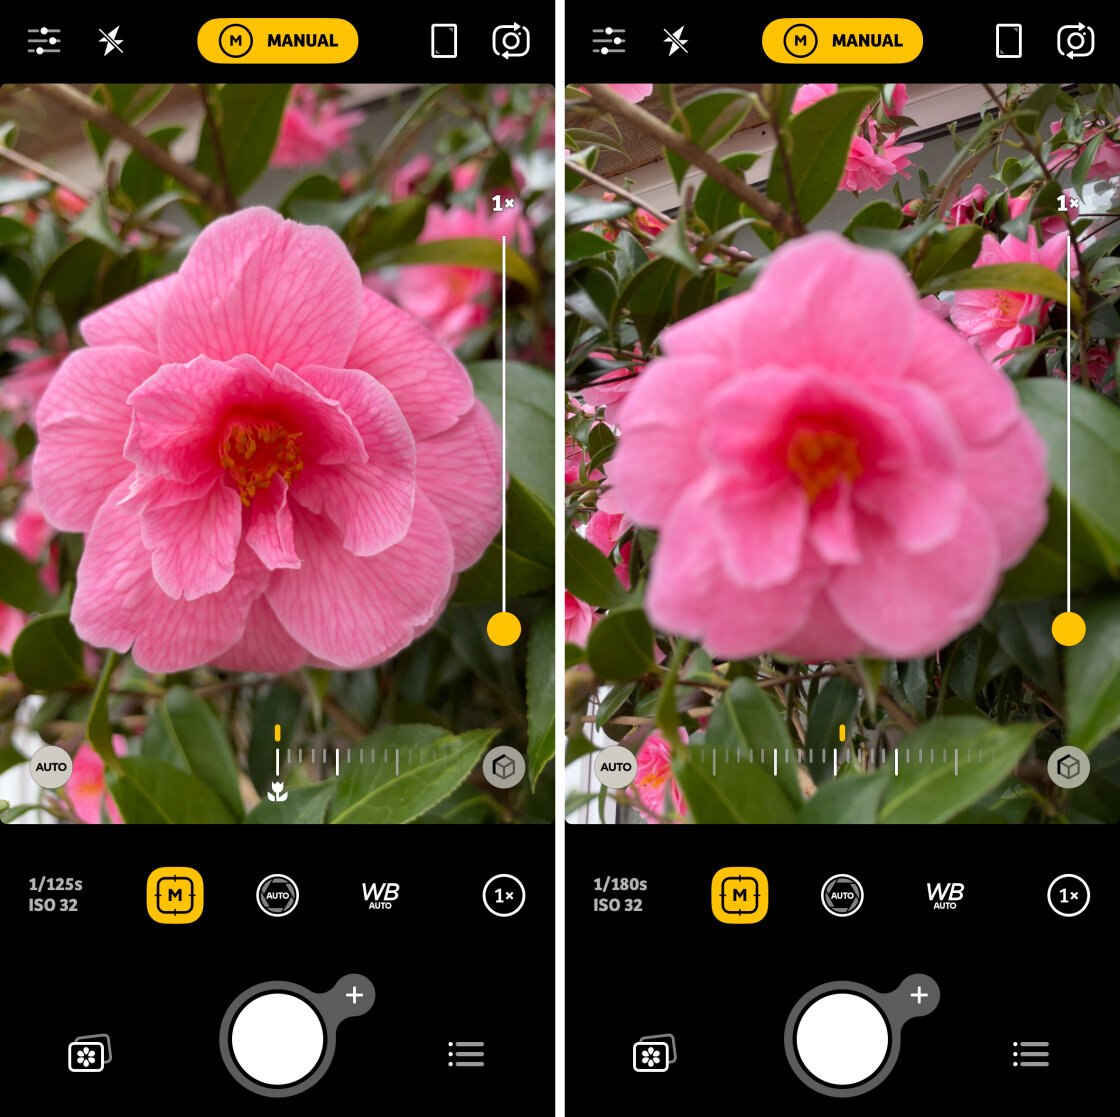
When you’re happy with the focus, tap the shutter button to take your photo.
Remember, in most cases, tapping to set the focus point results in great photos.
But sometimes it’s more difficult to set the focus accurately, especially when shooting close-up macro photos. That’s when you should use the Manual Focus slider in Camera+ 2 to fine-tune the focus more precisely.

3. Exposure: How To Get Perfect Brightness Levels In Your Pictures
After you set focus, it’s important to get the exposure right.
Exposure refers to the brightness of an image.
A photo that’s too bright is over-exposed. And a photo that’s too dark is under-exposed.
Getting the correct exposure will result in beautiful photos that are neither too bright nor too dark.
So, how do you adjust exposure on the iPhone?
It’s actually very easy. Here’s how to do it:
3.1 Adjust Exposure Manually
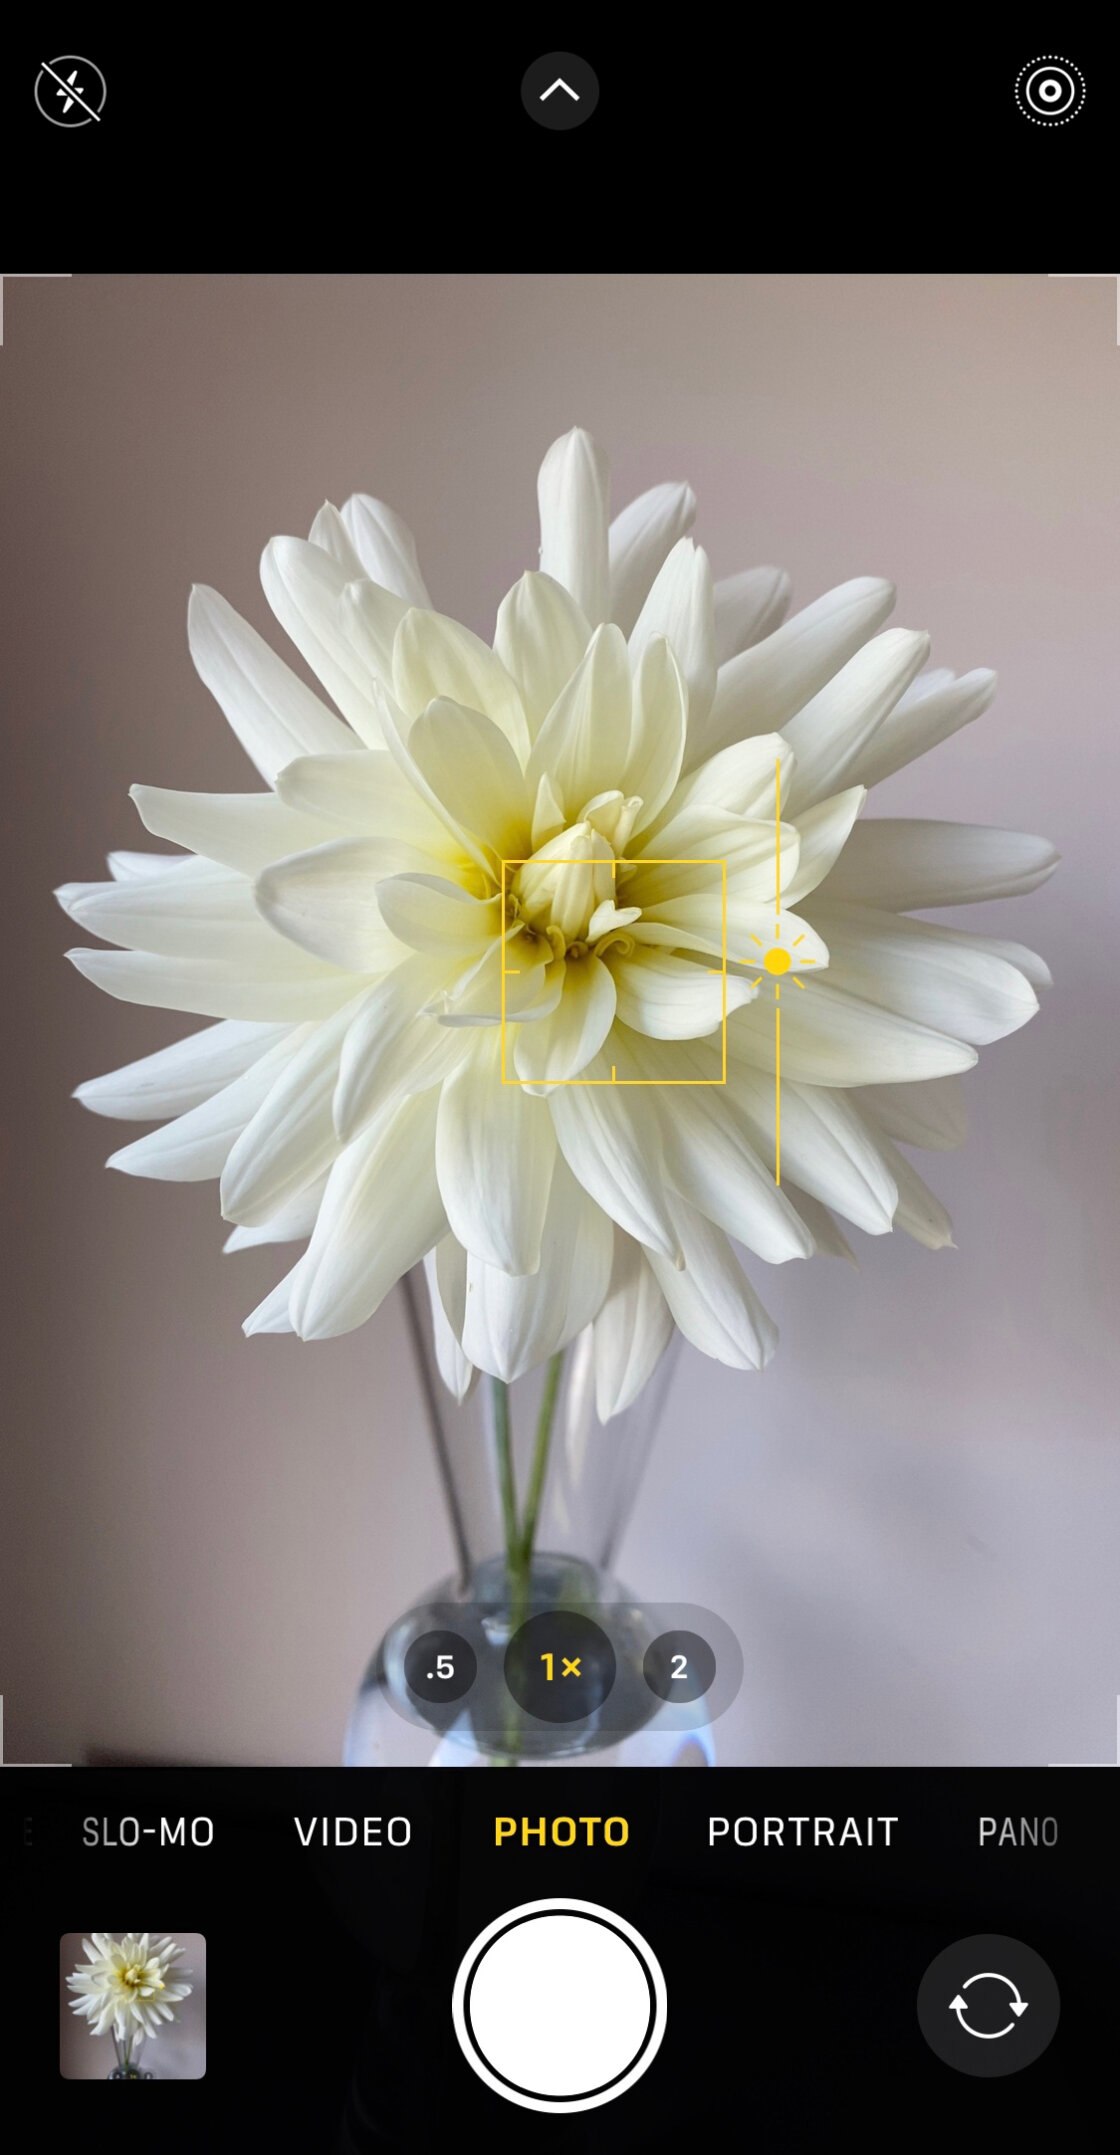
In the built-in Camera app, start by tapping to set focus. Then simply swipe up or down to adjust exposure (brightness).
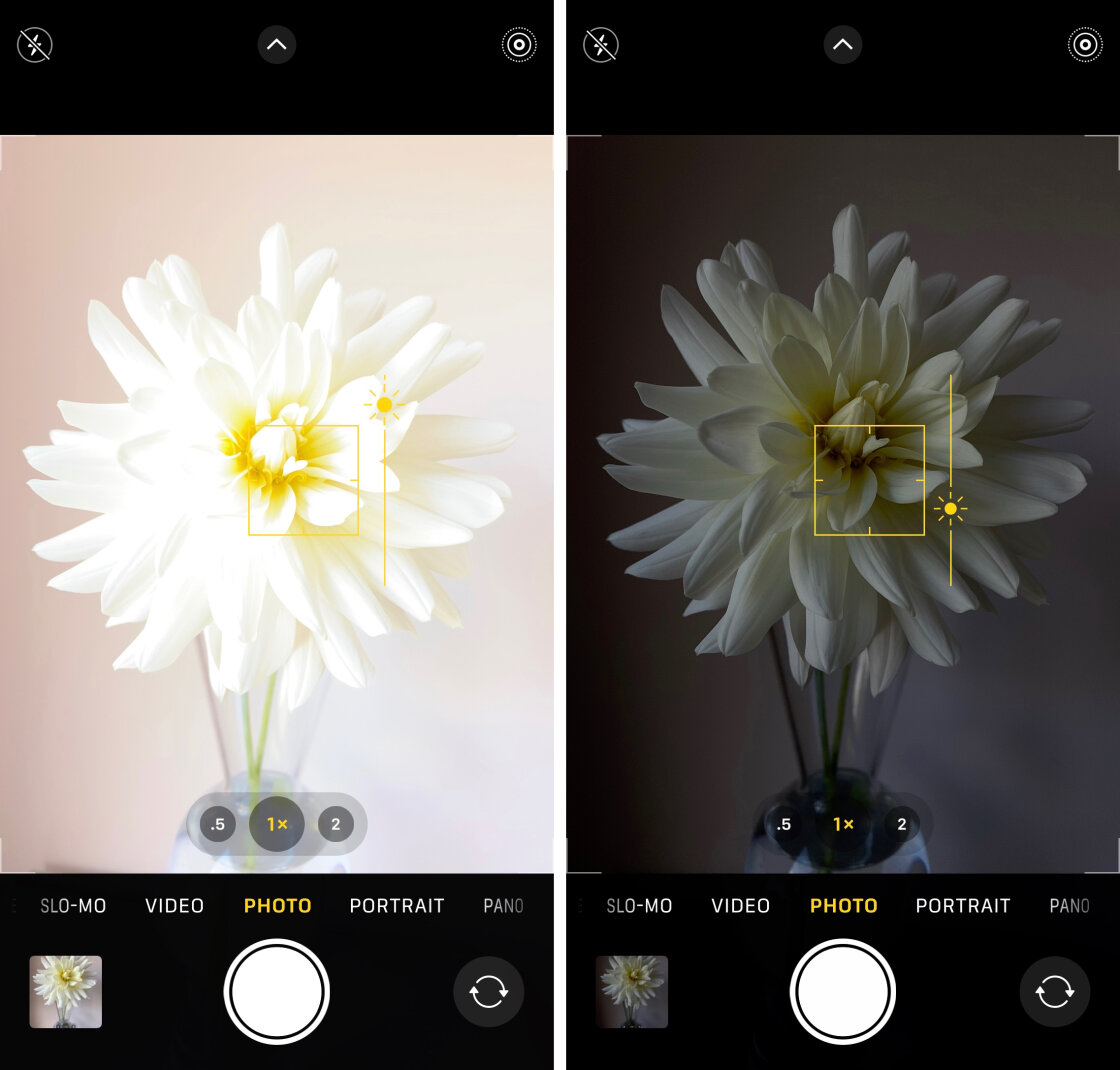
Swipe up to make the image brighter, or down to make it darker.
When the brightness levels look good, tap the shutter button to take a photo.
Now, if you have an iPhone 11 or later (running iOS 14 or later), there’s a second way to adjust exposure in the Camera app. This involves using the Exposure Compensation slider in the hidden camera menu.
To access the hidden menu, tap the arrow at the top of the screen (or swipe up on your viewfinder). Next, tap the Exposure icon (circle with a plus and minus symbol).
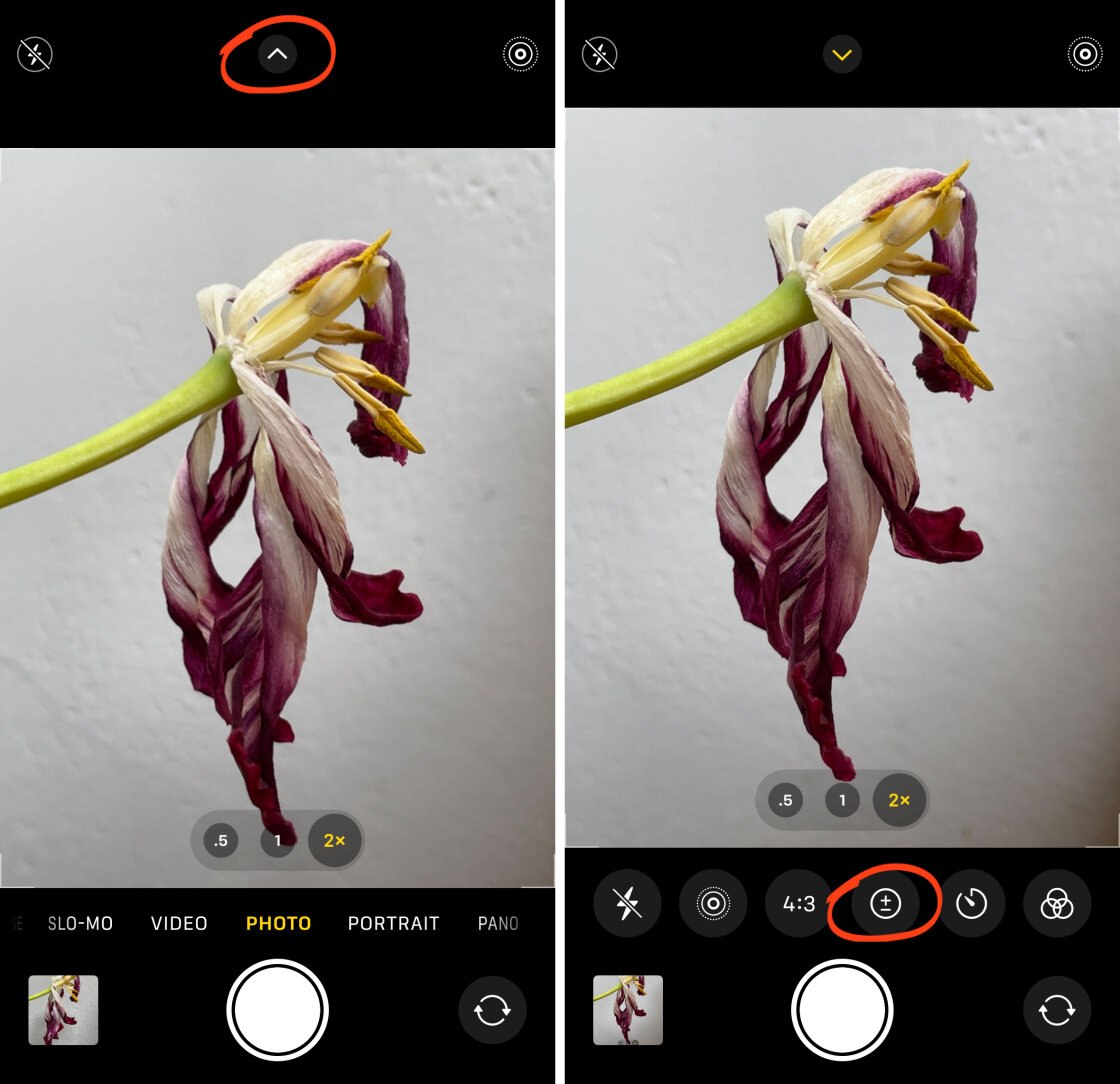
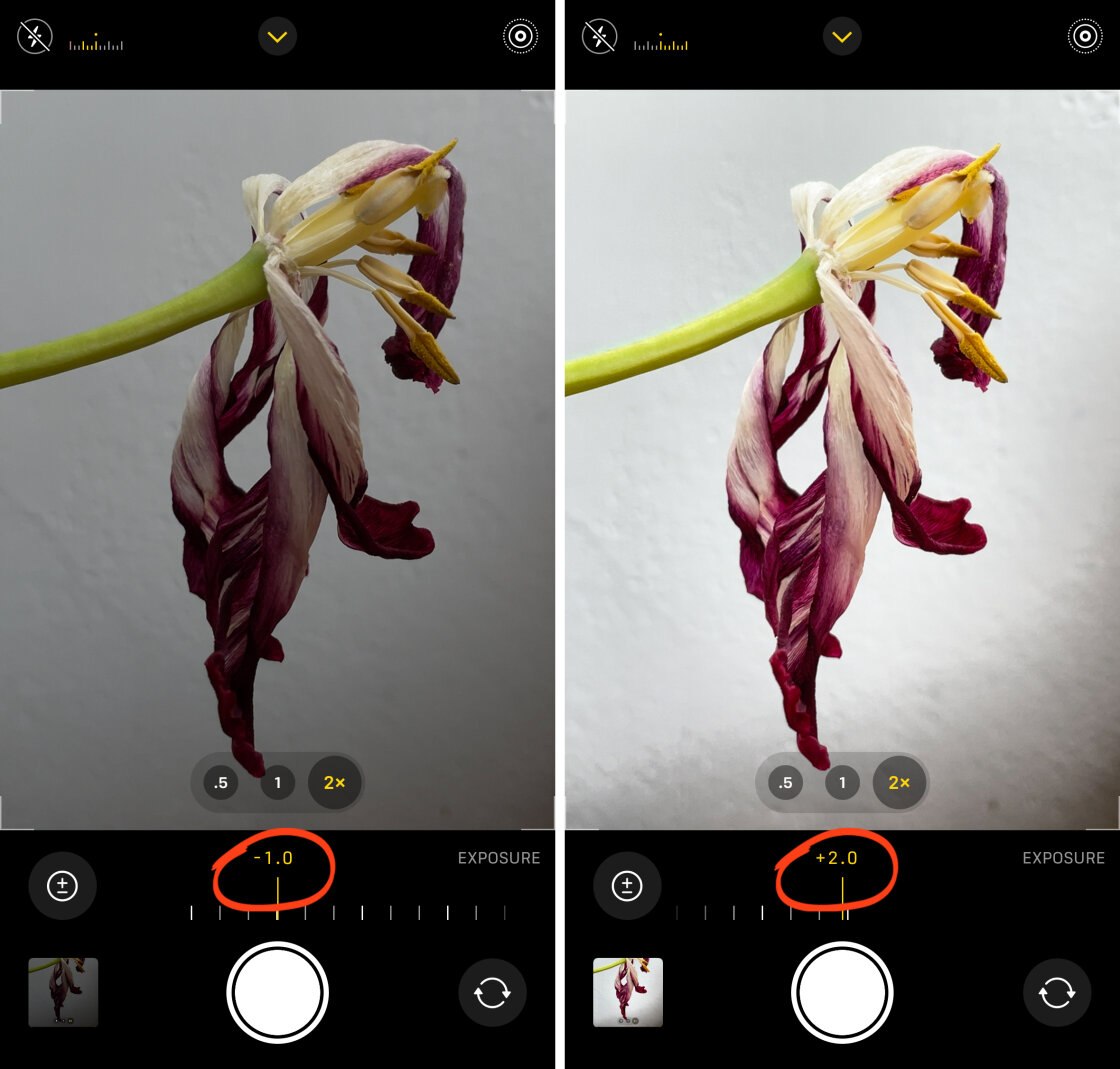
Then drag the exposure slider left or right to adjust the brightness.
Your chosen exposure setting will be used for any photos that you take from now on. This is very useful when you want to set a precise exposure for a series of upcoming shots.
However, when you’ve finished shooting, it’s a good idea to adjust the exposure back to zero. If you don’t, the exposure might not look right when you start shooting a different subject in different light.
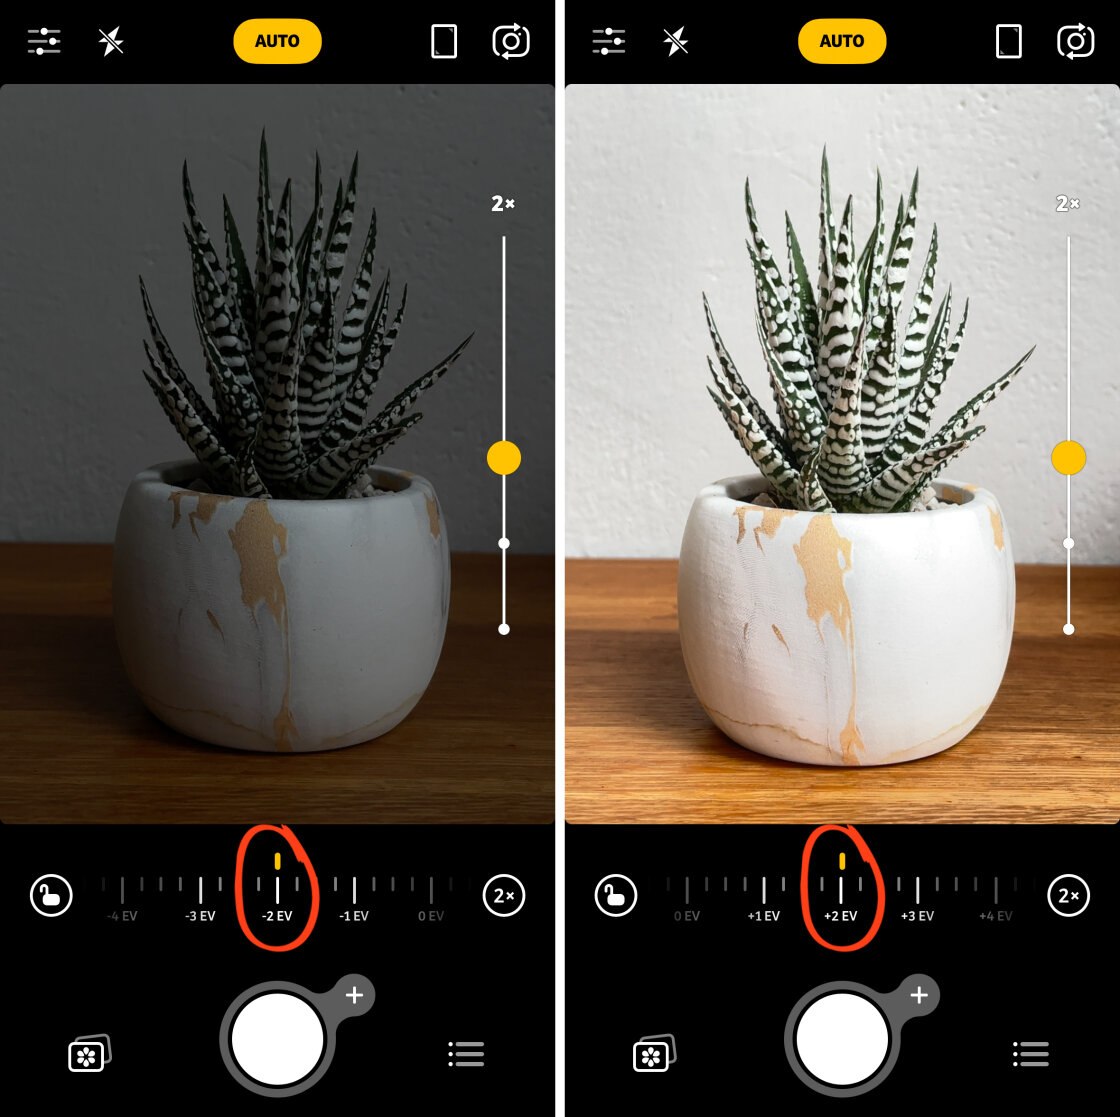
If you’re using the Camera+ 2 app, it has a very similar Exposure Compensation slider. Just ensure Auto mode is selected at the top of the screen, then drag the EV slider left or right to adjust exposure.
Keep in mind that there’s no exact science to setting exposure. You just have to decide what looks best for the particular photo you’re taking.
In most cases, you should aim for an exposure where there’s sufficient detail in all parts of the scene.
If that isn’t possible (because of awkward lighting), ensure the most important part of the scene is correctly exposed.
In the photo below, I chose to expose for the landscape, rather than for the dark interior of the church. Even though there’s no detail in the shadows, the result is quite dramatic!
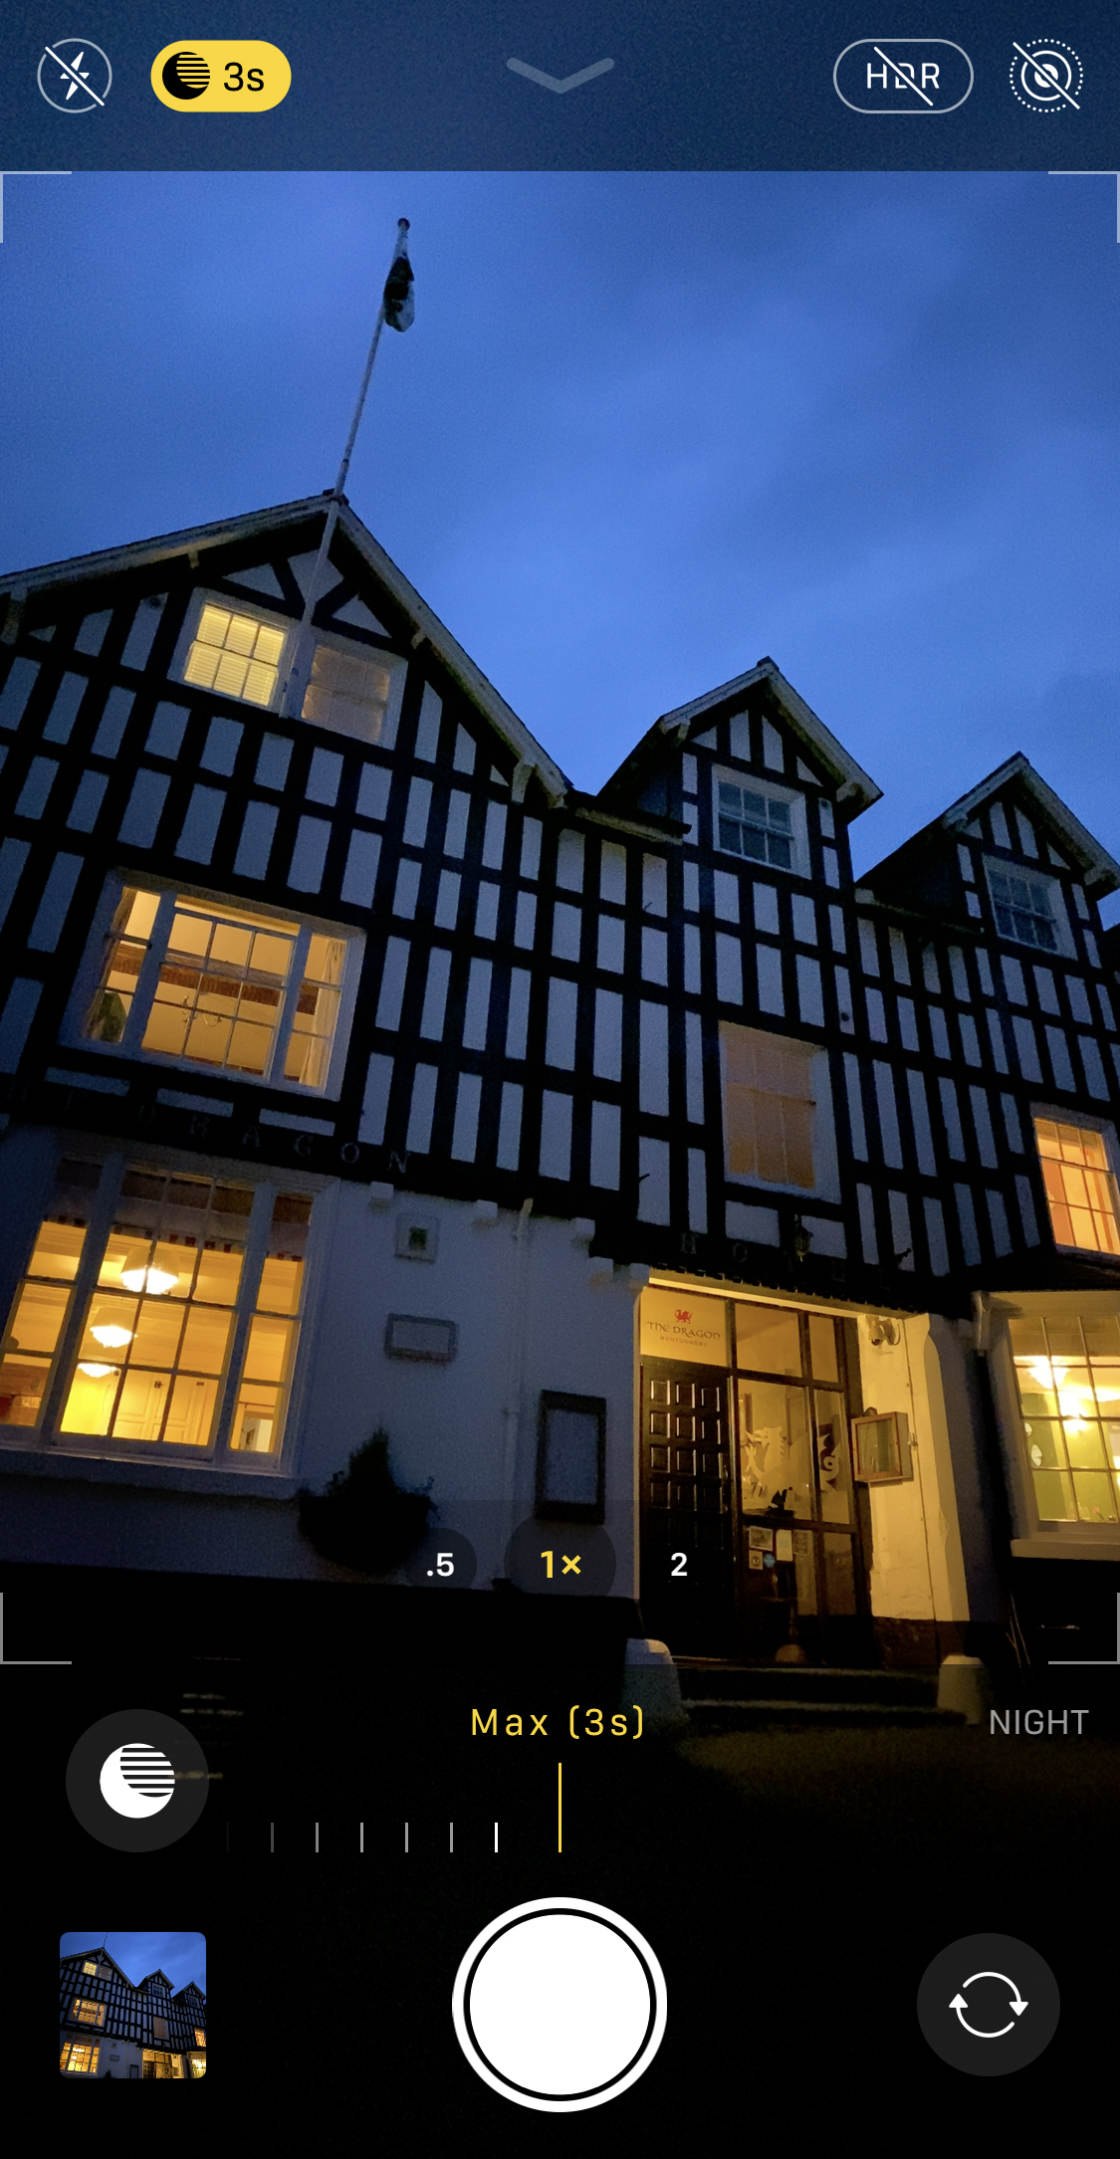
When shooting at night, the camera often brightens the exposure. It does this in an attempt to capture more detail. But the results aren’t always good. The brighter areas can end up over-exposed, while the darker areas can look grainy.
To capture stunning photos at night, reduce the exposure to make the image darker. The blacks will appear black, and the highlights will have more detail.

3.2 Use Exposure To Change The Mood Of A Photo
Getting creative with exposure allows you to enhance or change the mood of a photo.
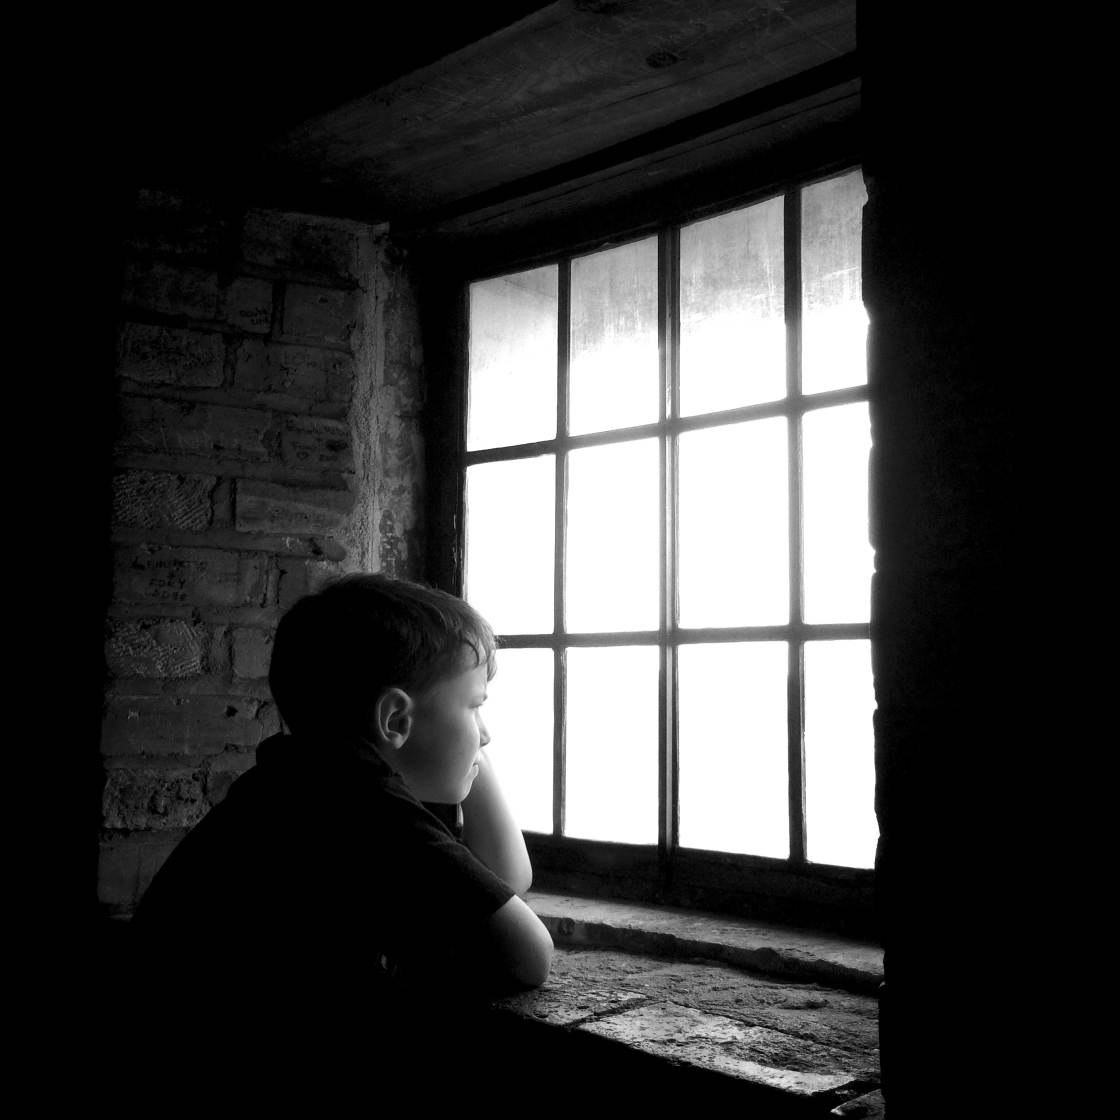
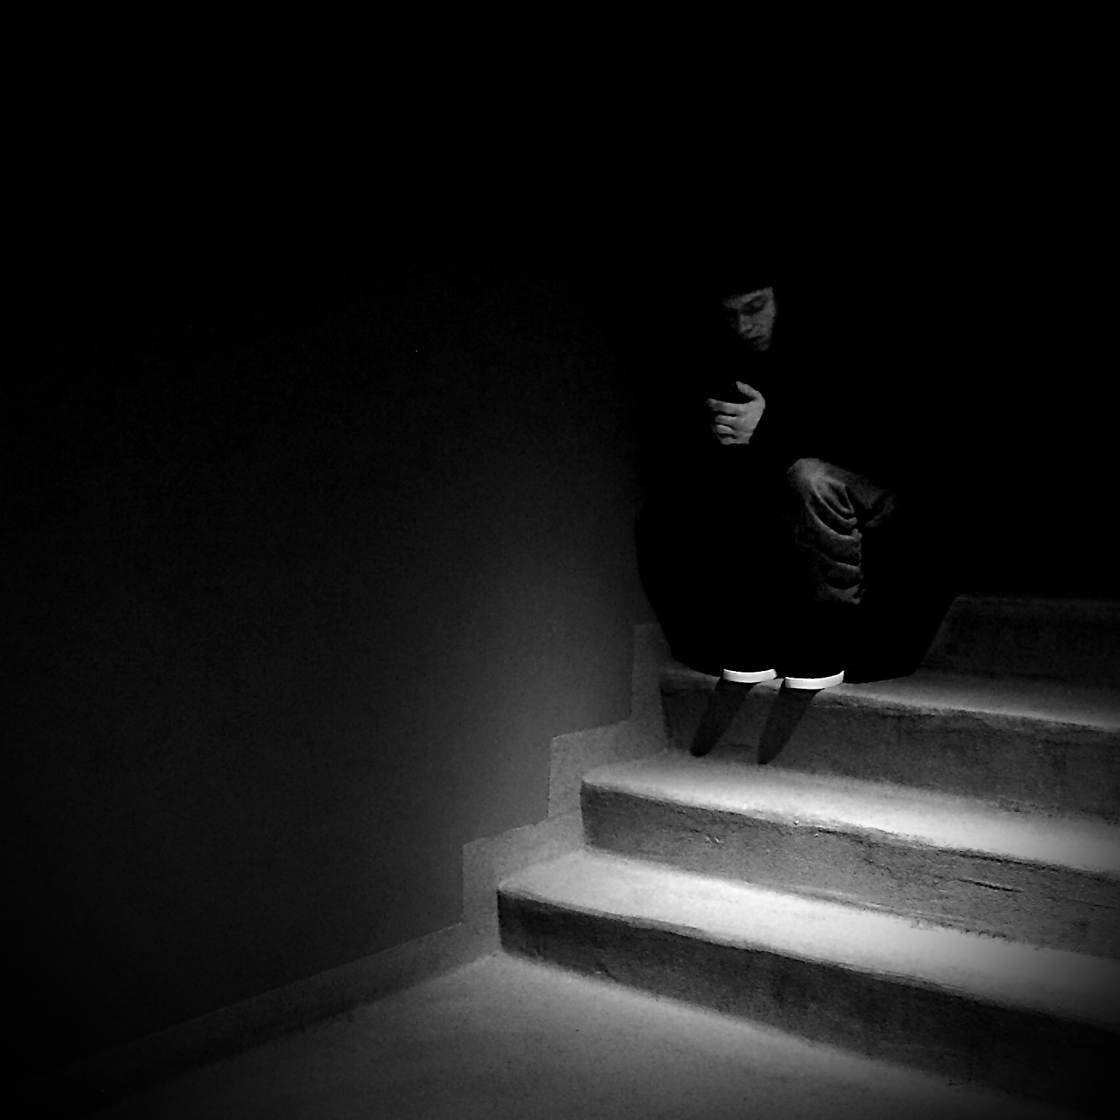
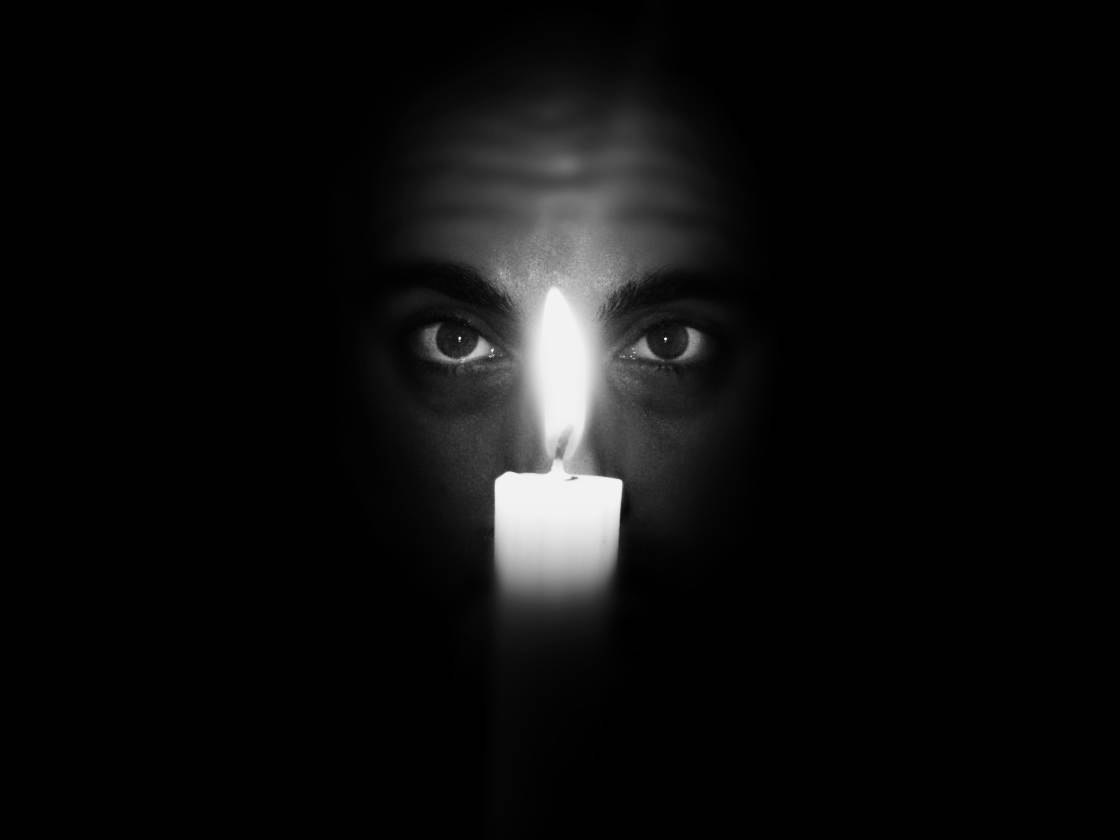
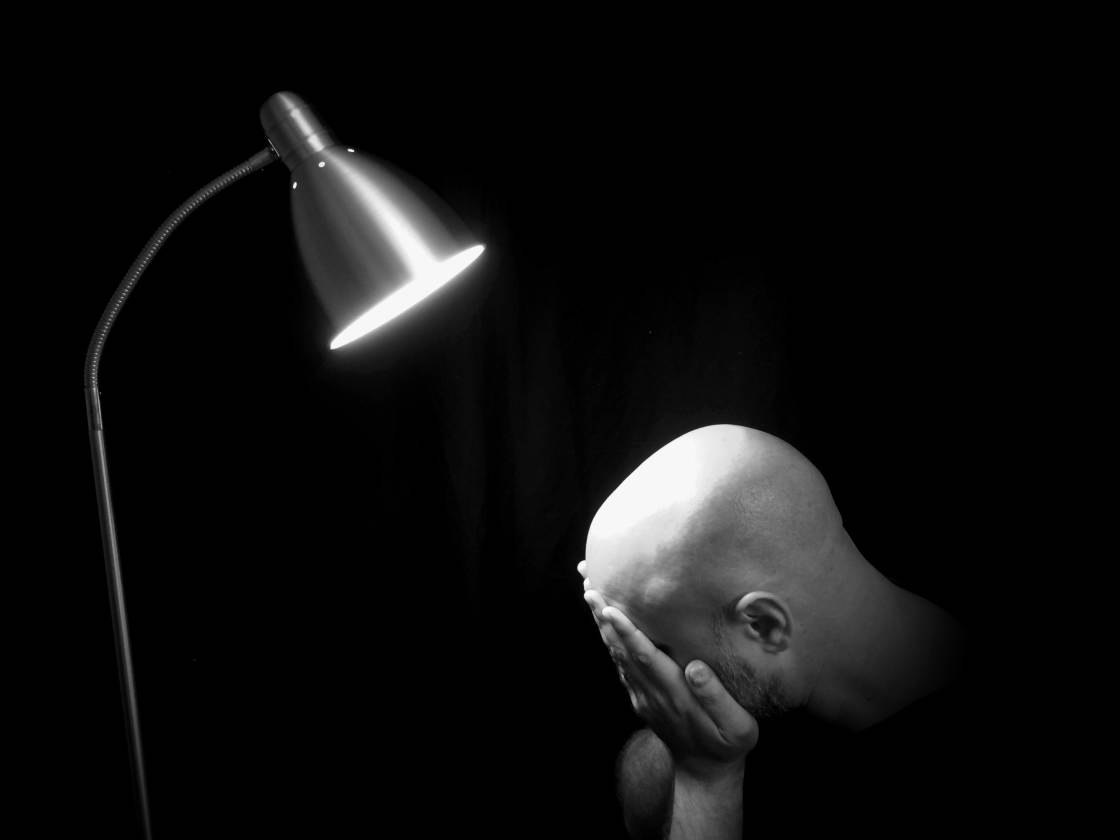
For example, if you want a dark and moody image, try deliberately under-exposing. The dark tones will add a wonderful sense of drama or mystery.
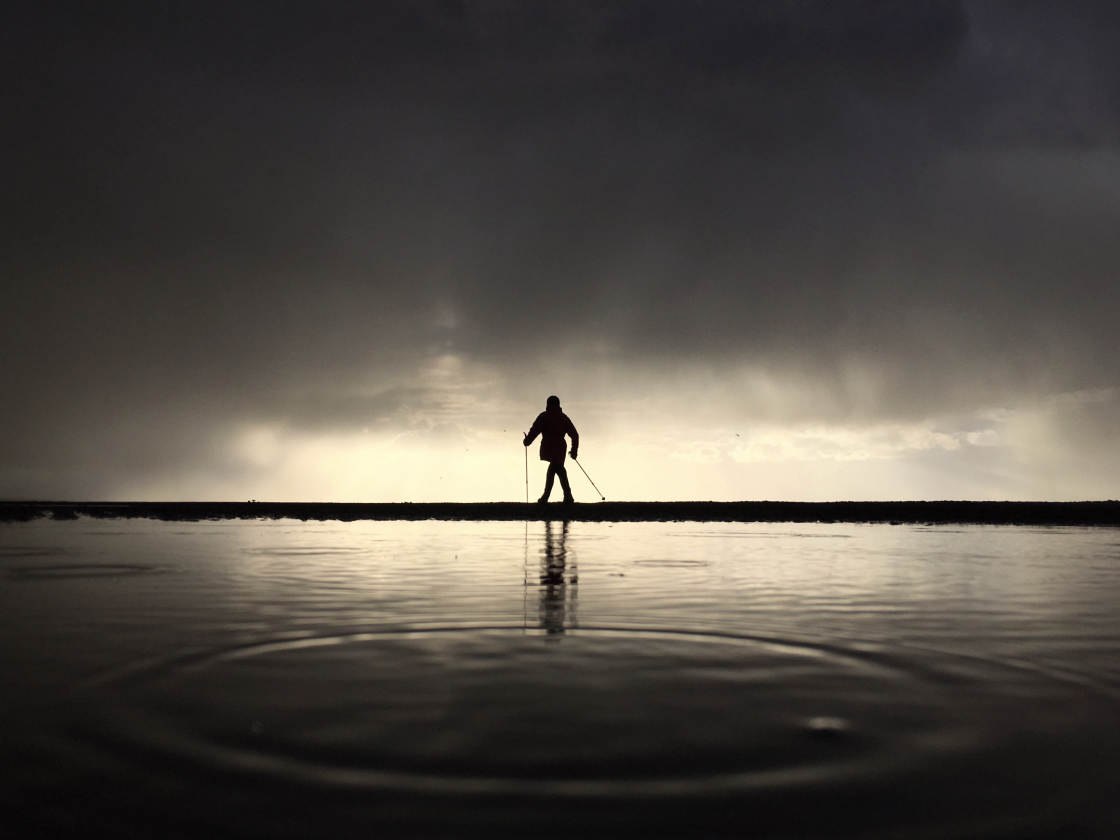
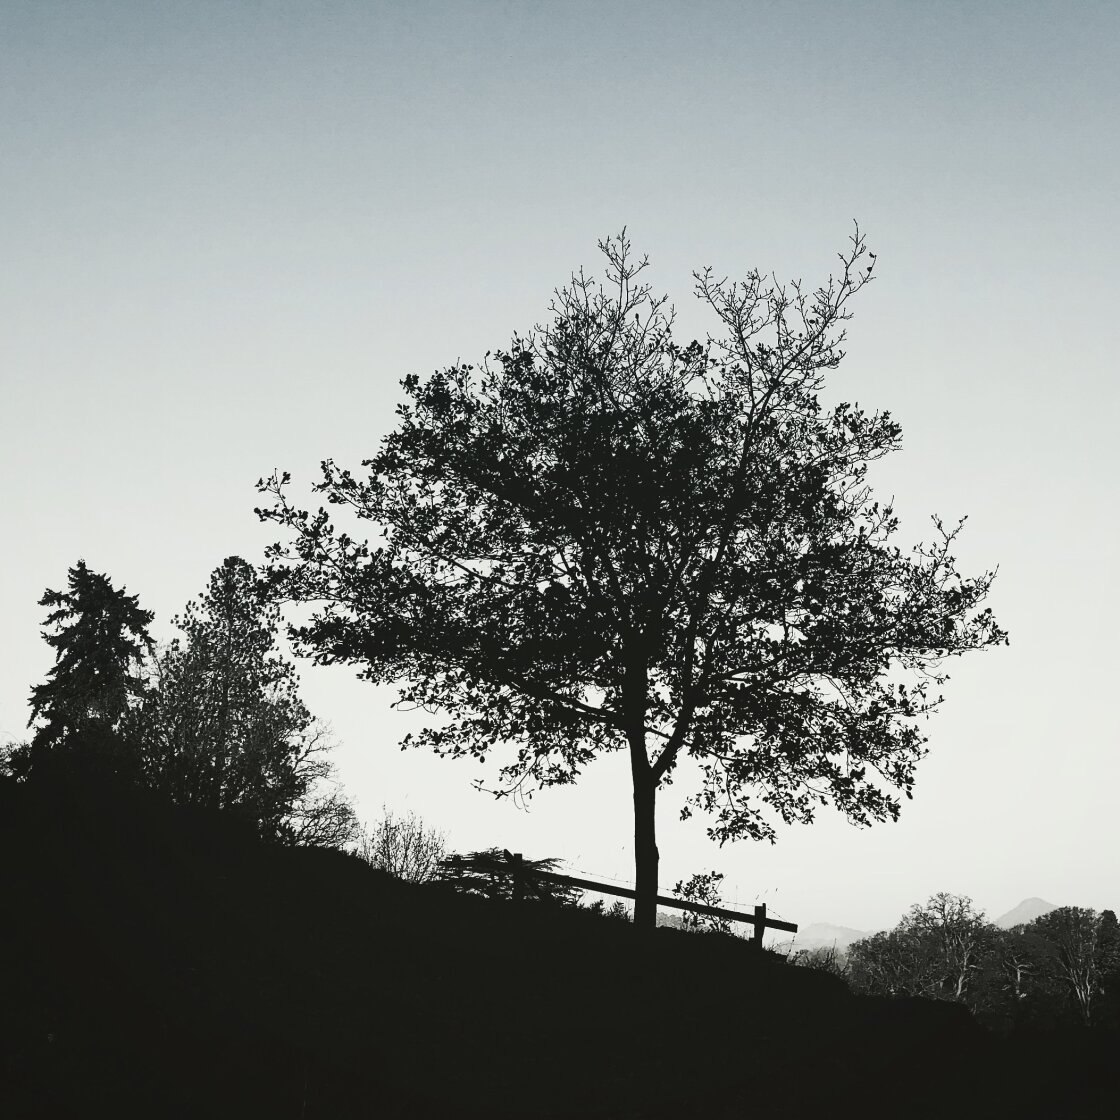
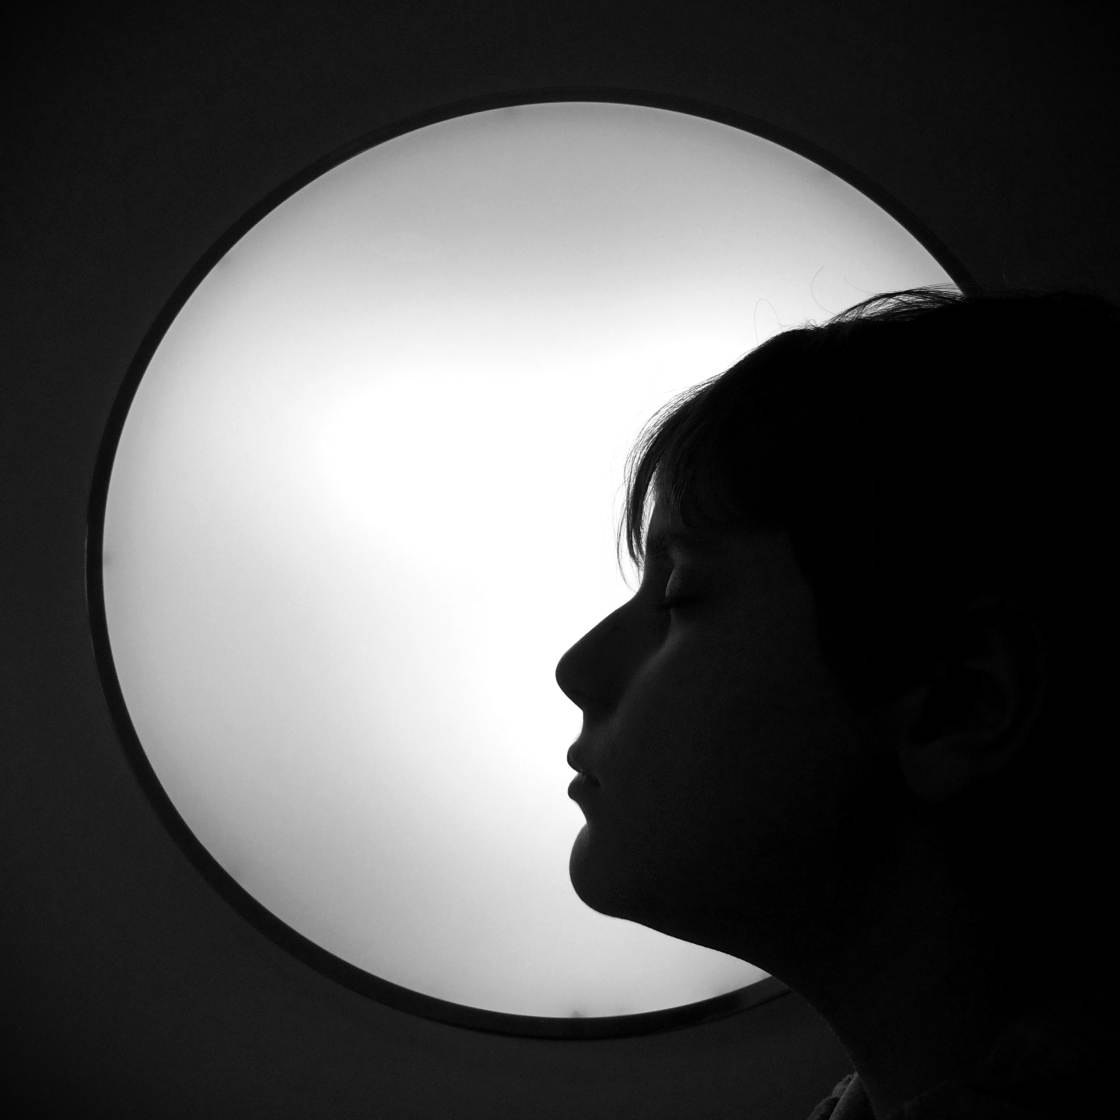
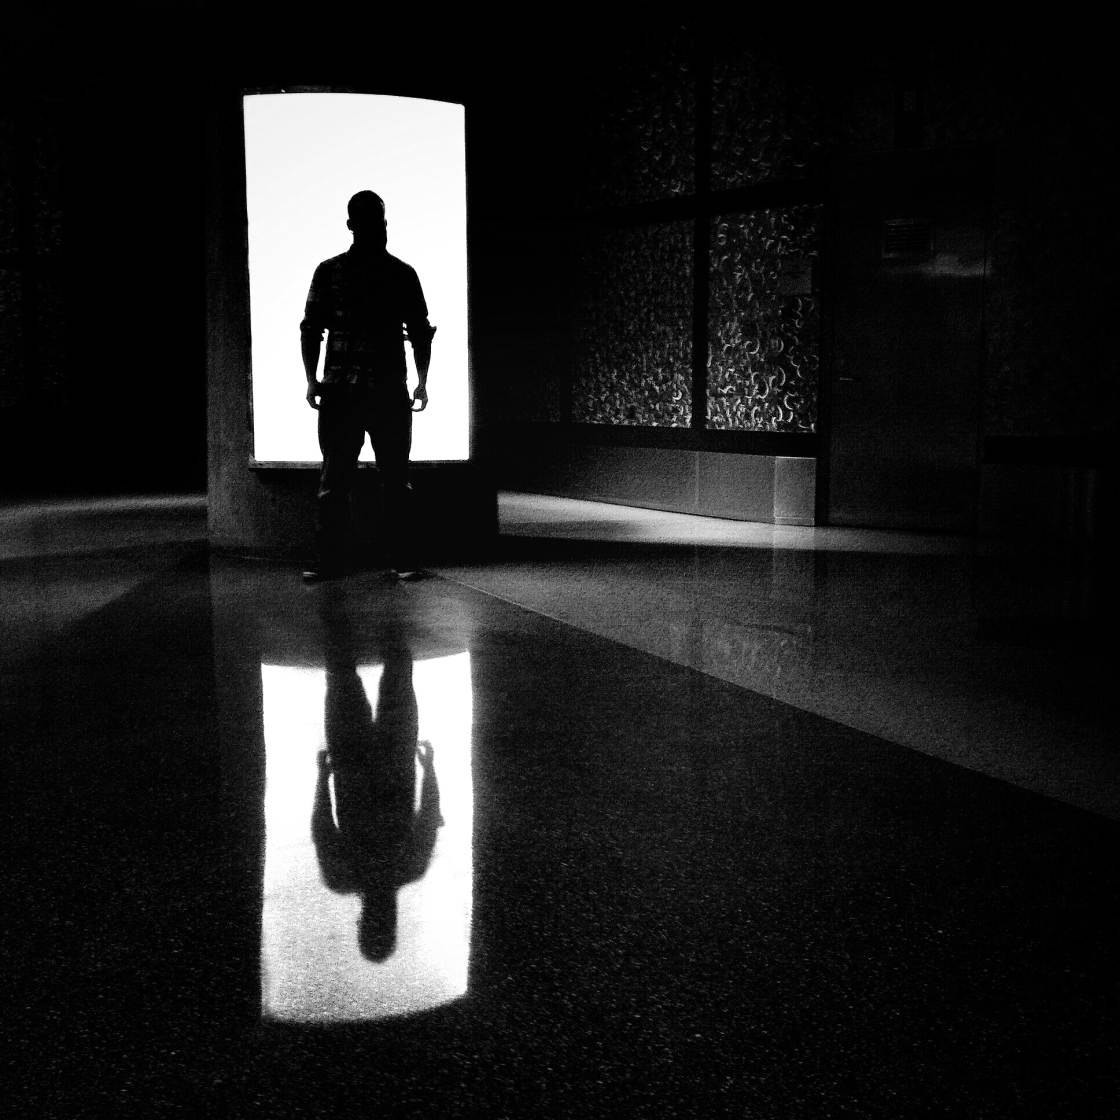
You’ll also need to under-expose to create a silhouette photo. The silhouetted subject should be completely black, with no color or detail.
Likewise, you’ll need to under-expose to capture dark shadows. The lack of detail in the shadows will create a sense of mystery and intrigue.
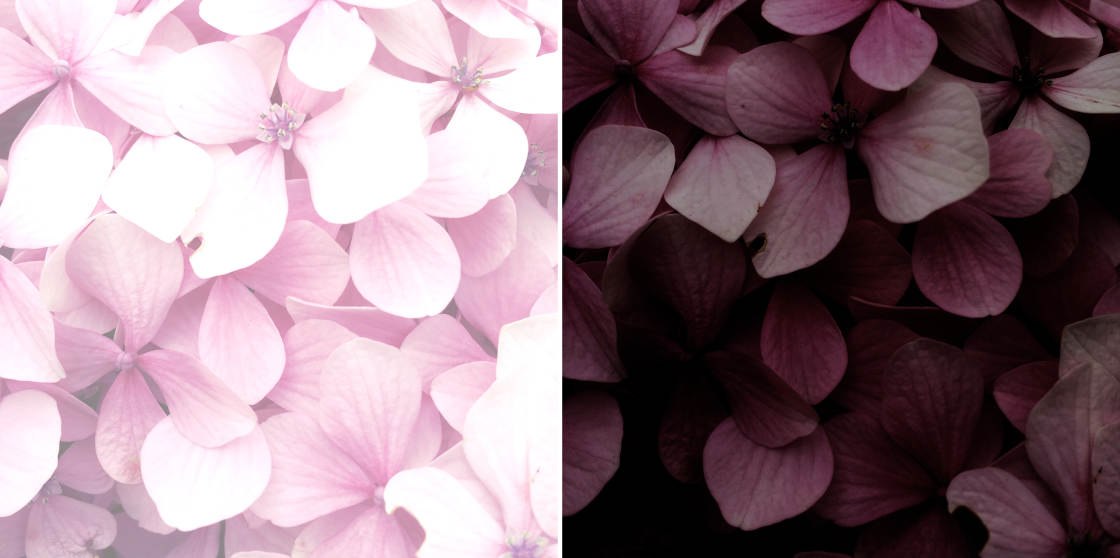
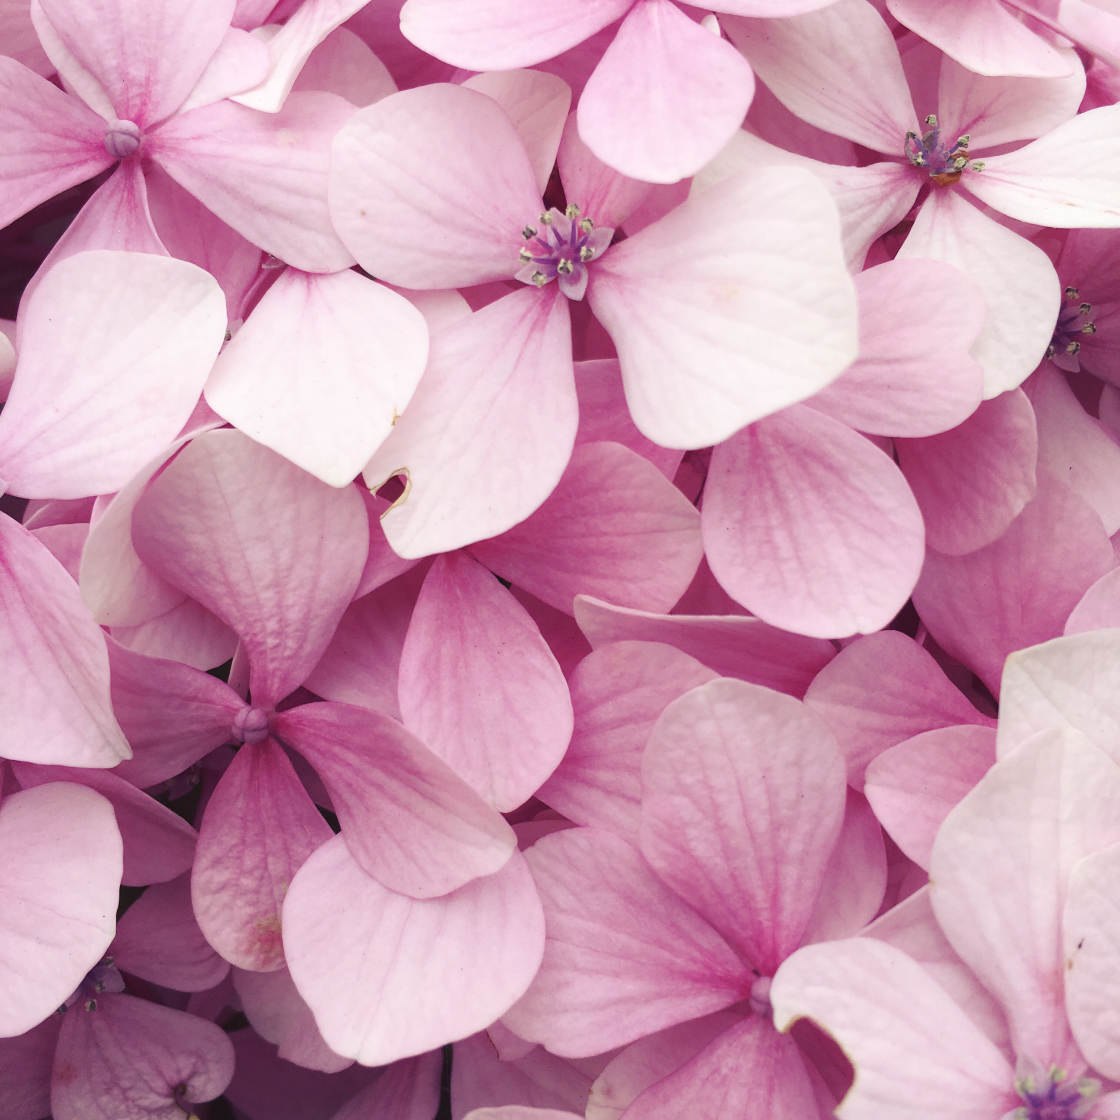
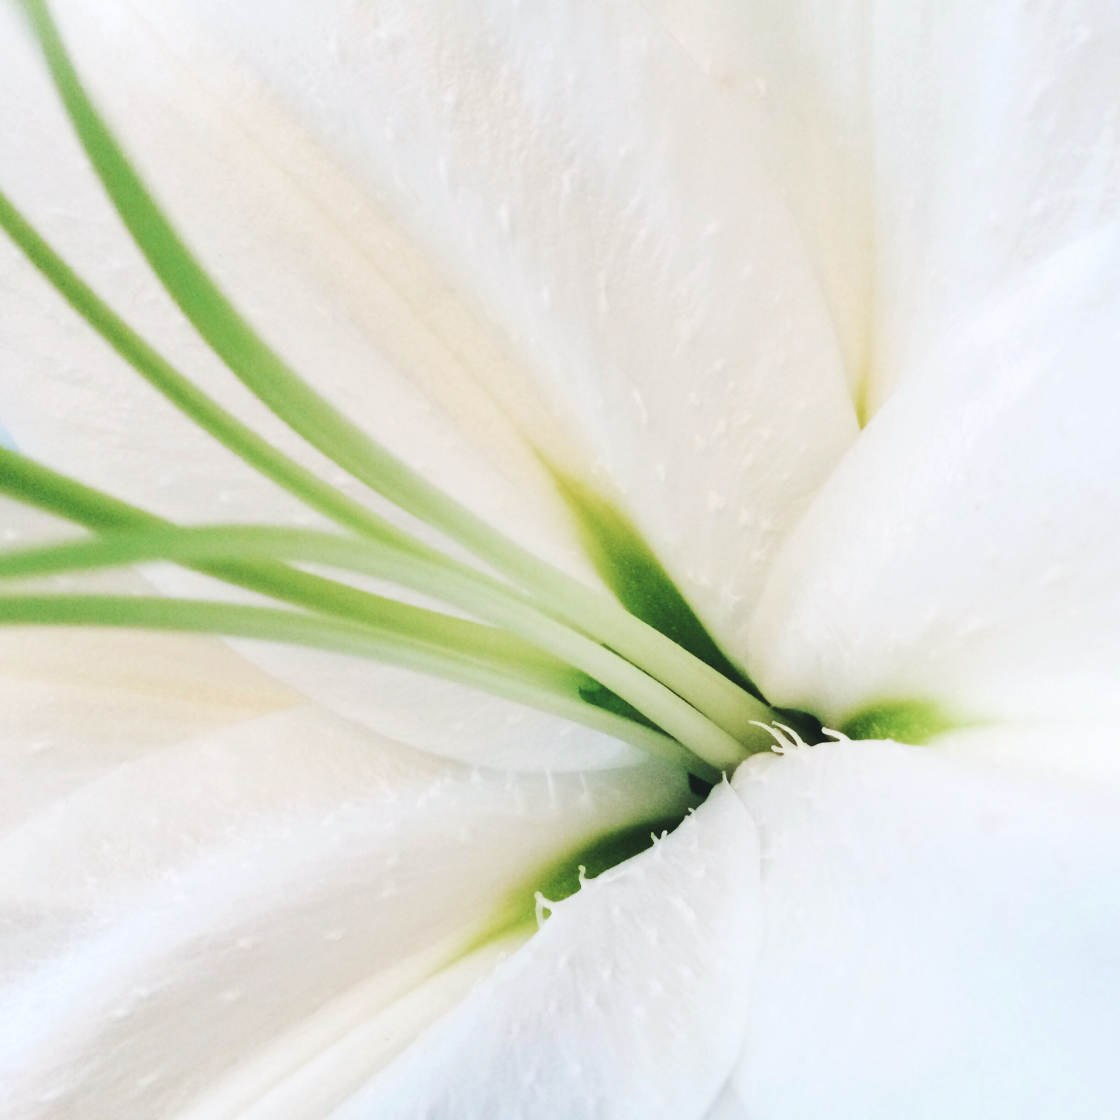
On the other hand, slightly over-exposing will create a bright and airy image with a happy or carefree mood.
Over-exposing works especially well when a large portion of the scene is white. This helps to create a bright, fresh image that really catches the eye.
3.3 Switch On HDR For Better Exposure In High Contrast Scenes
Photographing high contrast scenes (with both bright and dark areas) can be a big problem when it comes to exposure.
This is because the camera isn’t capable of capturing detail in both the dark and bright areas at the same time.
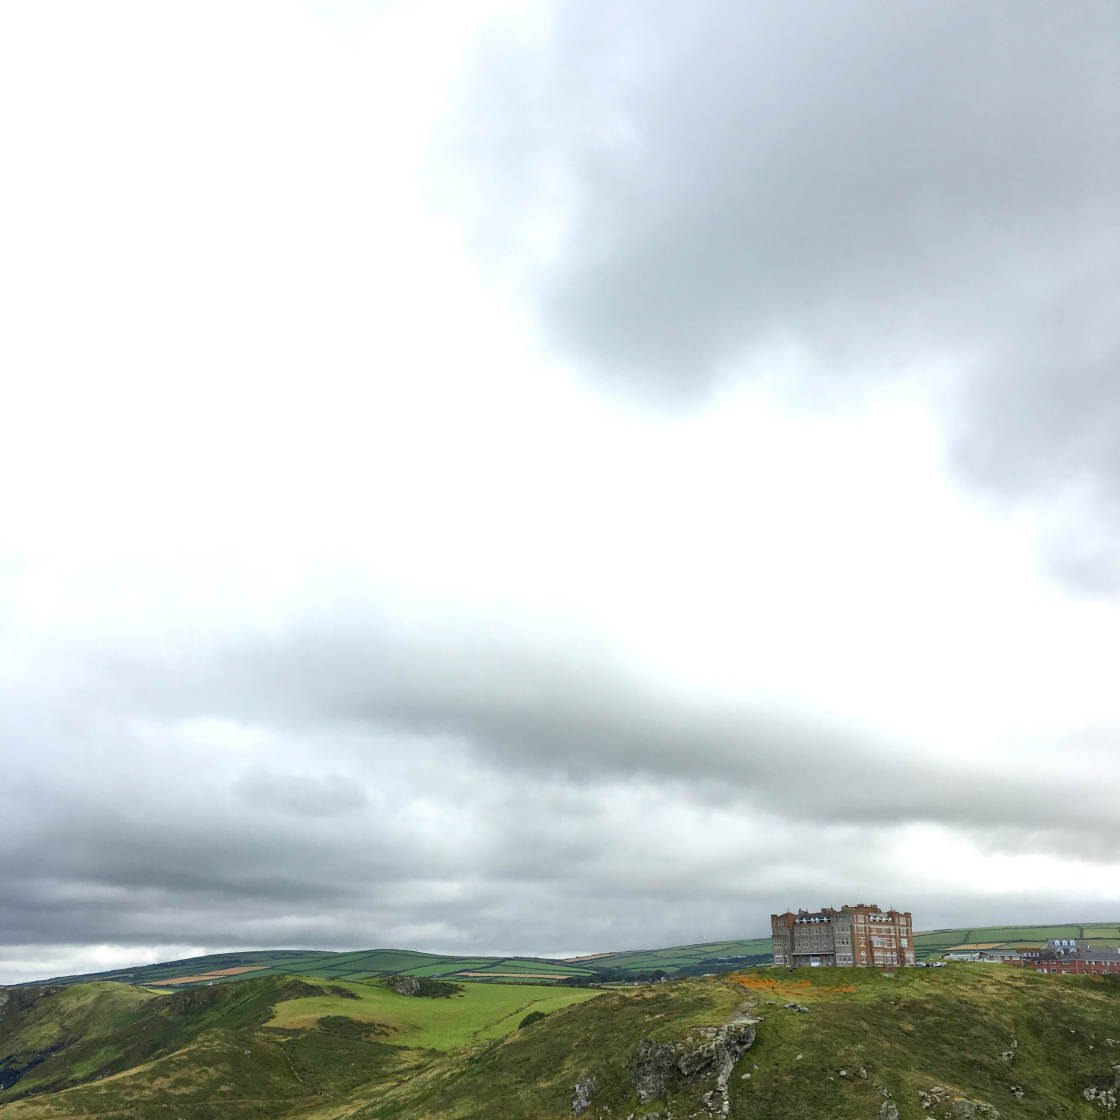
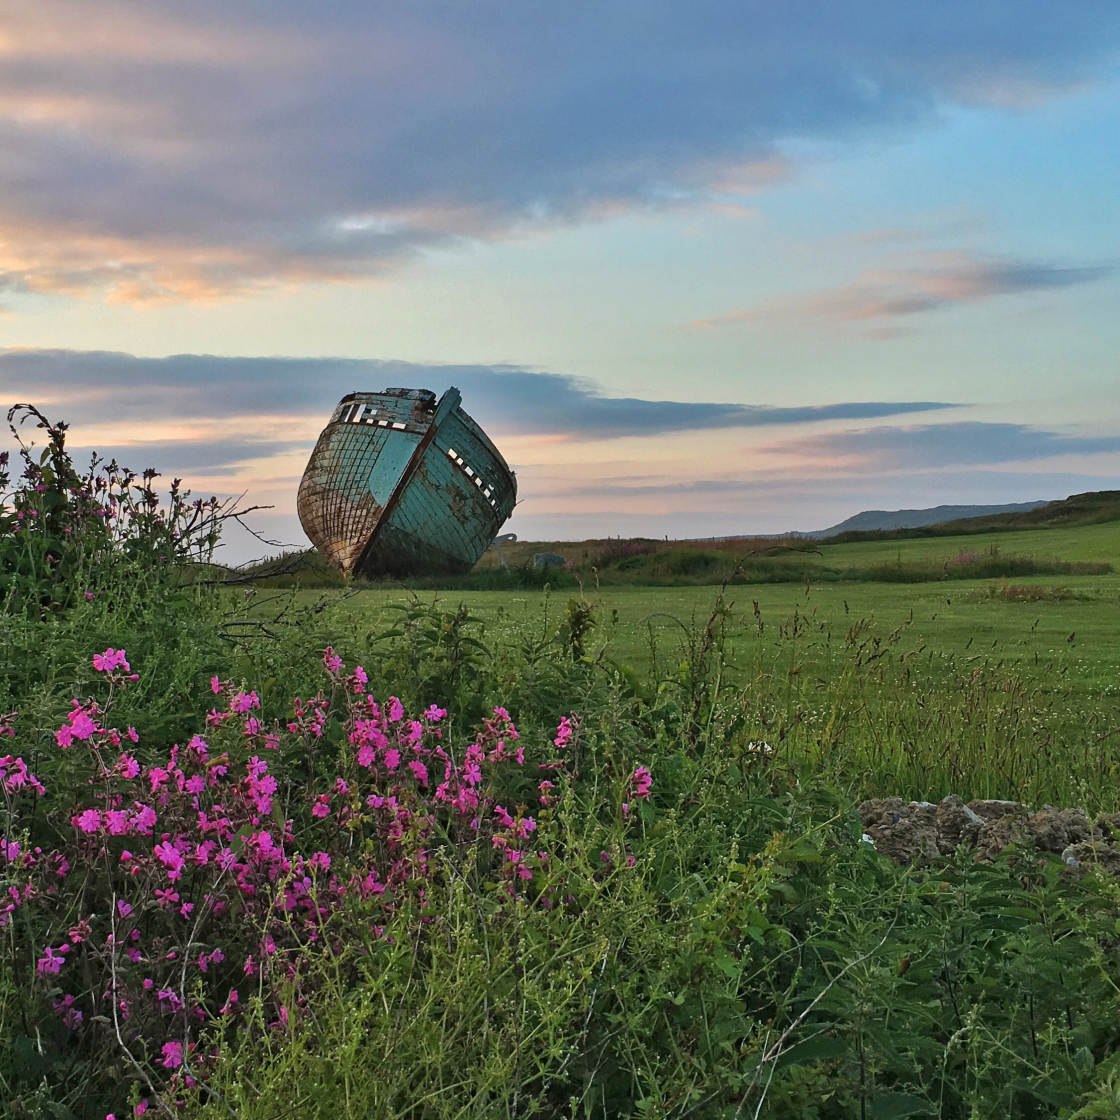
In the photo above, the dark foreground has been exposed correctly. But the bright areas of sky are over-exposed with no color or detail at all.
The examples below show how difficult it is to capture detail in both the bright and dark areas at the same time.
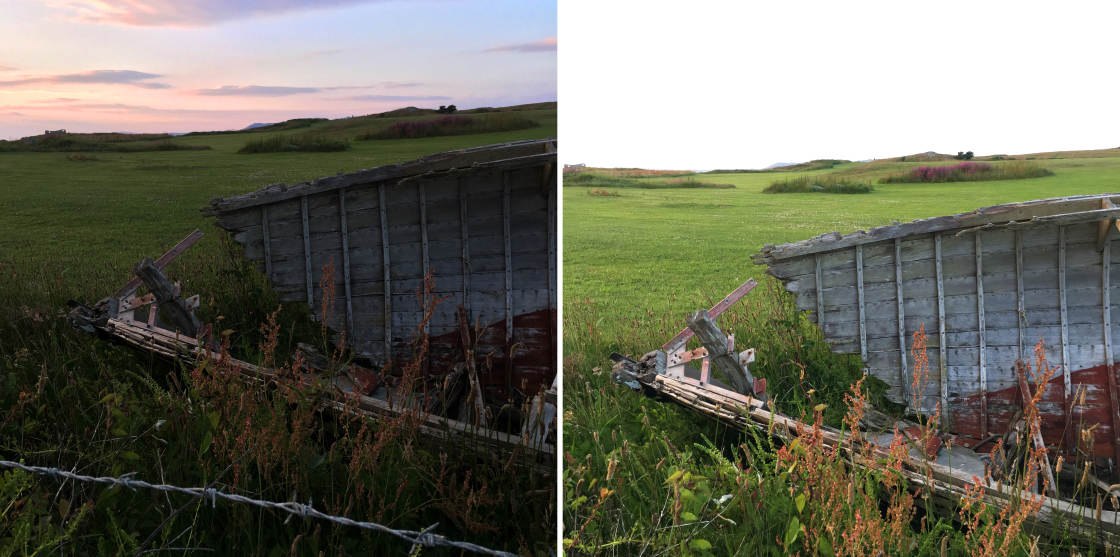
If you expose to capture detail in the highlights (bright areas), the shadows (dark areas) will be under-exposed. And if you expose to capture detail in the shadows, the highlights will be over-exposed.
However, the built-in iPhone Camera app offers a great solution!
It’s called HDR.
HDR stands for High Dynamic Range. When you use HDR, the camera captures several images at different exposures (from dark to bright).
These images are automatically combined into a single well-exposed photo. It will have detail in both the shadows and the highlights.
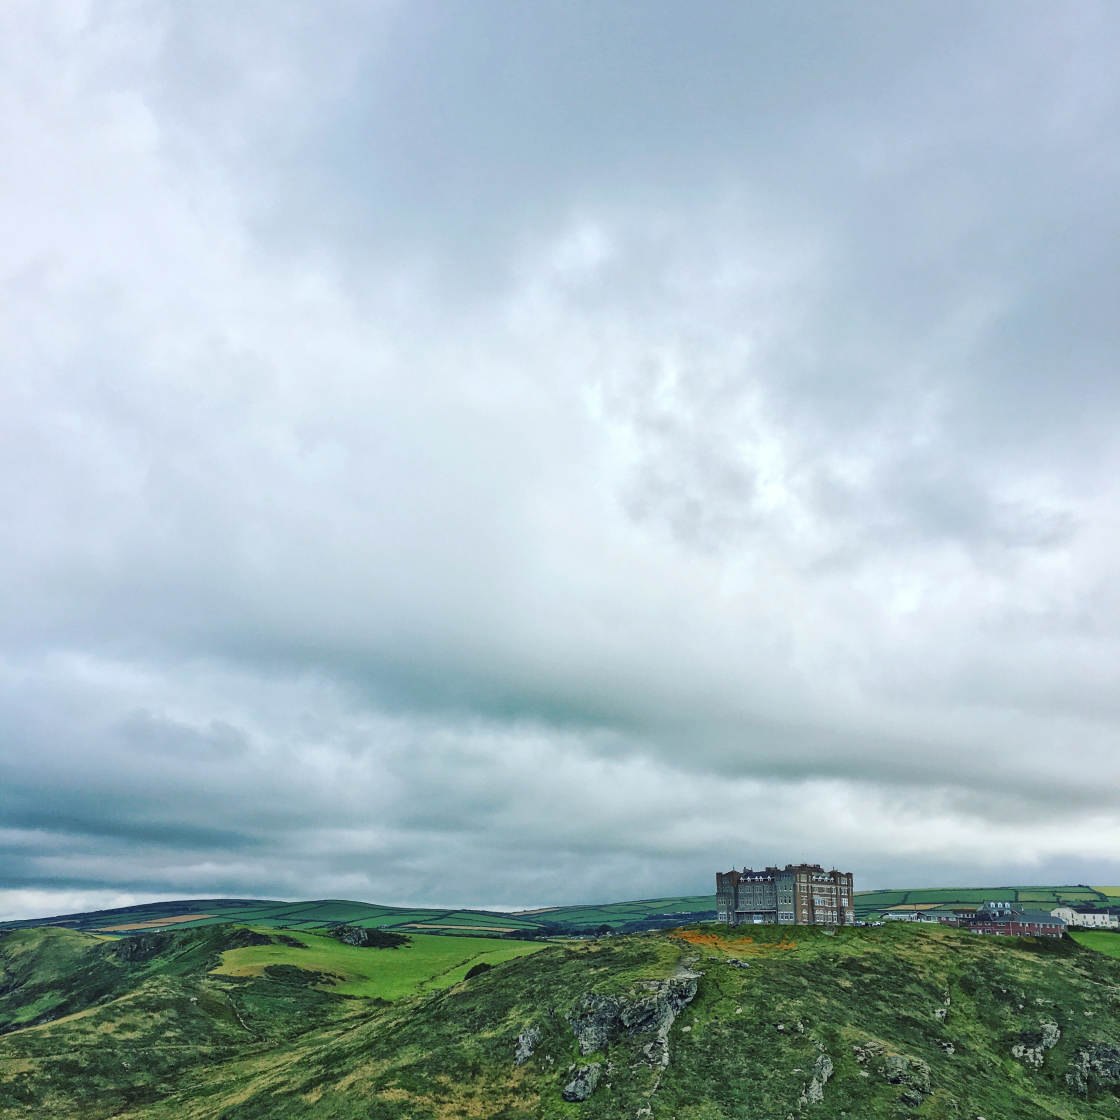
HDR is perfect for landscape photography where you have a bright sky and darker foreground.
Using HDR will ensure you get good exposure in both the foreground and the sky.
So how do you use HDR in the iPhone Camera app?
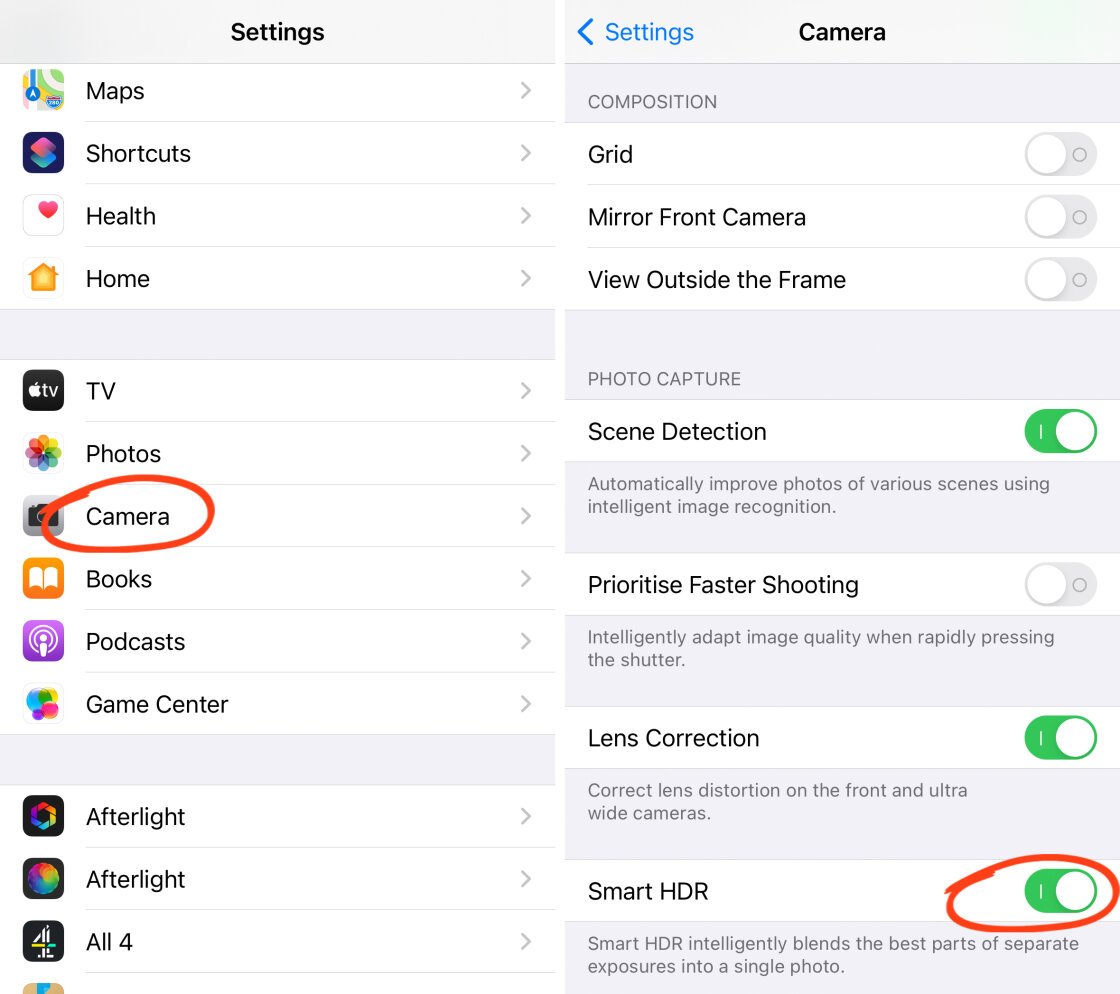
First, you need to check your HDR settings. Open the Settings app from the Home screen, then select Camera. Scroll down, and ensure the Smart HDR option is switched on (green).
If you switch on Smart HDR, you’ll never need to think about whether to use HDR or not. The camera will always decide for you.
Smart HDR does an amazing job of capturing detail in both the shadows and the highlights. And I’d recommend that you keep it switched on in most situations.
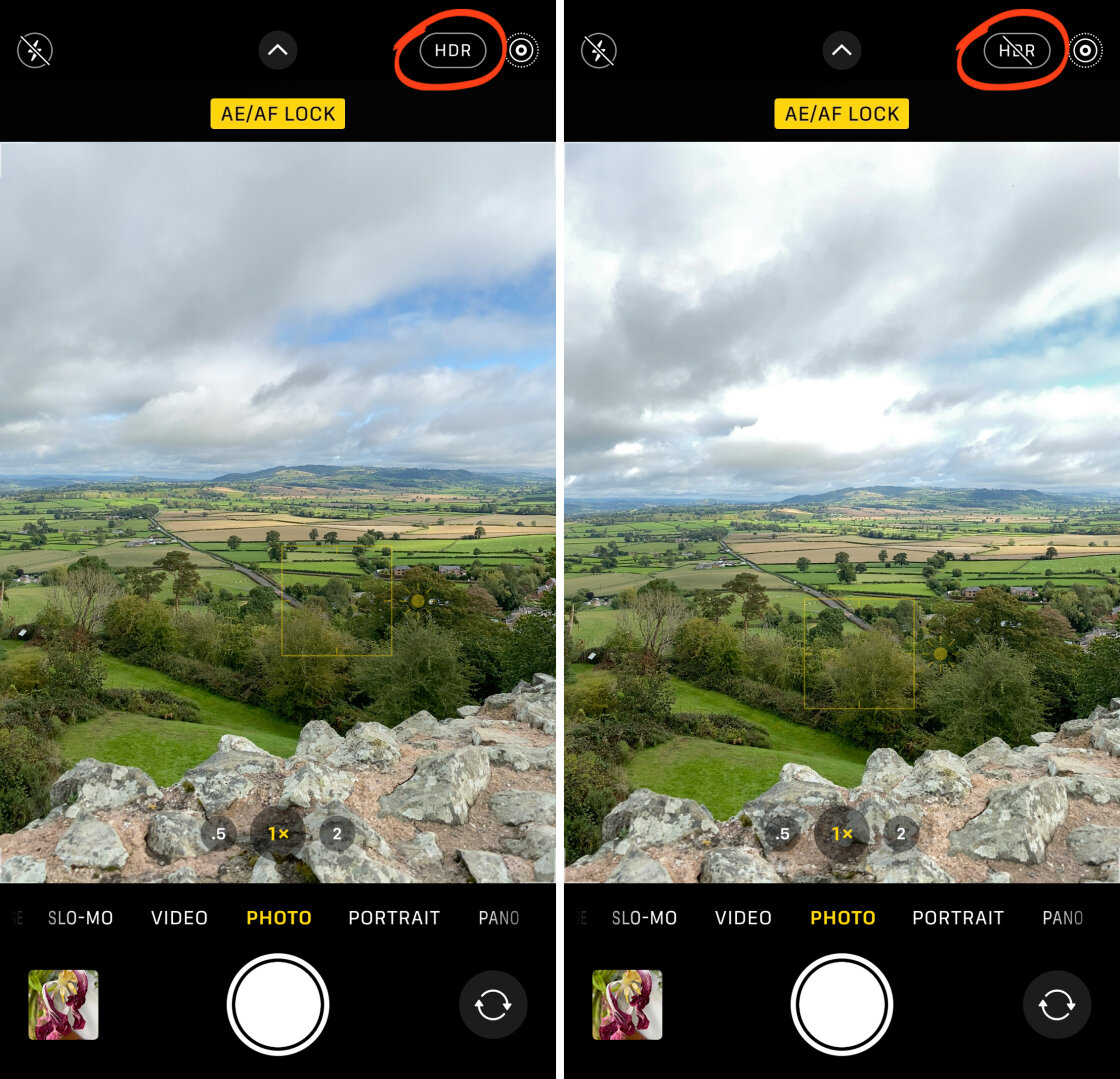
However, if you’d prefer to manually control HDR in the Camera app, you’ll need to switch the Smart HDR setting off.
With Smart HDR switched off, you’ll see an HDR icon at the top of the Camera app. You can tap the icon to turn HDR on or off. (HDR is off when a line appears through the icon).
If you’re controlling HDR manually, you’ll need to remember to switch it on when shooting high-contrast scenes, such as landscapes. Otherwise, you may end up with over-exposed highlights as shown above.
One reason you might want to switch off HDR is if you want to capture dark shadows. HDR tries to capture detail in the shadows, but switching it off allows you to capture darker, more dramatic shadows.
4. Shutter Speed: How To Change Shutter Speed On iPhone
The ability to control shutter speed is typically associated with DSLR cameras.
But did you know you can change the iPhone shutter speed?
Once you master shutter speed, you’ll be able to control how movement appears in your photos. And this will take your creativity to a whole new level!
4.1 What Is Shutter Speed?
Shutter speed refers to the amount of time the camera’s shutter is open for when taking a photo.
Shutter speed is measured in seconds (or fractions of seconds), e.g. 8s, 2s, 1/30s, 1/250s, 1/500s, etc.
A fast shutter speed means the shutter is open for a very short amount of time (a fraction of a second).
Fast shutter speeds freeze any movement in the scene. A fast shutter speed allows you to capture sharp photos of moving subjects. It also ensures you won’t get blurry photos from camera shake.
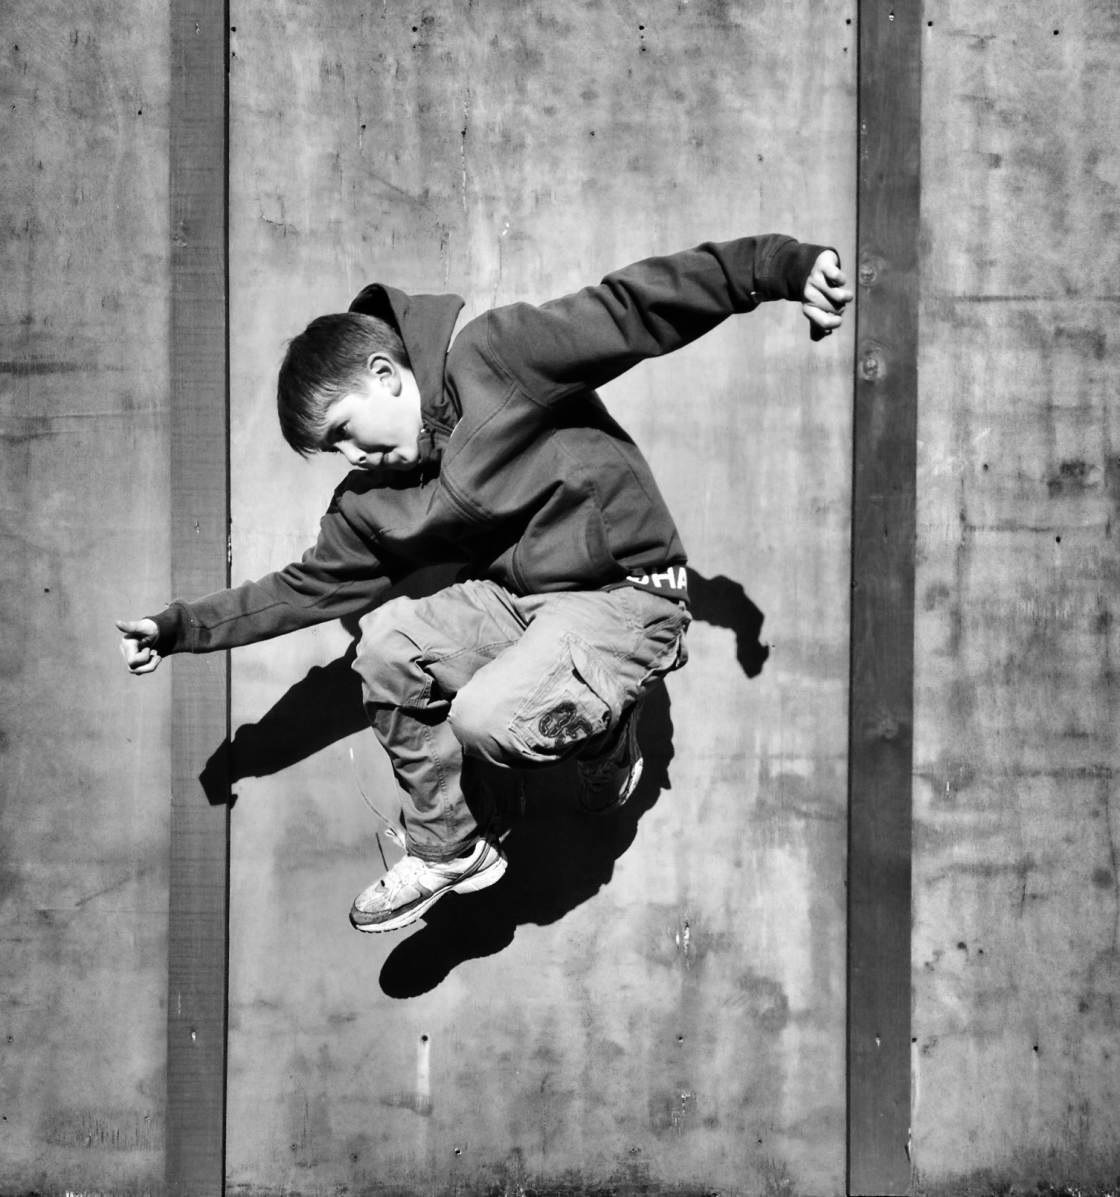
A slow shutter speed means the shutter is open for a longer amount of time (several seconds).
If anything in the scene moves during this long exposure time, that movement will be captured as a blur or streak. This kind of blur is called motion blur.
Slow shutter speeds are a great way to convey a sense of movement in a photo. The motion blur clearly shows that the subject was moving through the frame.
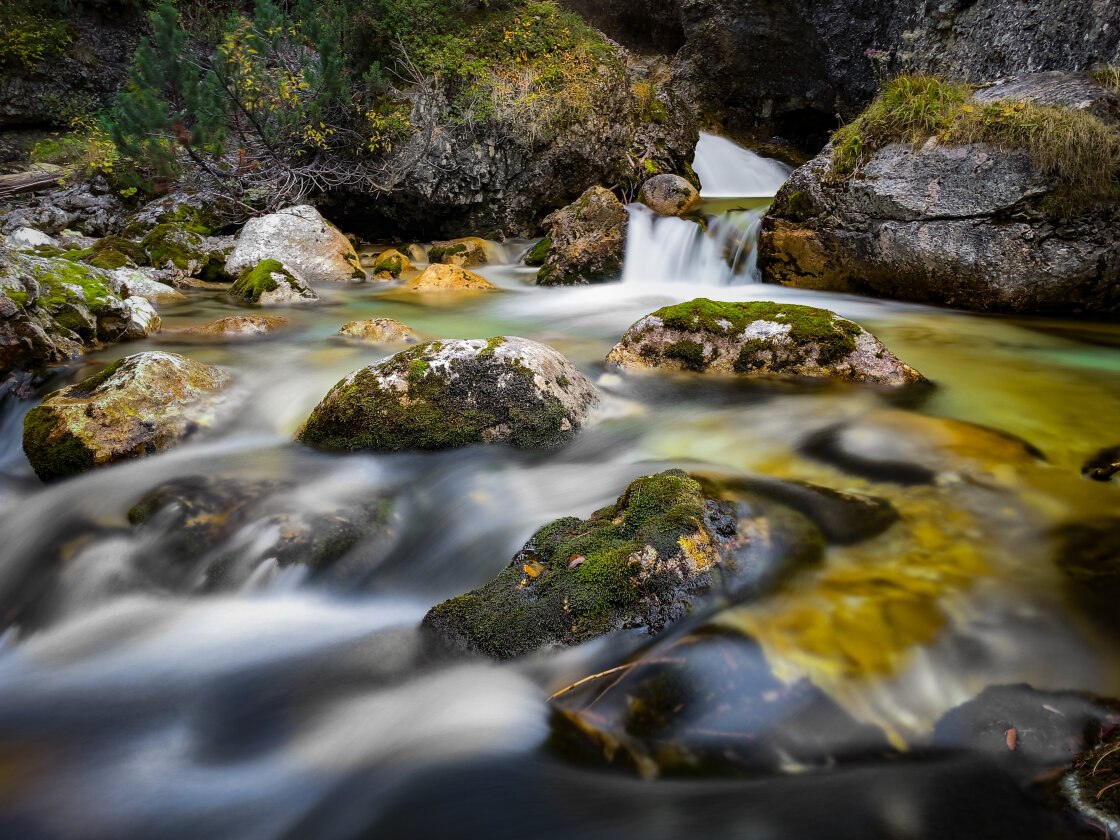
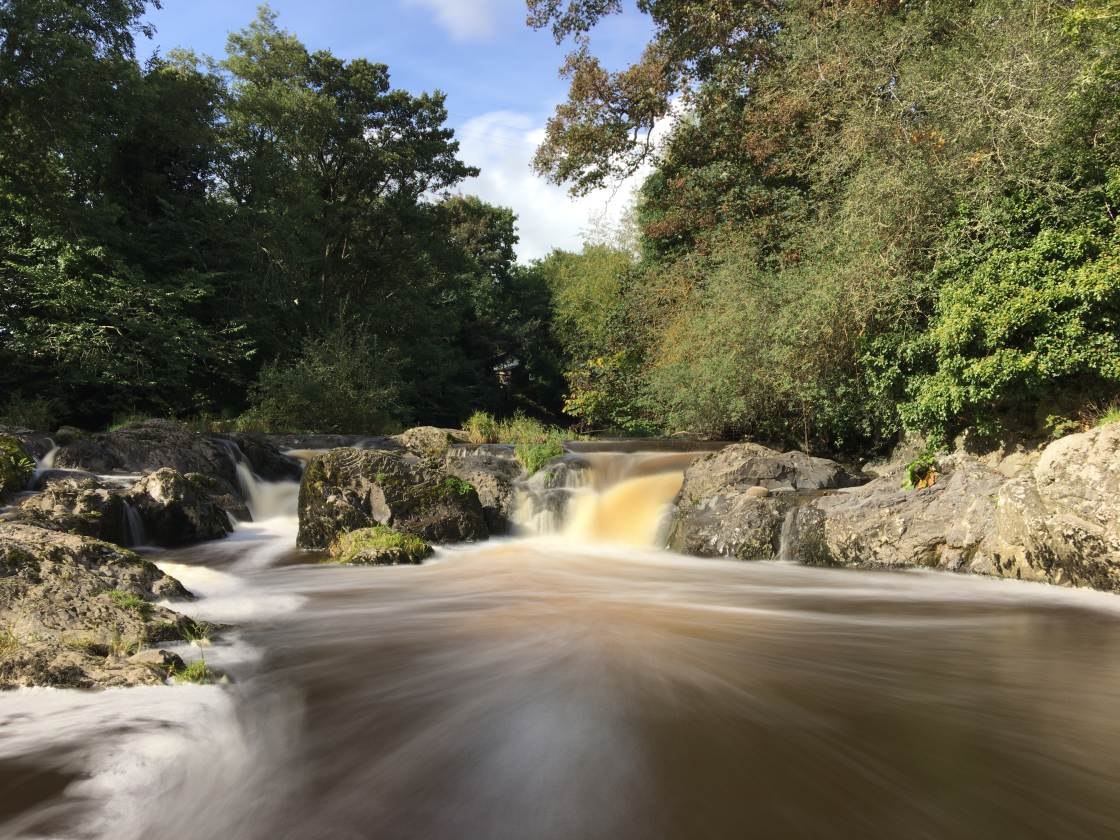
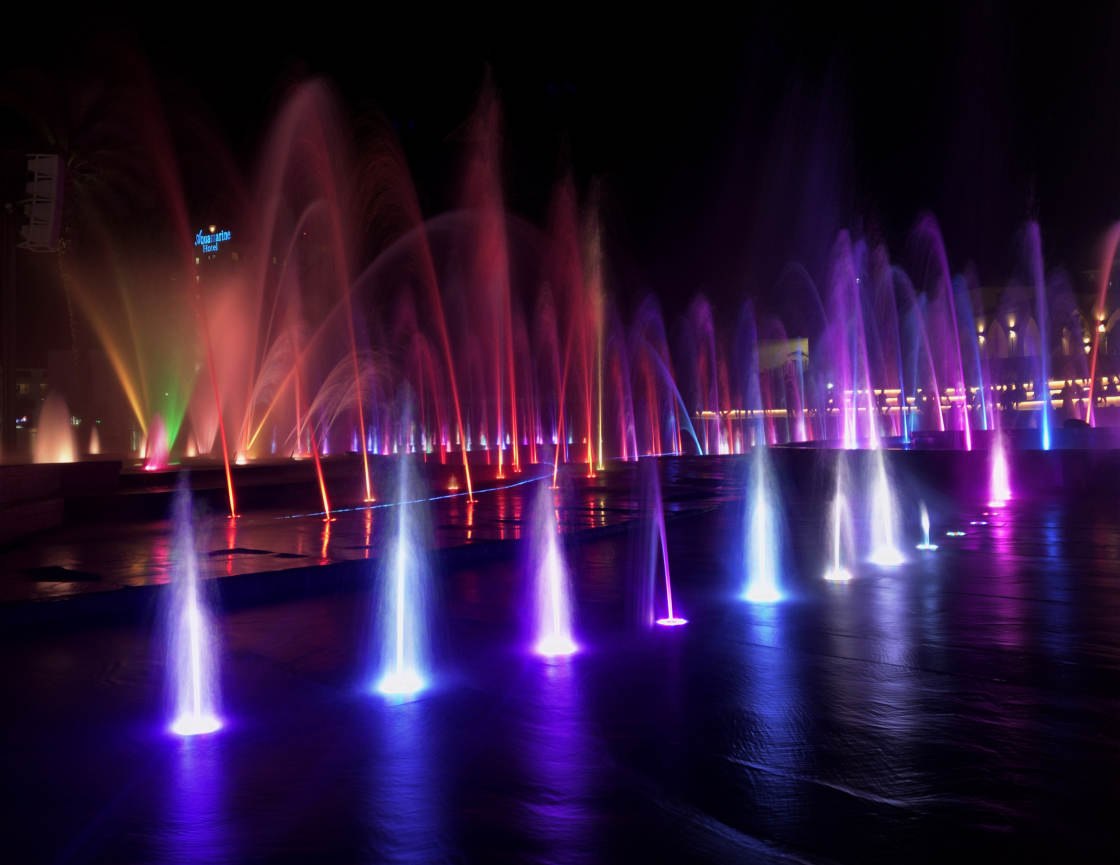
A slow shutter speed allows you to create beautiful long exposure photos of waterfalls and rivers. The long exposure time results in the moving water appearing silky smooth.
4.2 How To Change Shutter Speed On iPhone
The built-in iPhone Camera app doesn’t have a shutter speed option. So you’ll need a third-party app with iPhone manual camera controls.
There are several excellent iPhone camera apps that let you control shutter speed.
Camera+ 2 ($7.99) is a great option as it has a wide range of shutter speeds – from very fast to very slow. It even has a dedicated Slow Shutter shooting mode for capturing long exposure photos.
Here’s how you change shutter speed on iPhone using Camera+ 2:
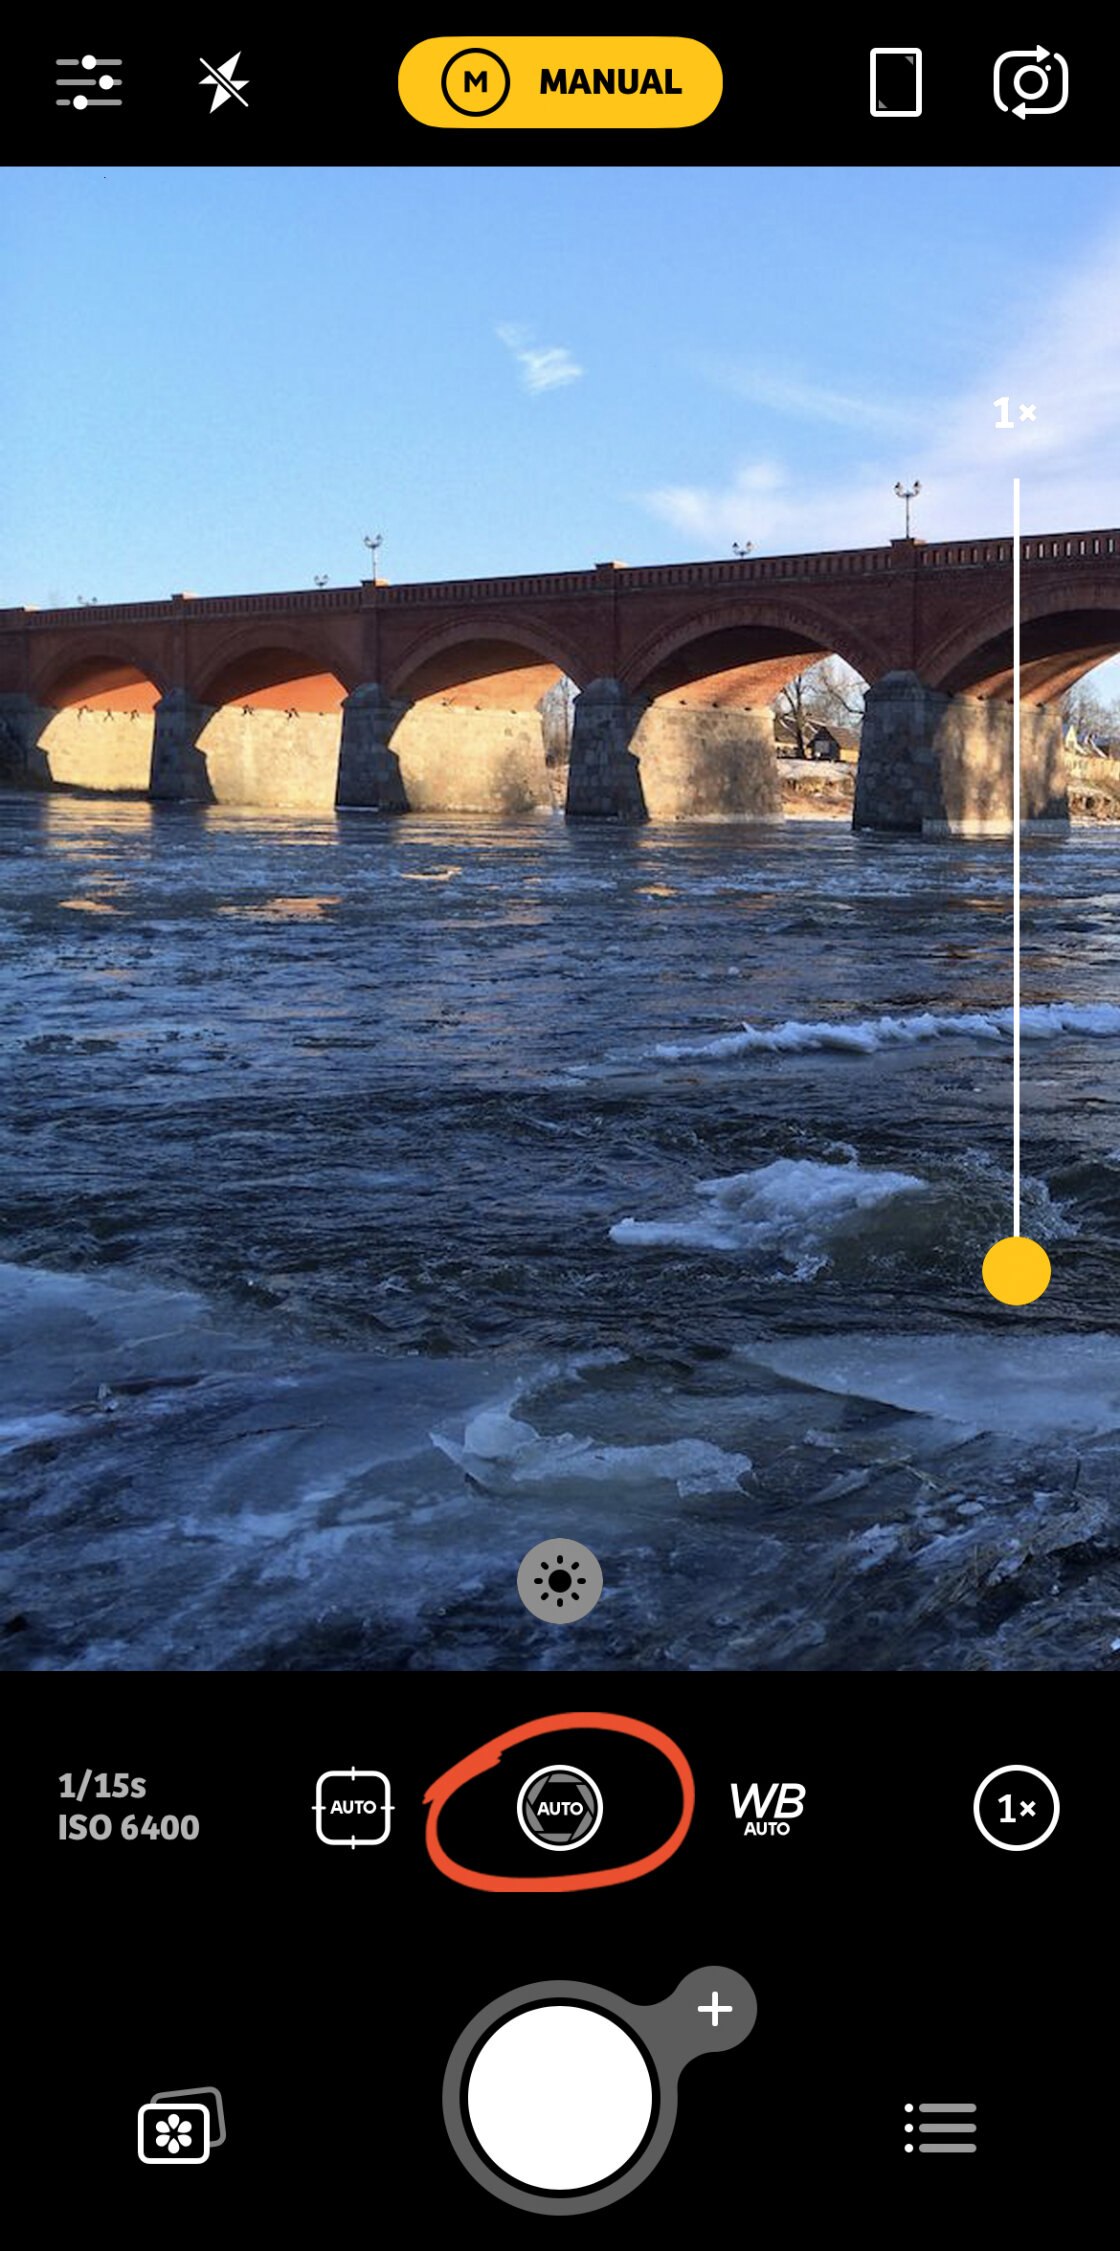
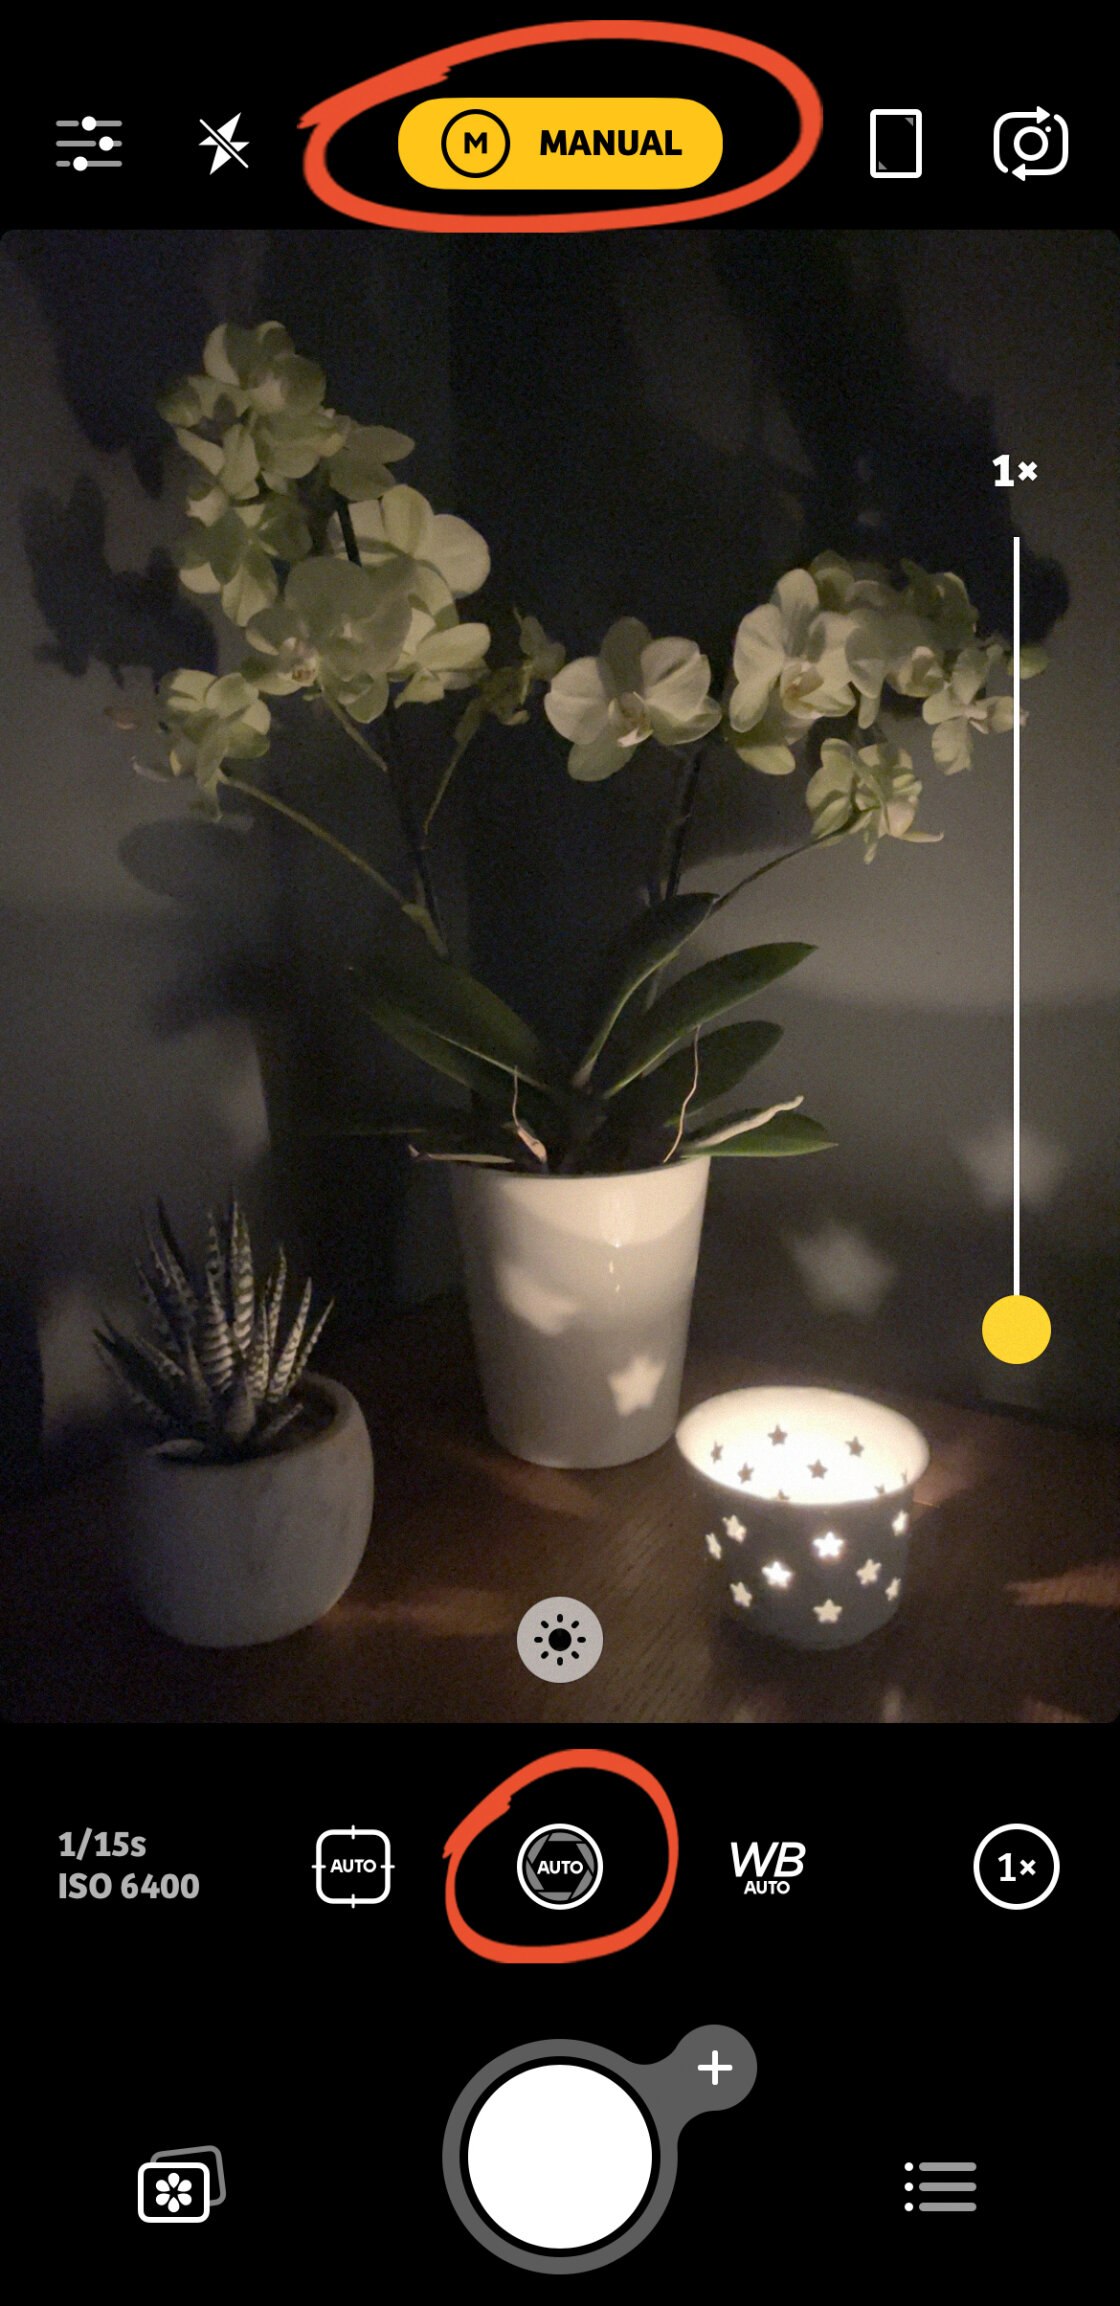
Open the Camera+ 2 app. Set the shooting mode (yellow icon) at the top of the screen to Manual.
Next, tap the Shutter Speed icon just above the shutter button (circled in red below).
The Shutter Speed slider will appear at the bottom of the viewfinder. Drag the slider left or right to adjust the shutter speed.
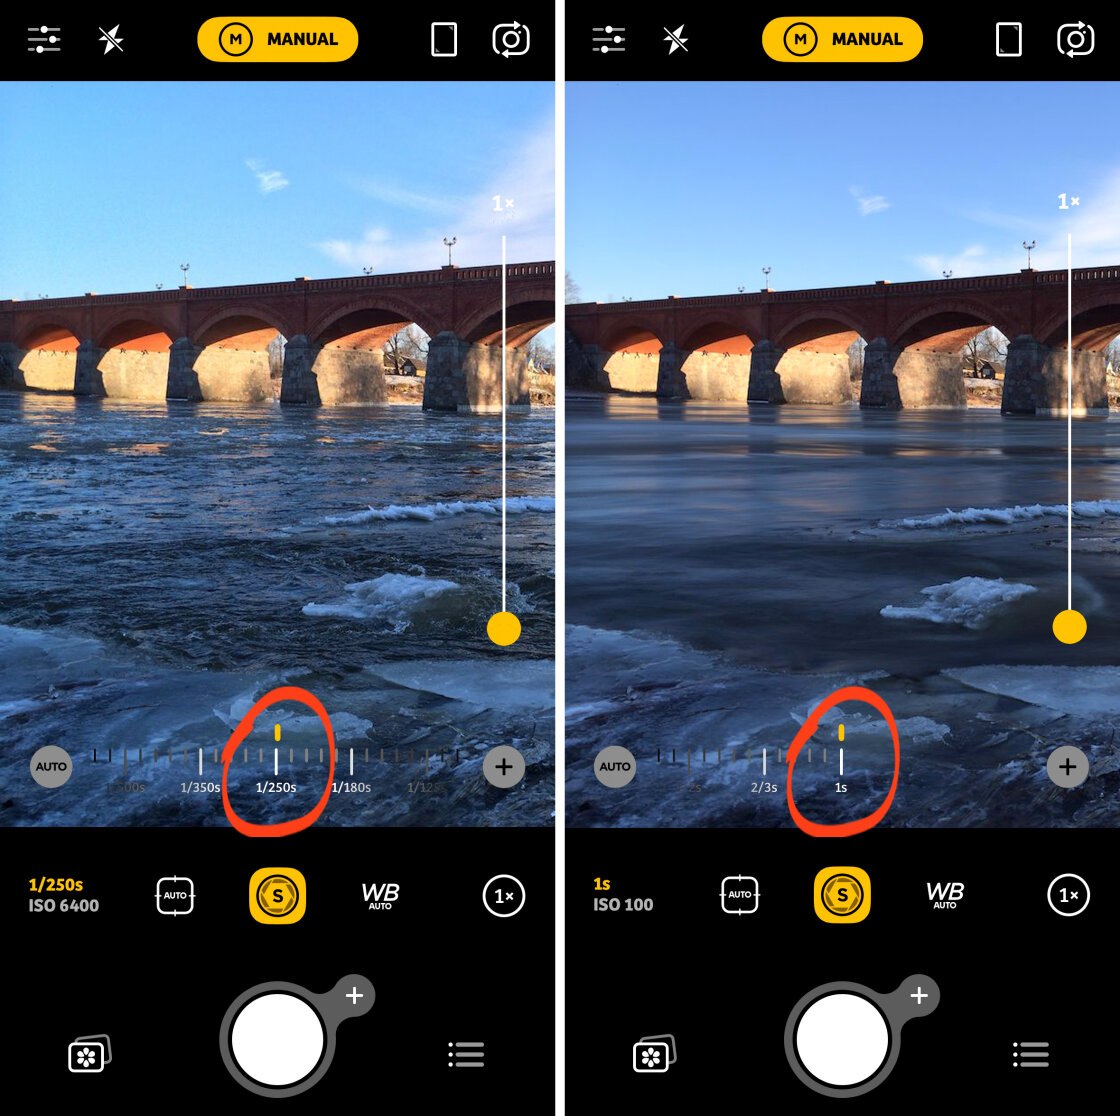
The further left you go, the faster the shutter speed will be. Fast shutter speeds freeze the motion of moving subjects and help eliminate camera shake.

The further right you go, the slower the shutter speed becomes. Slow shutter speeds blur the motion of moving subjects.
Note that the slowest shutter speed in Manual shooting mode is 1 second. If you want to shoot long exposure photos with Camera+ 2, you’ll probably need slower shutter speeds than this.
Read on to learn how to shoot beautiful long exposure photos with your iPhone.
4.3 Use A Slow Shutter Speed For Stunning Long Exposure Photos
In this section, you’ll learn how to capture incredible long exposure photos using two different apps: Camera+ 2 ($7.99) and Slow Shutter Cam ($1.99).
Both apps produce great results, but they offer slightly different functionality.
Before you begin, make sure you have an iPhone tripod. A tripod keeps your camera perfectly still during the long exposure time.
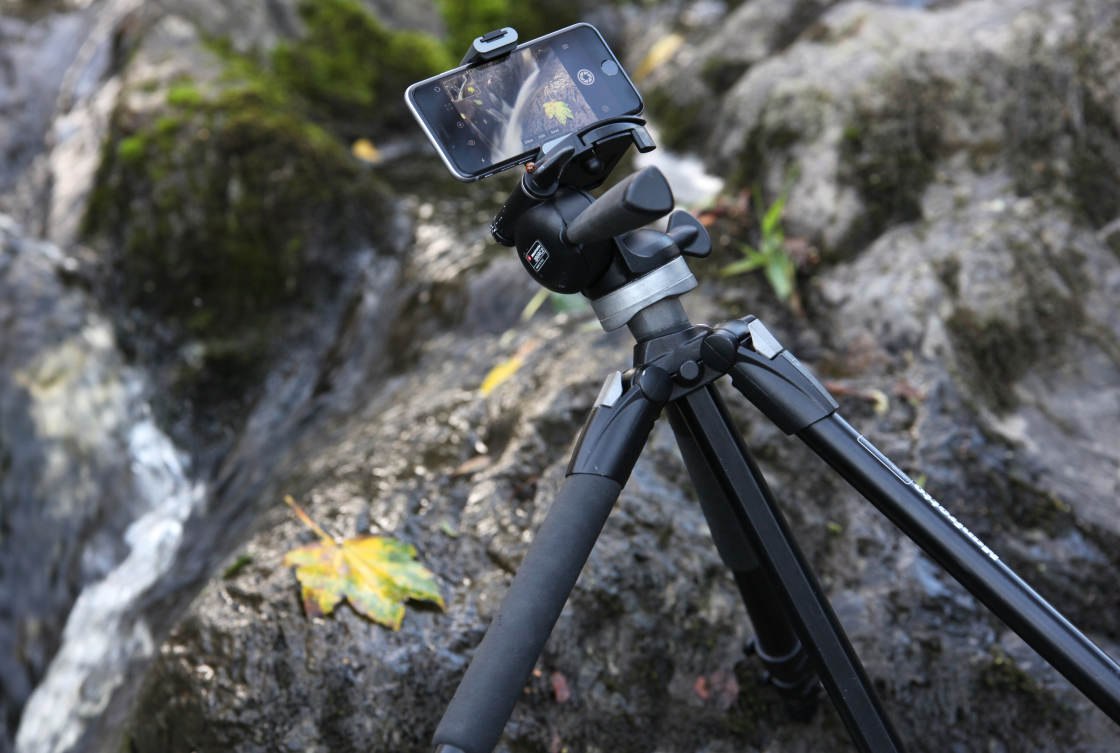
If you hand-hold your iPhone, you won’t be able to keep it still enough. And the result will be a shaky photo that’s entirely blurred.
4.3.1 How To Shoot Long Exposure Photos Using Camera+ 2
The Camera+ 2 app has a dedicated Slow Shutter mode for shooting long exposure photos.
Set the shooting mode (yellow icon) at the top of the screen to Slow Shutter.
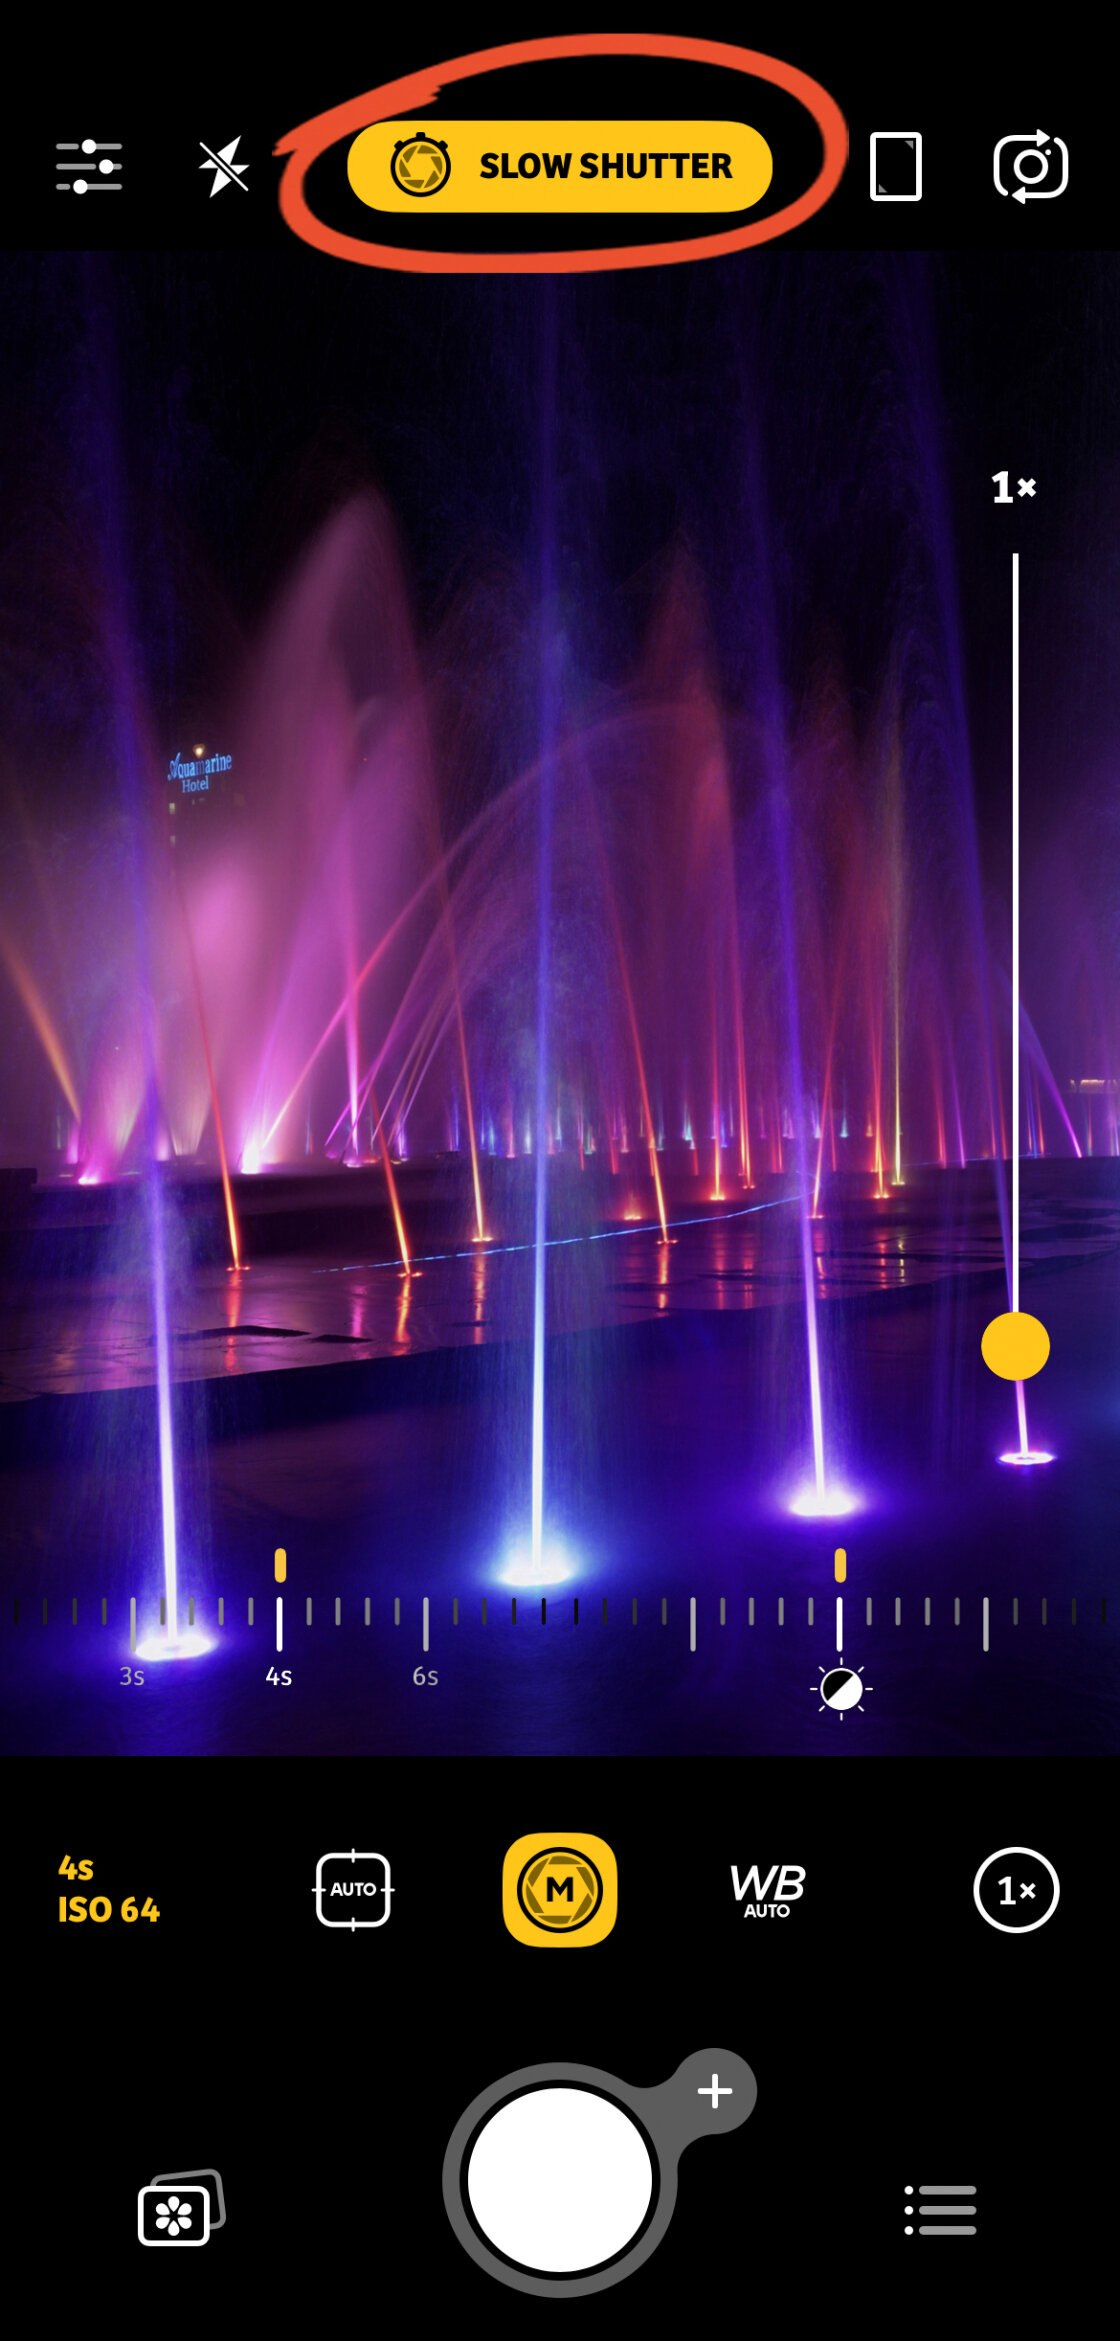
At the bottom of the viewfinder, you’ll see two sliders. The left slider controls shutter speed.
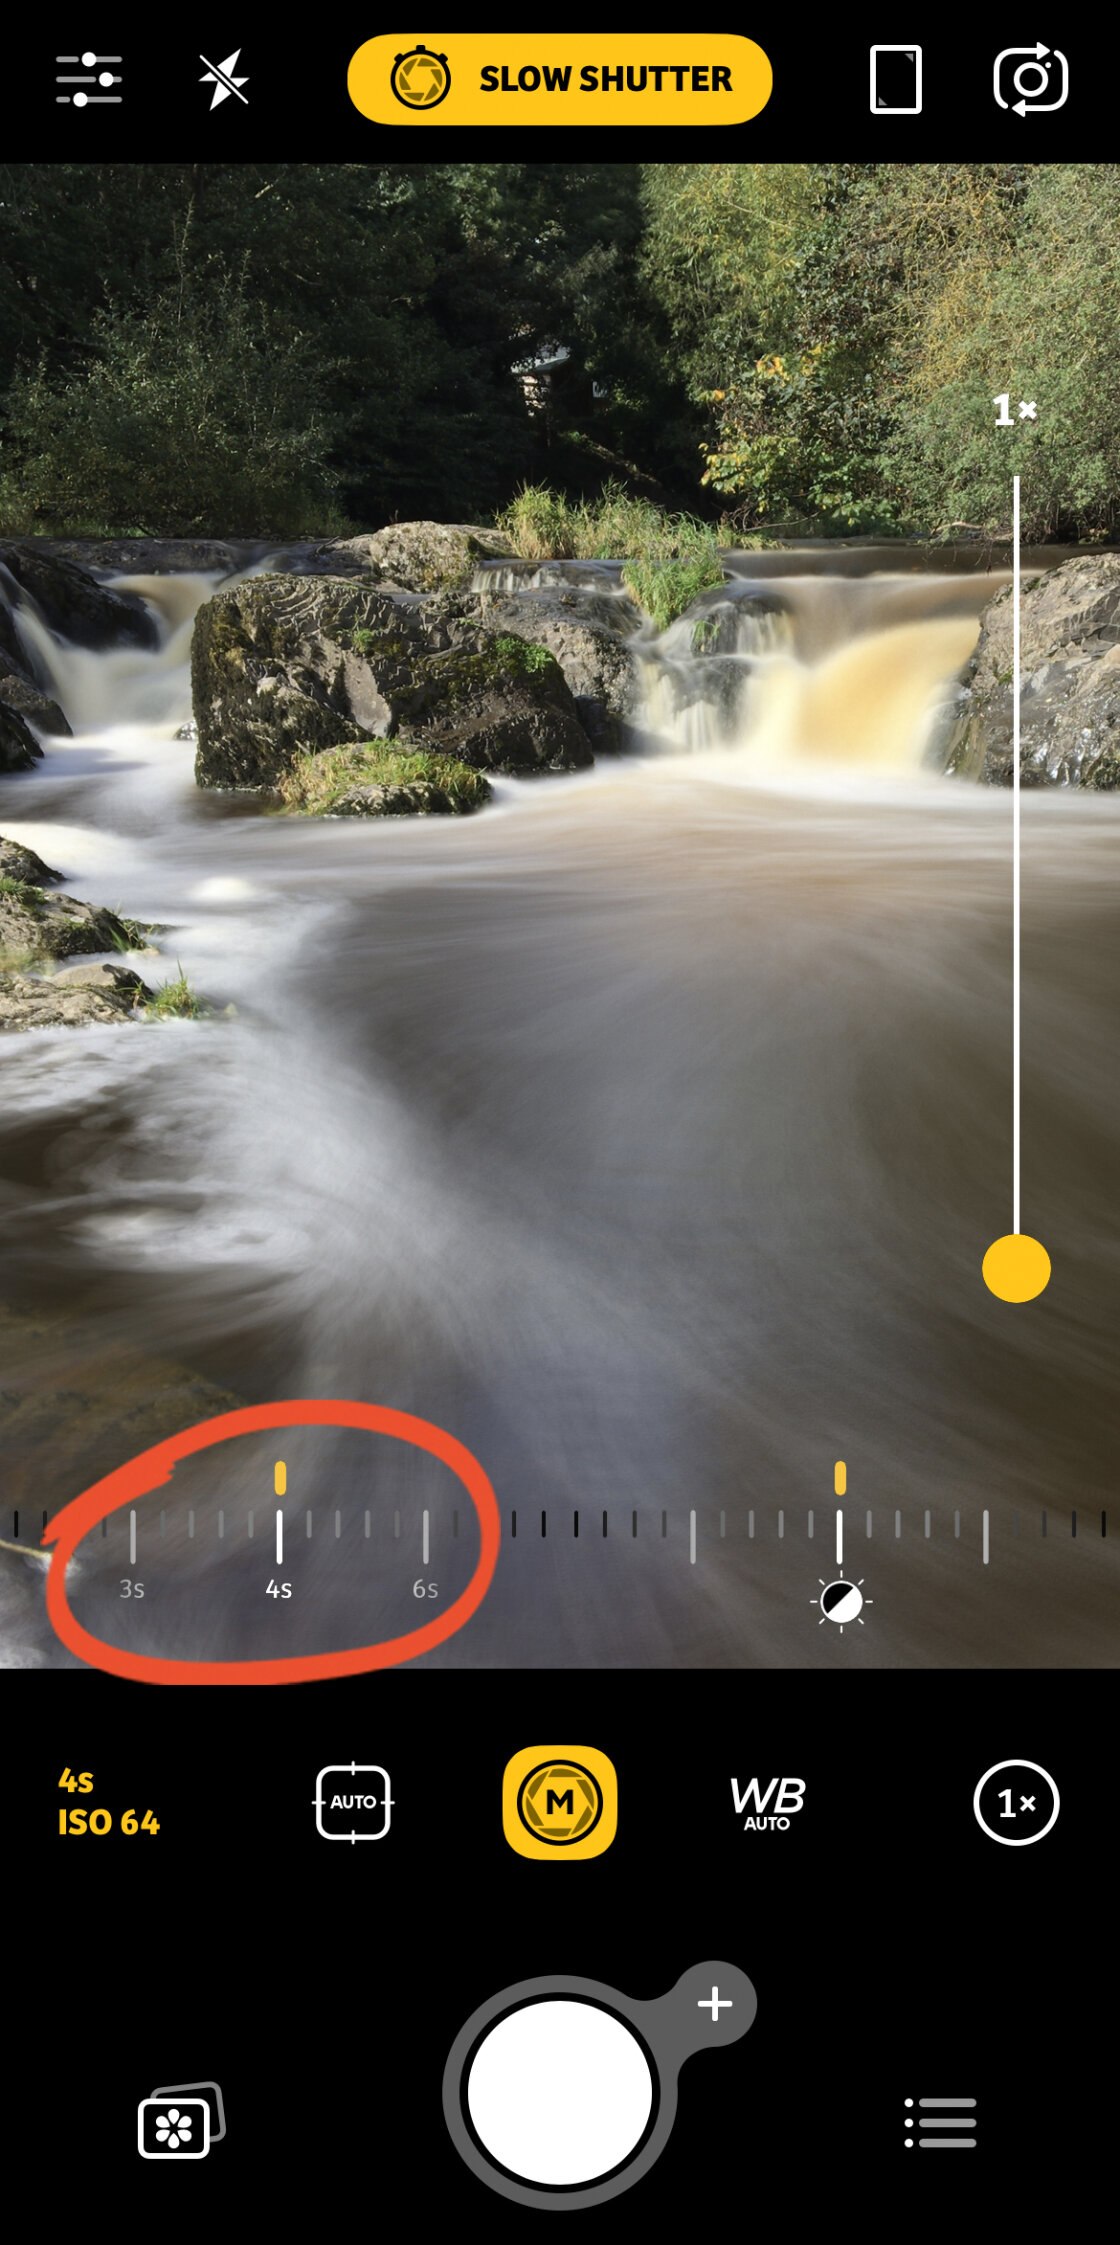
Drag the Shutter Speed slider to set the shutter speed value, e.g. 2 seconds, 15 seconds, 30 seconds, etc. The longer the shutter speed, the more blurred any motion will appear.
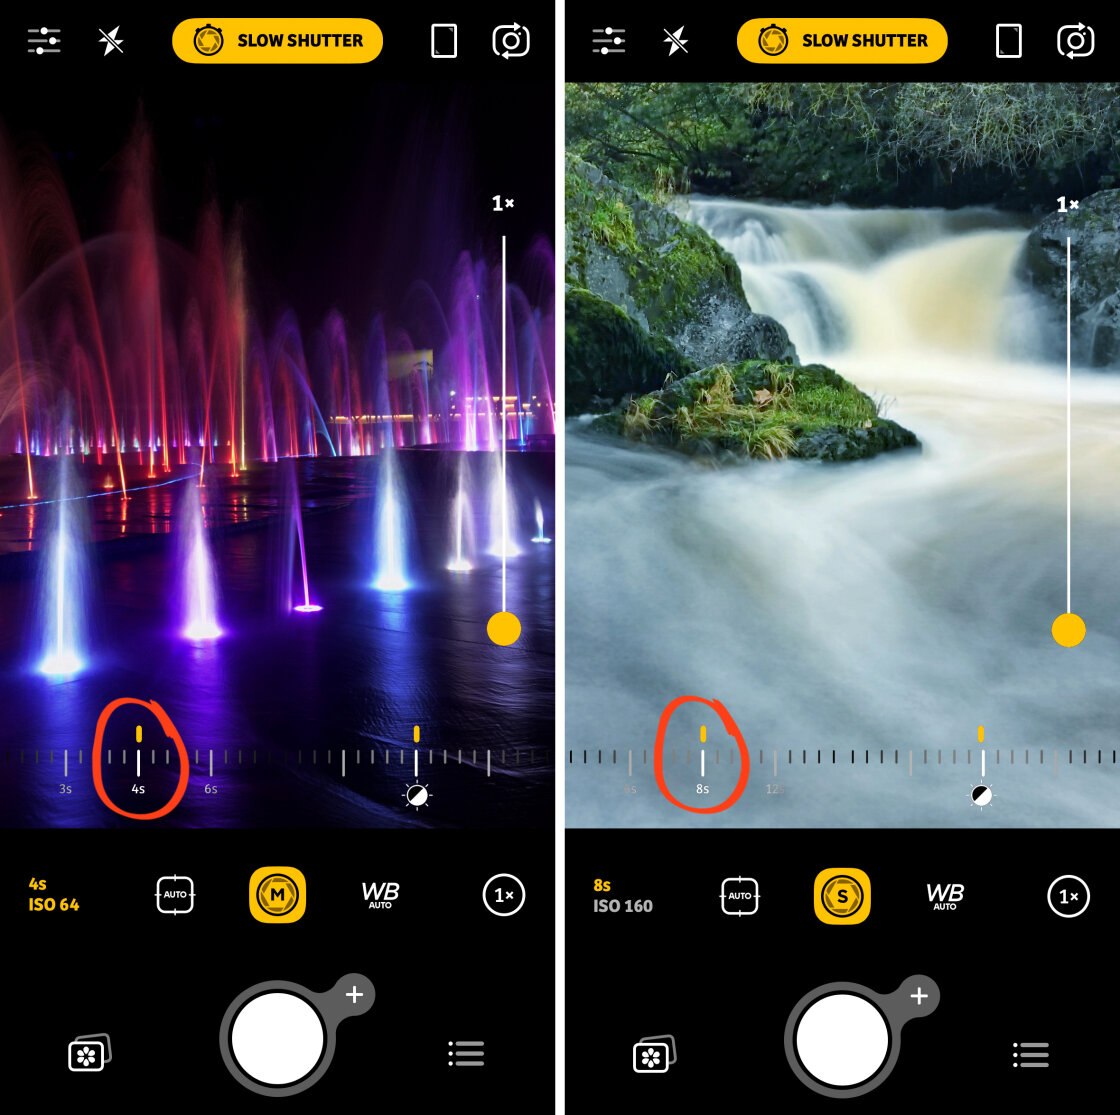
If you want to adjust exposure (brightness), use the right-hand slider with the Sun icon.
When you tap the shutter button to take your shot, ensure the camera remains perfectly still while the photo is being taken.
4.3.2 How To Shoot Long Exposure Photos Using Slow Shutter Cam
The Slow Shutter Cam app is designed specifically for shooting long exposure photos.
It makes it easy to capture long exposures of water, light trails, and low light scenes.
Open the Slow Shutter Cam app. Tap the Settings icon at the bottom left to open the capture mode options.
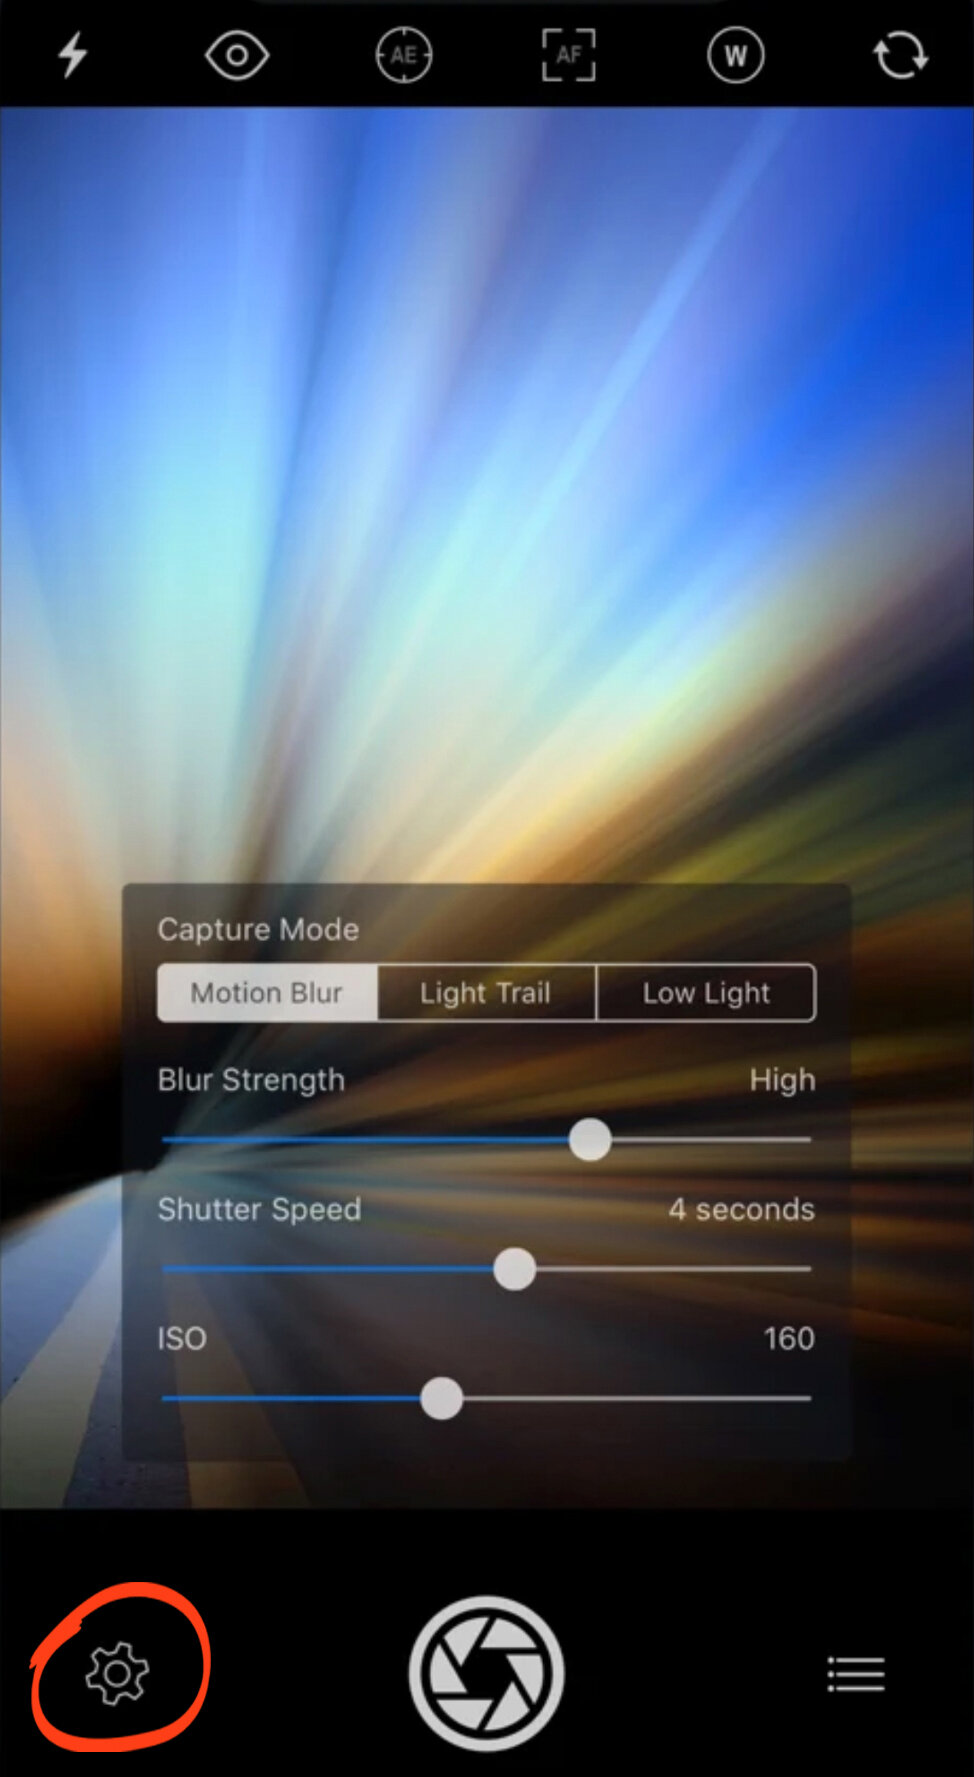
The app has three slow shutter capture modes: Motion Blur, Light Trail, and Low Light.
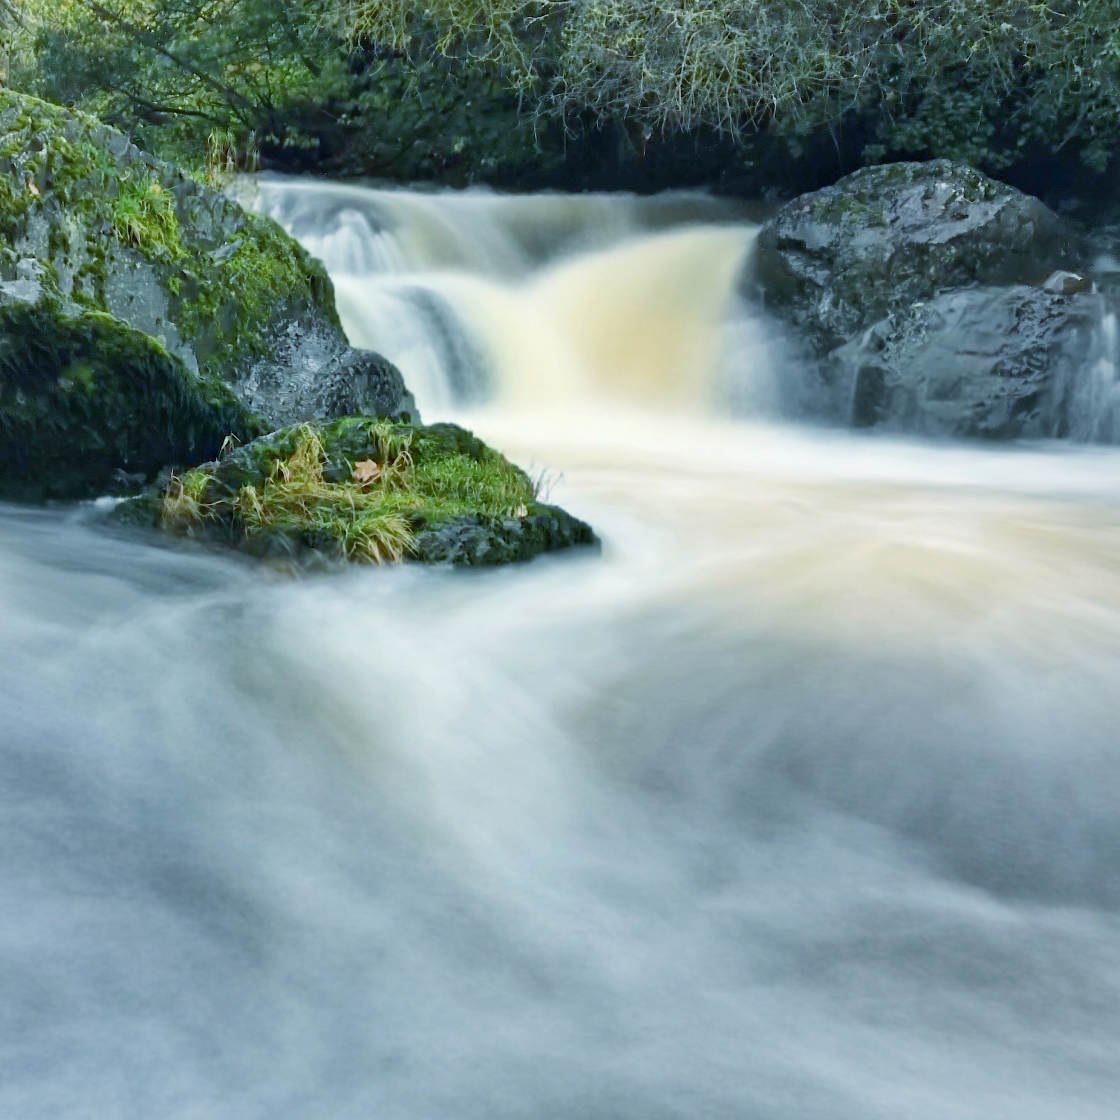
Motion Blur mode is perfect for creating long exposure water photos. But you can also use it to blur the motion of other moving subjects.
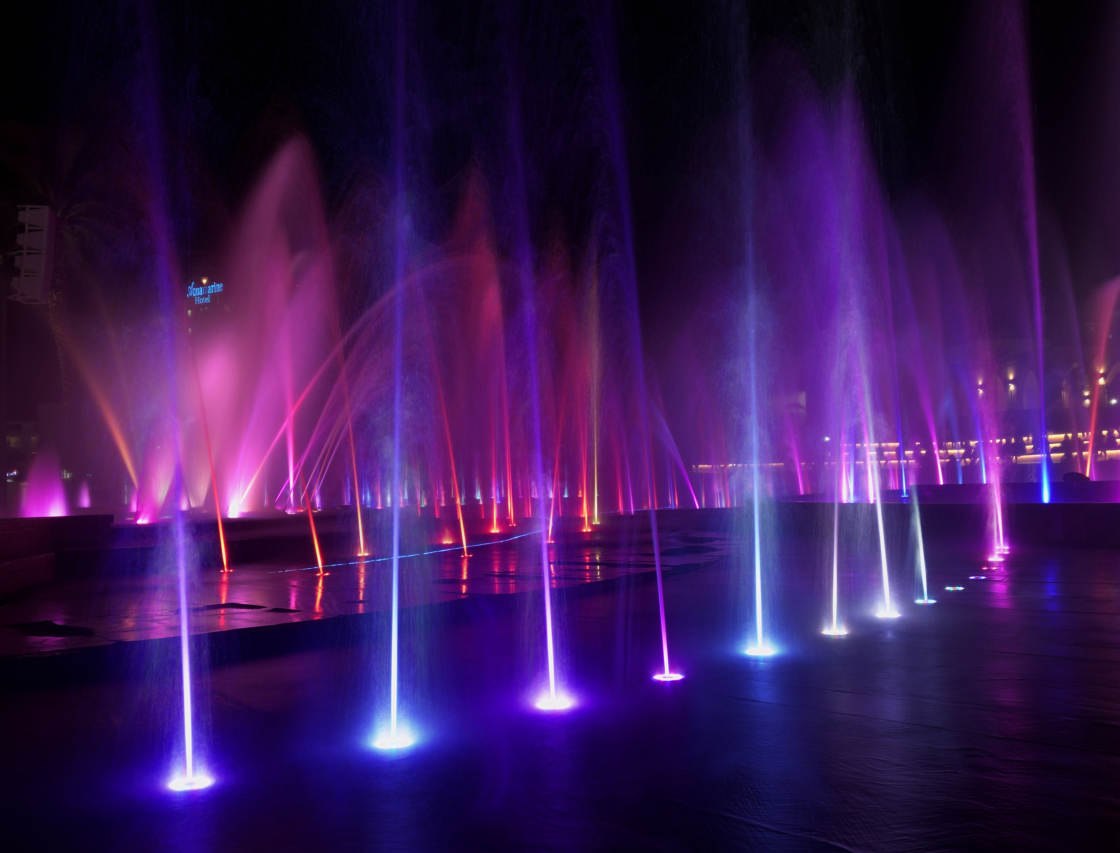
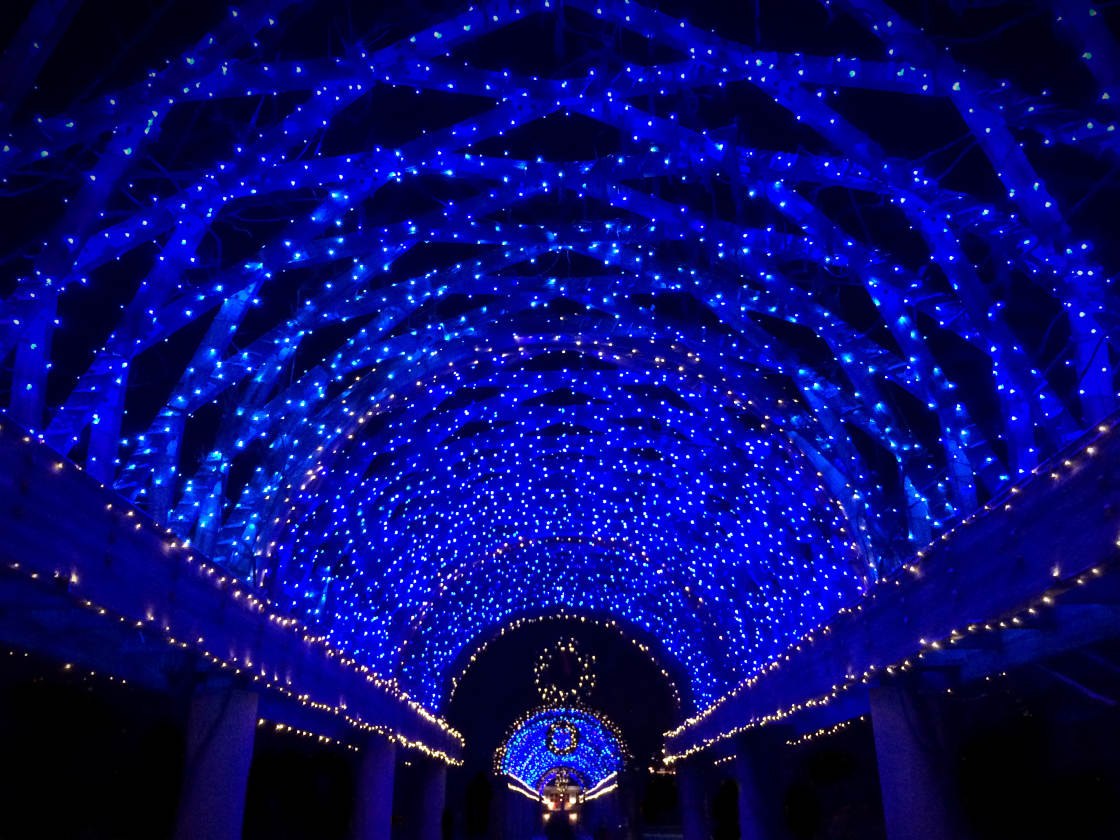
Light Trail mode lets you capture beautiful long exposure photos of moving lights. It’s great for photographing fireworks and car light trails.
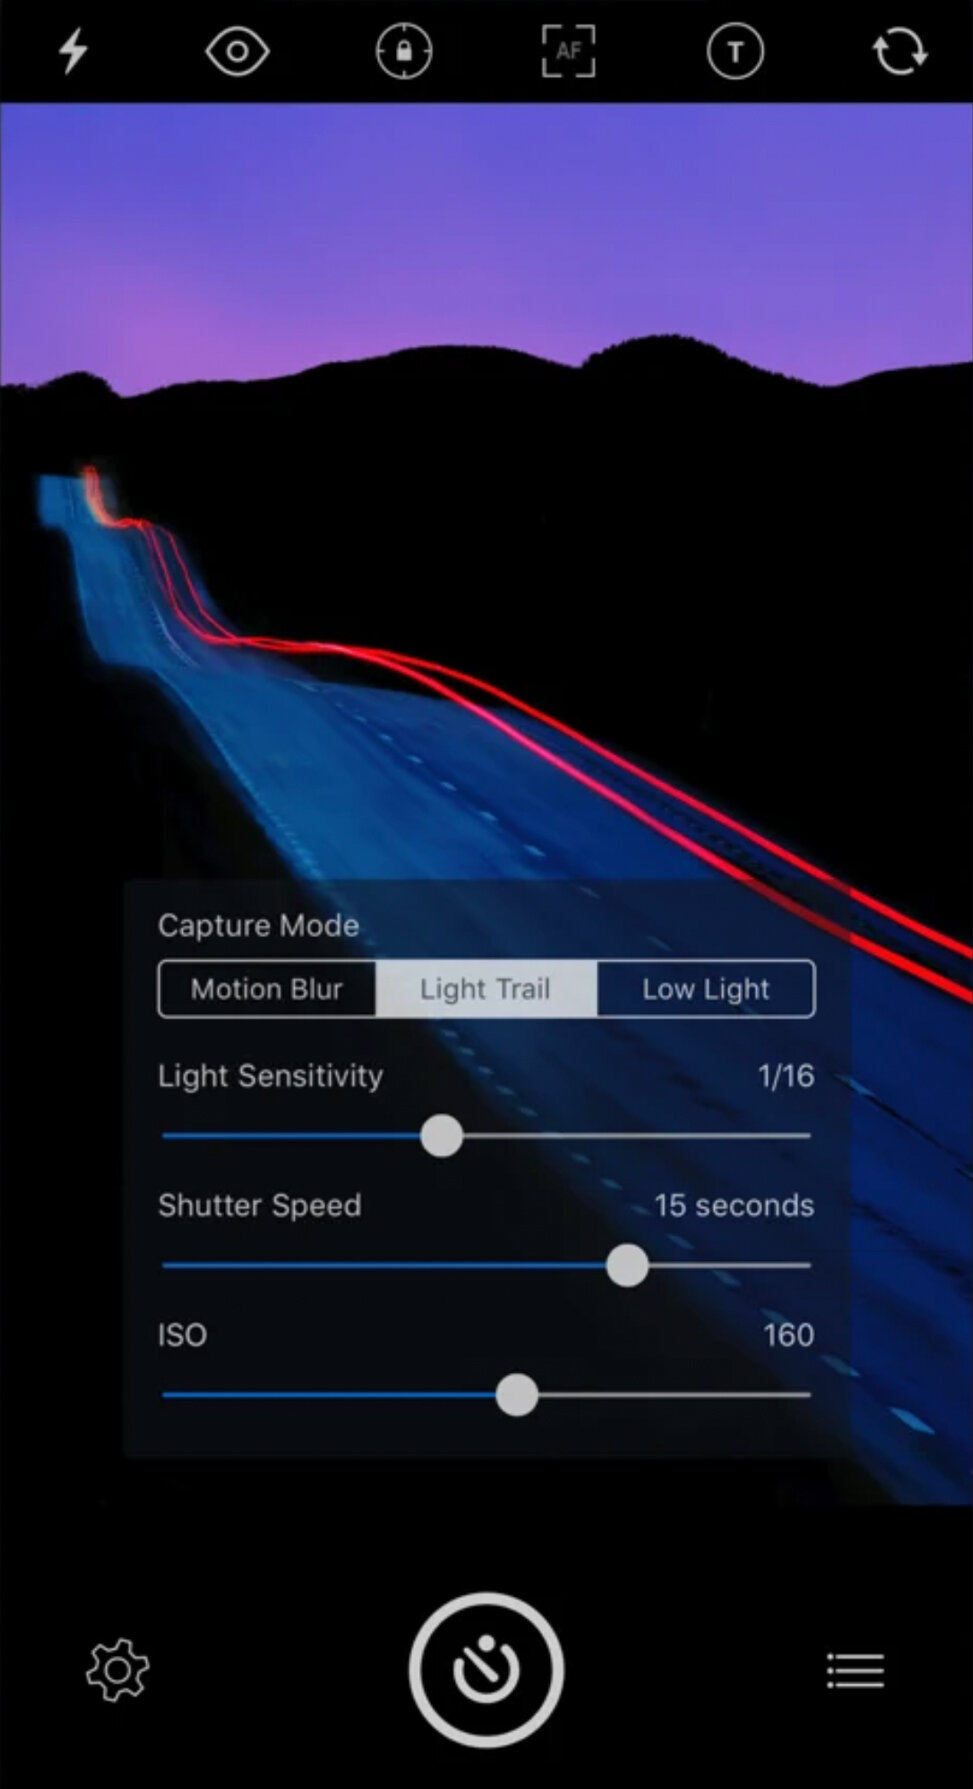
Low Light mode is useful for capturing brighter exposures when shooting at night.
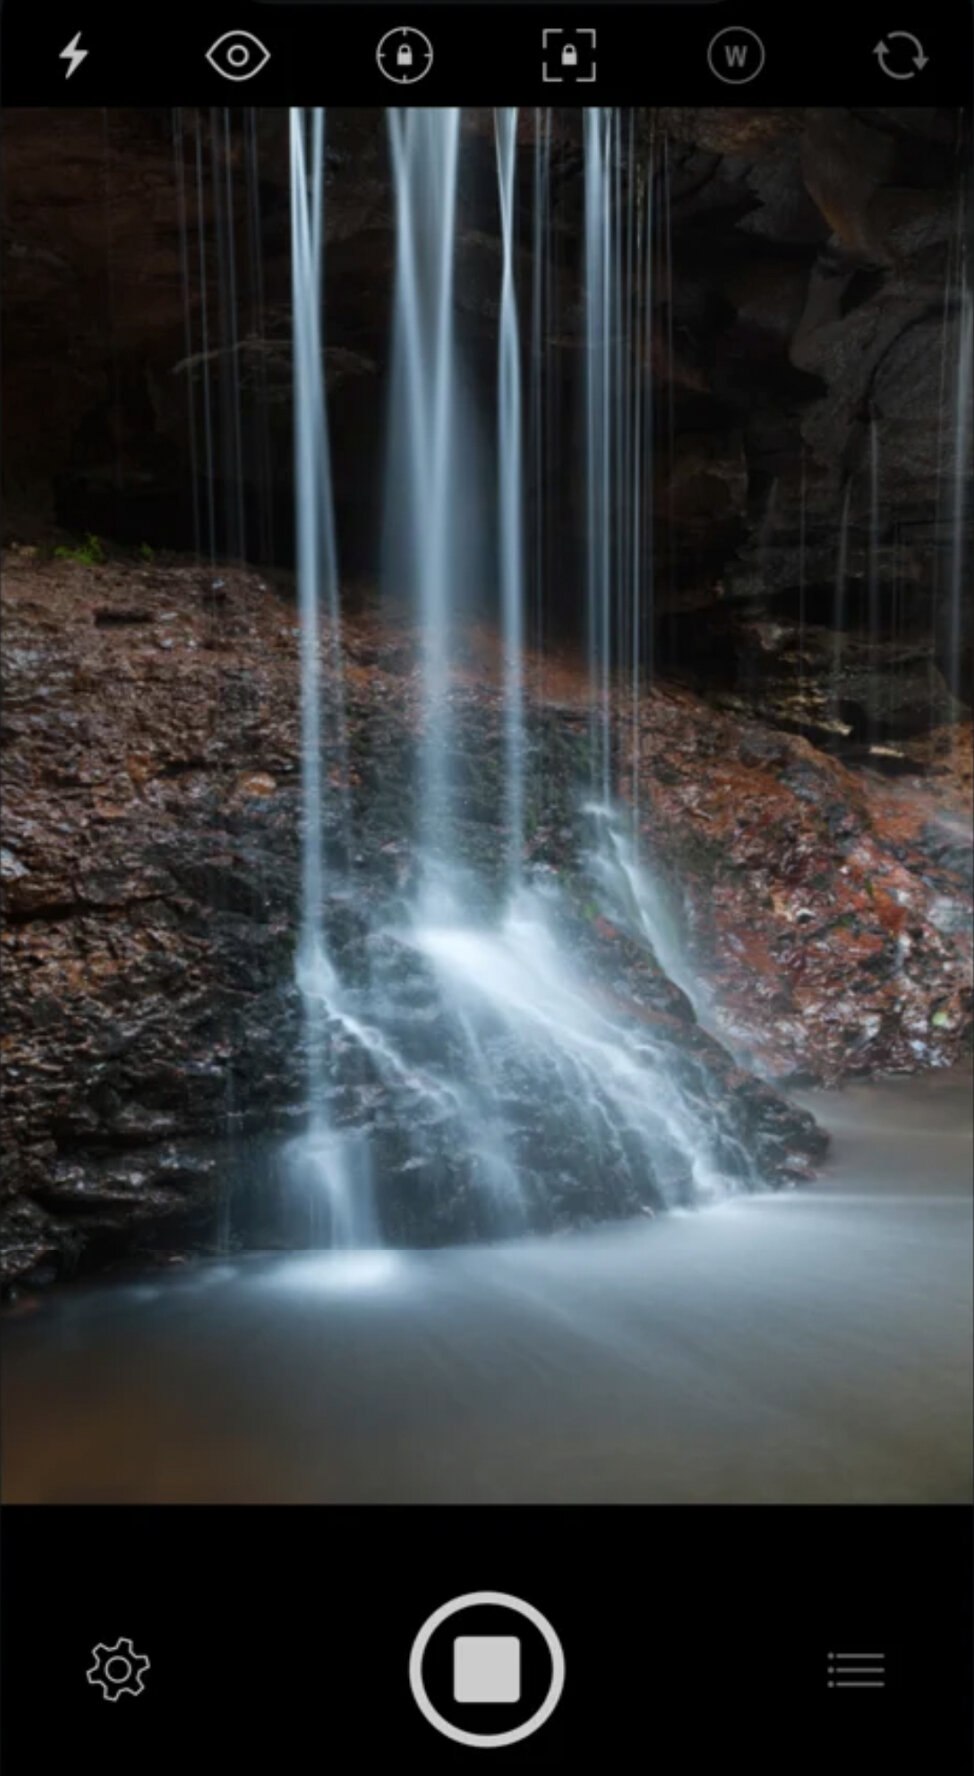
Each capture mode has a Shutter Speed slider. Drag the slider left for a faster shutter speed or right for a slower speed.
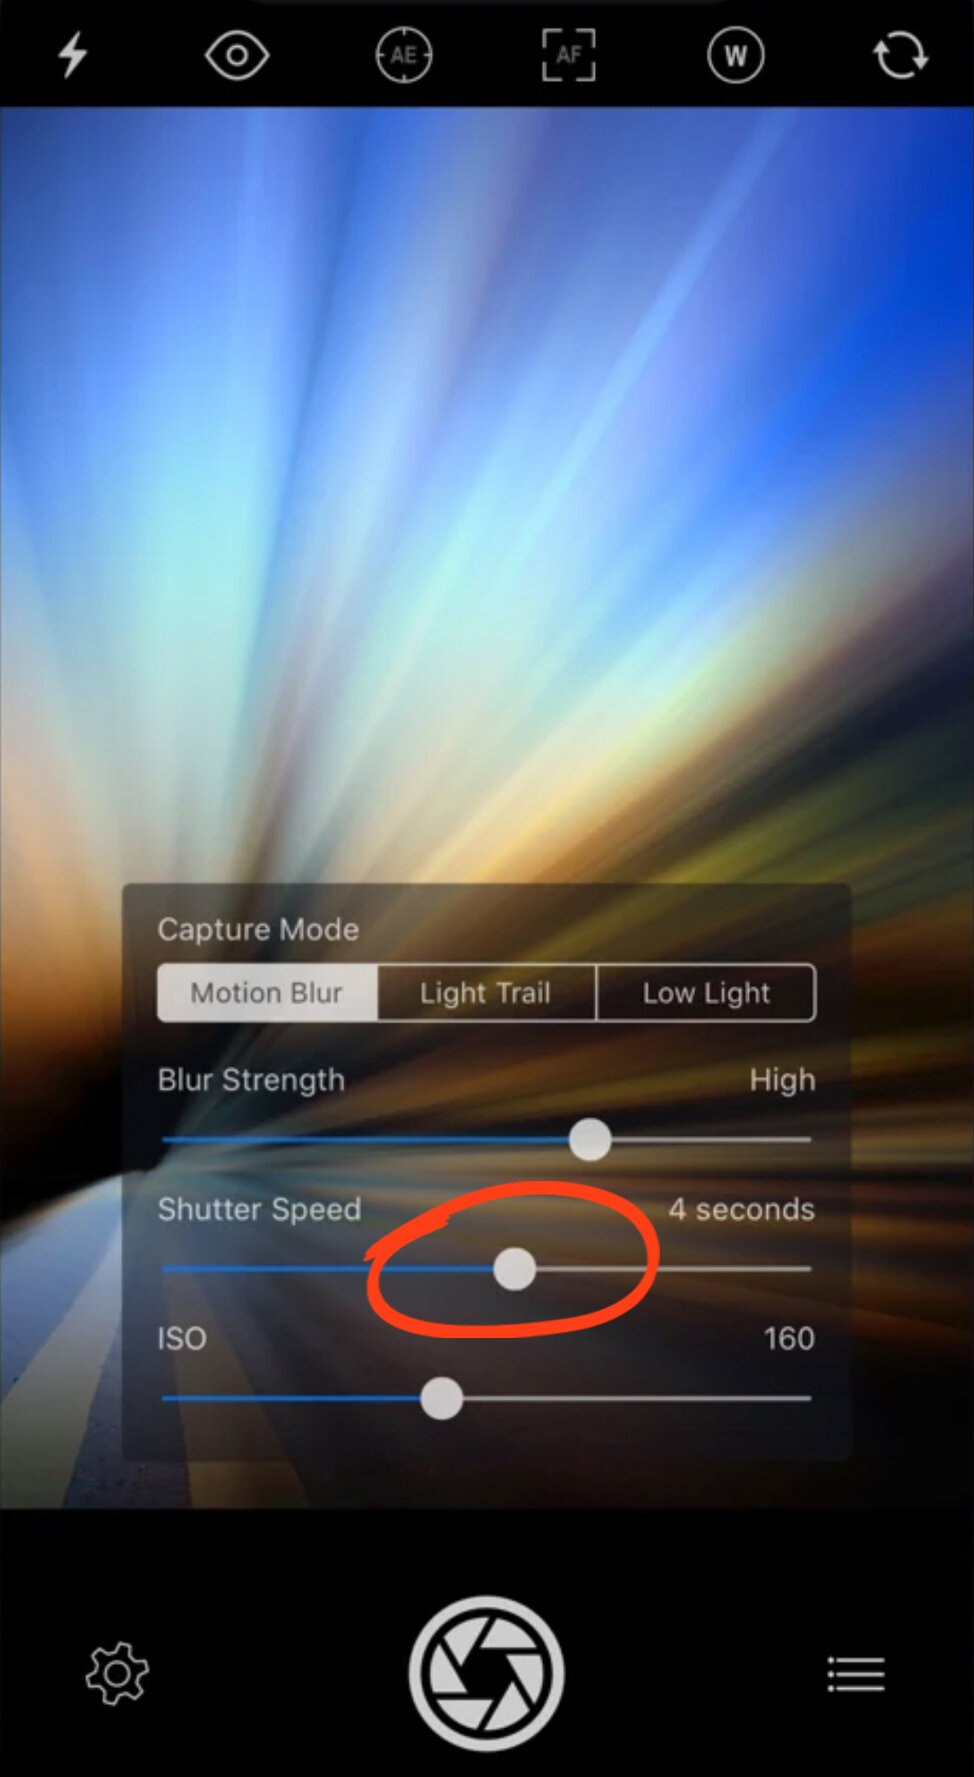
Dragging the Shutter Speed slider all the way to the right activates Bulb mode. This allows you to shoot with any shutter speed you want. Simply tap the shutter button to start the exposure, and tap again to finish taking the photo.
You can also experiment with the other sliders to fine-tune the image. For example, the Blur Strength slider lets you control how blurred the movement appears.
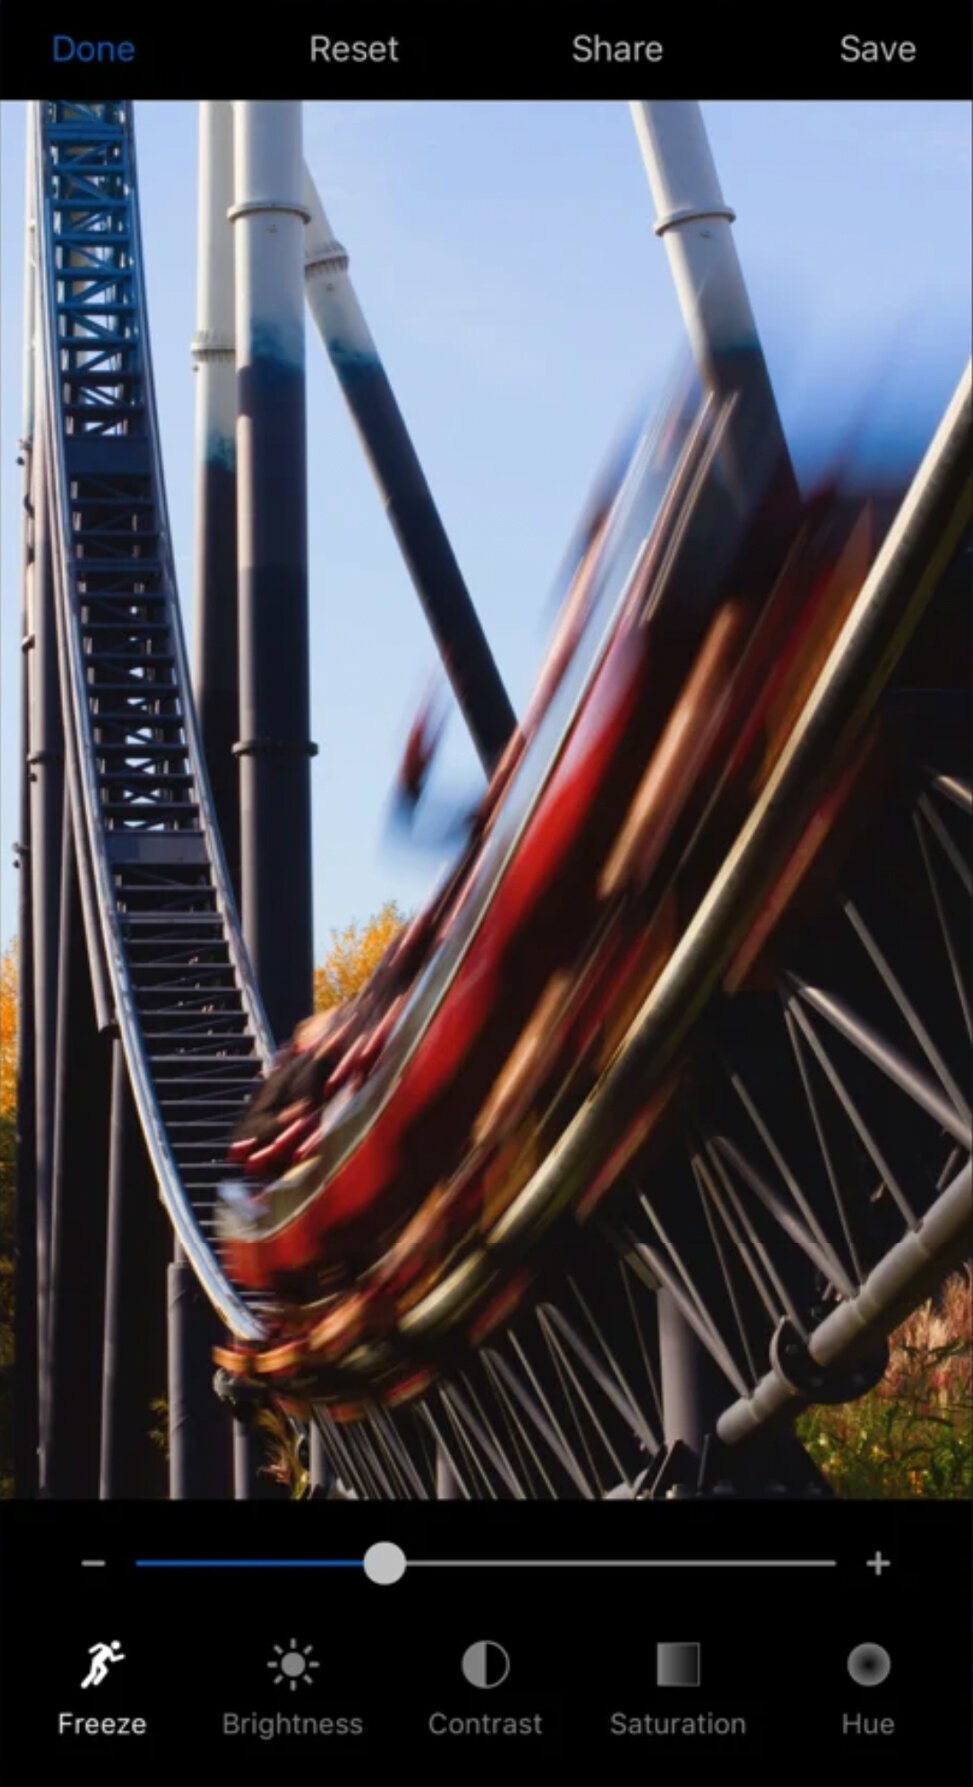
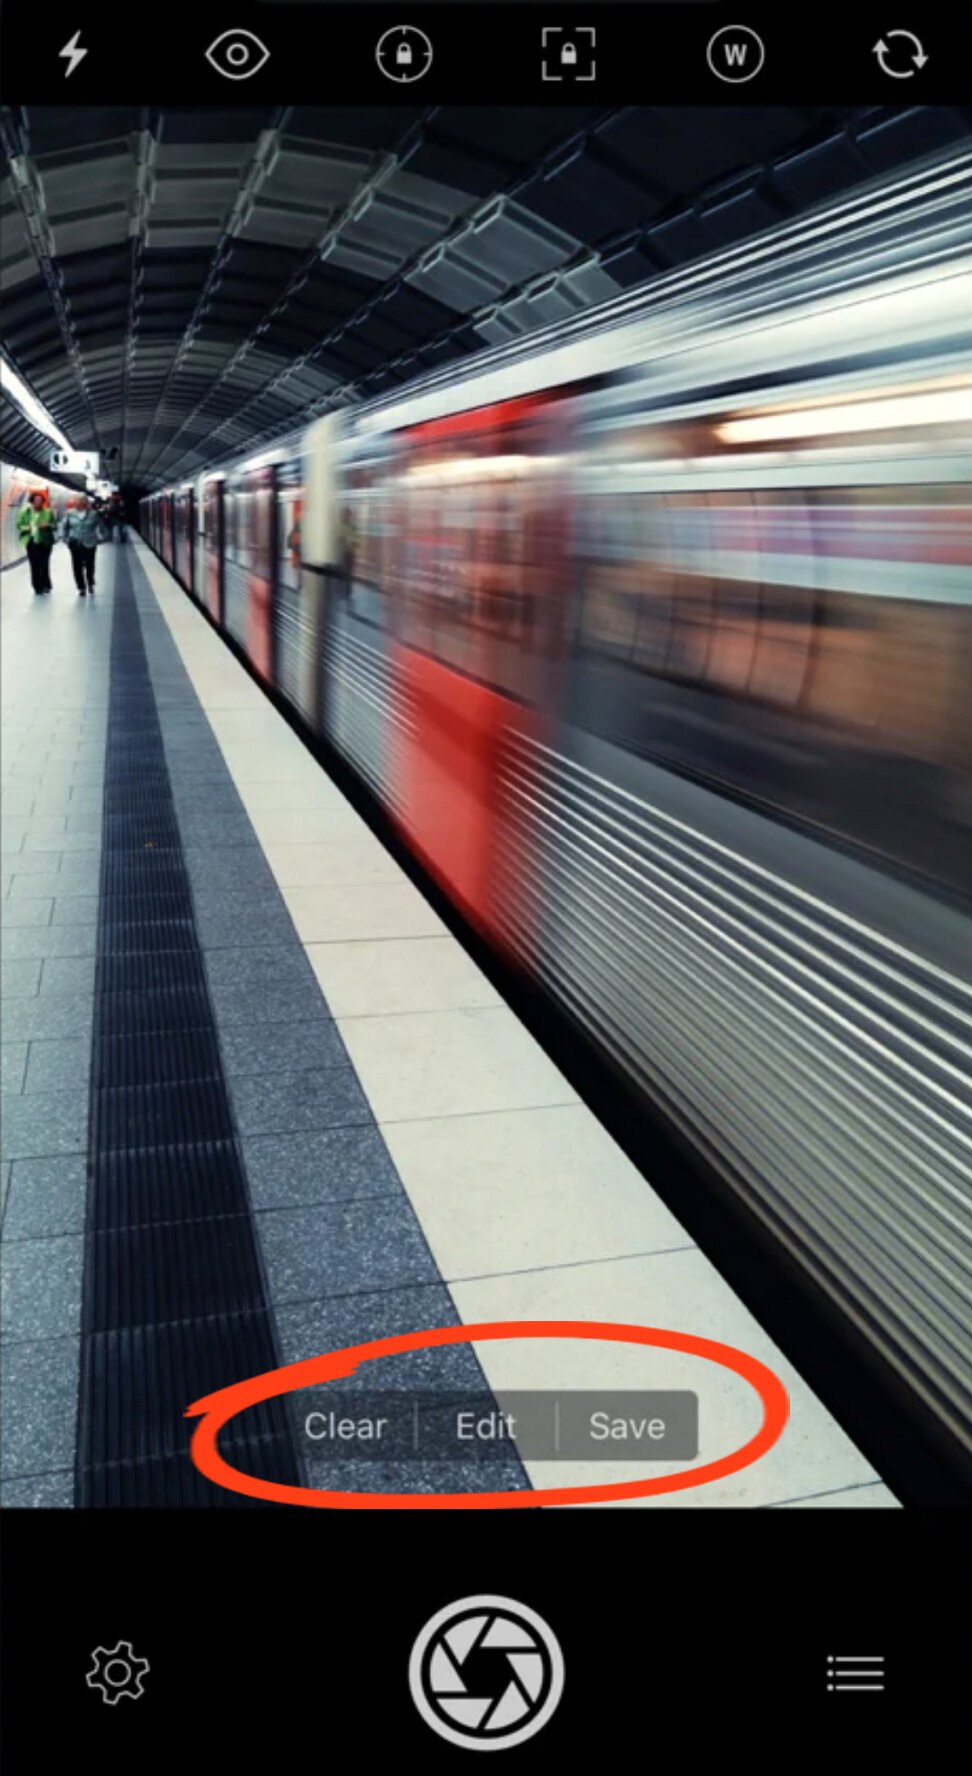
After taking a photo, you can edit it by tapping Edit at the bottom of the screen. Use the icons at the bottom of the screen to edit your image, then tap Done.
Tap Save to save your image. Or tap Clear to discard it.
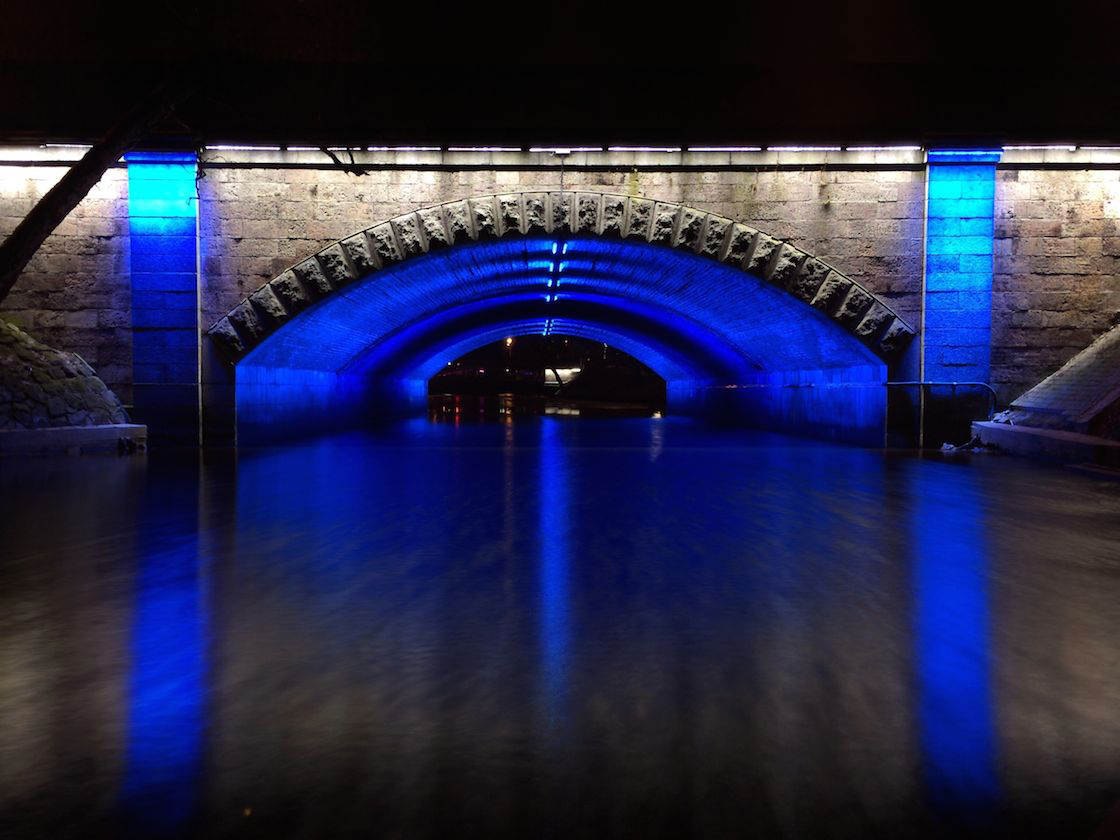
Using a slow iPhone shutter speed allows you to push the limits of your mobile photography.
With a little imagination, you can take your creativity to a whole new level!
5. ISO: How To Use ISO To Capture Grain-Free Shots In Low Light
Another useful iPhone manual camera setting is ISO.
In this section, you’ll discover how to use ISO to capture sharp, grain-free iPhone photos in low light.
Note that if you have one of the iPhone 11 models, you can use the new Night mode feature to capture stunning night photos.
5.1 What Is ISO?
ISO controls how sensitive the camera’s sensor is to light. The higher the ISO, the more sensitive the sensor is to light.
This means that ISO affects exposure (brightness). Essentially, the camera can record more light at high ISO settings.
This can come in handy when shooting in low light. However, there’s a big downside to using a high ISO.
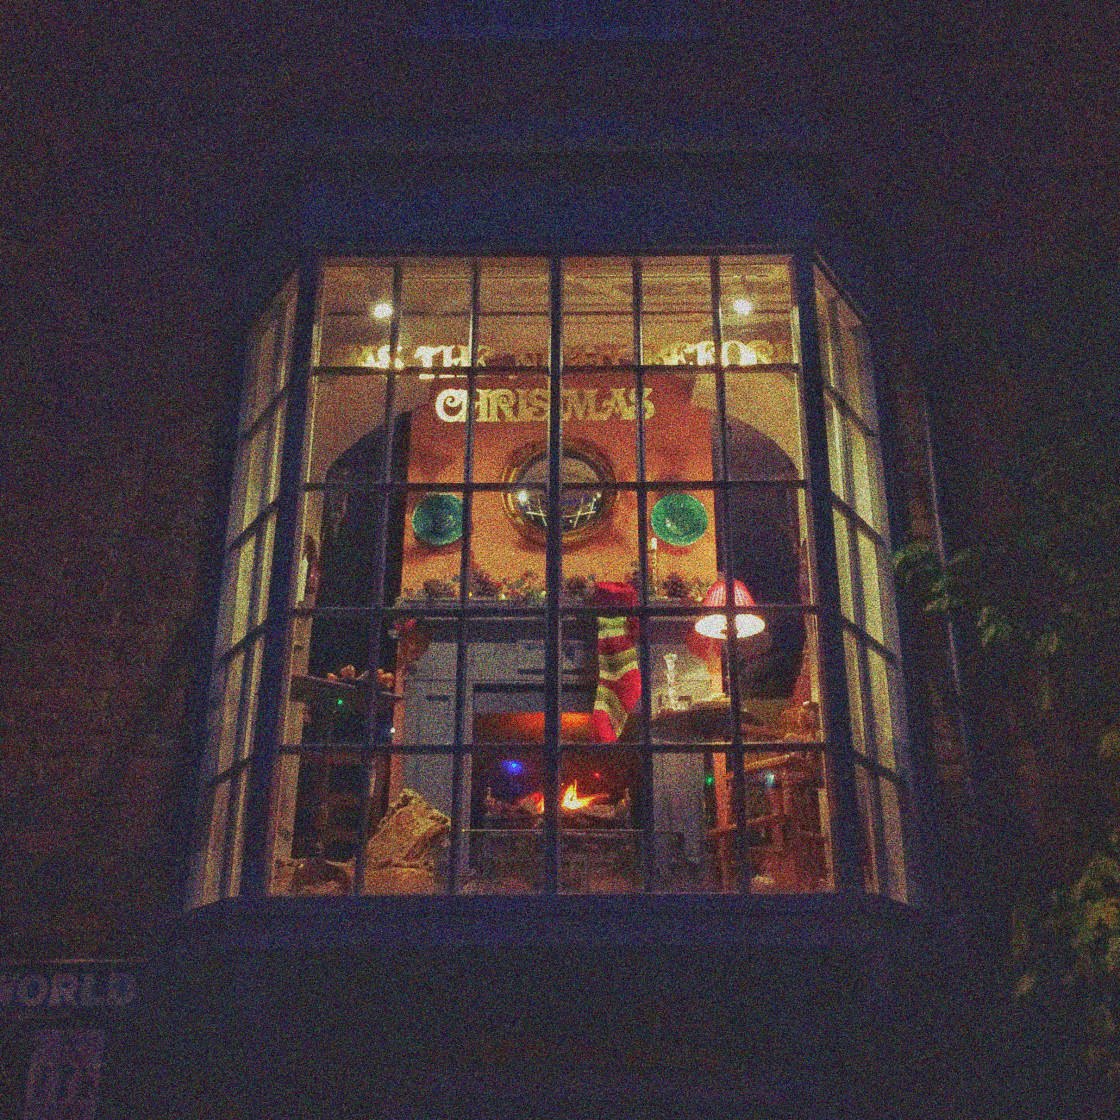
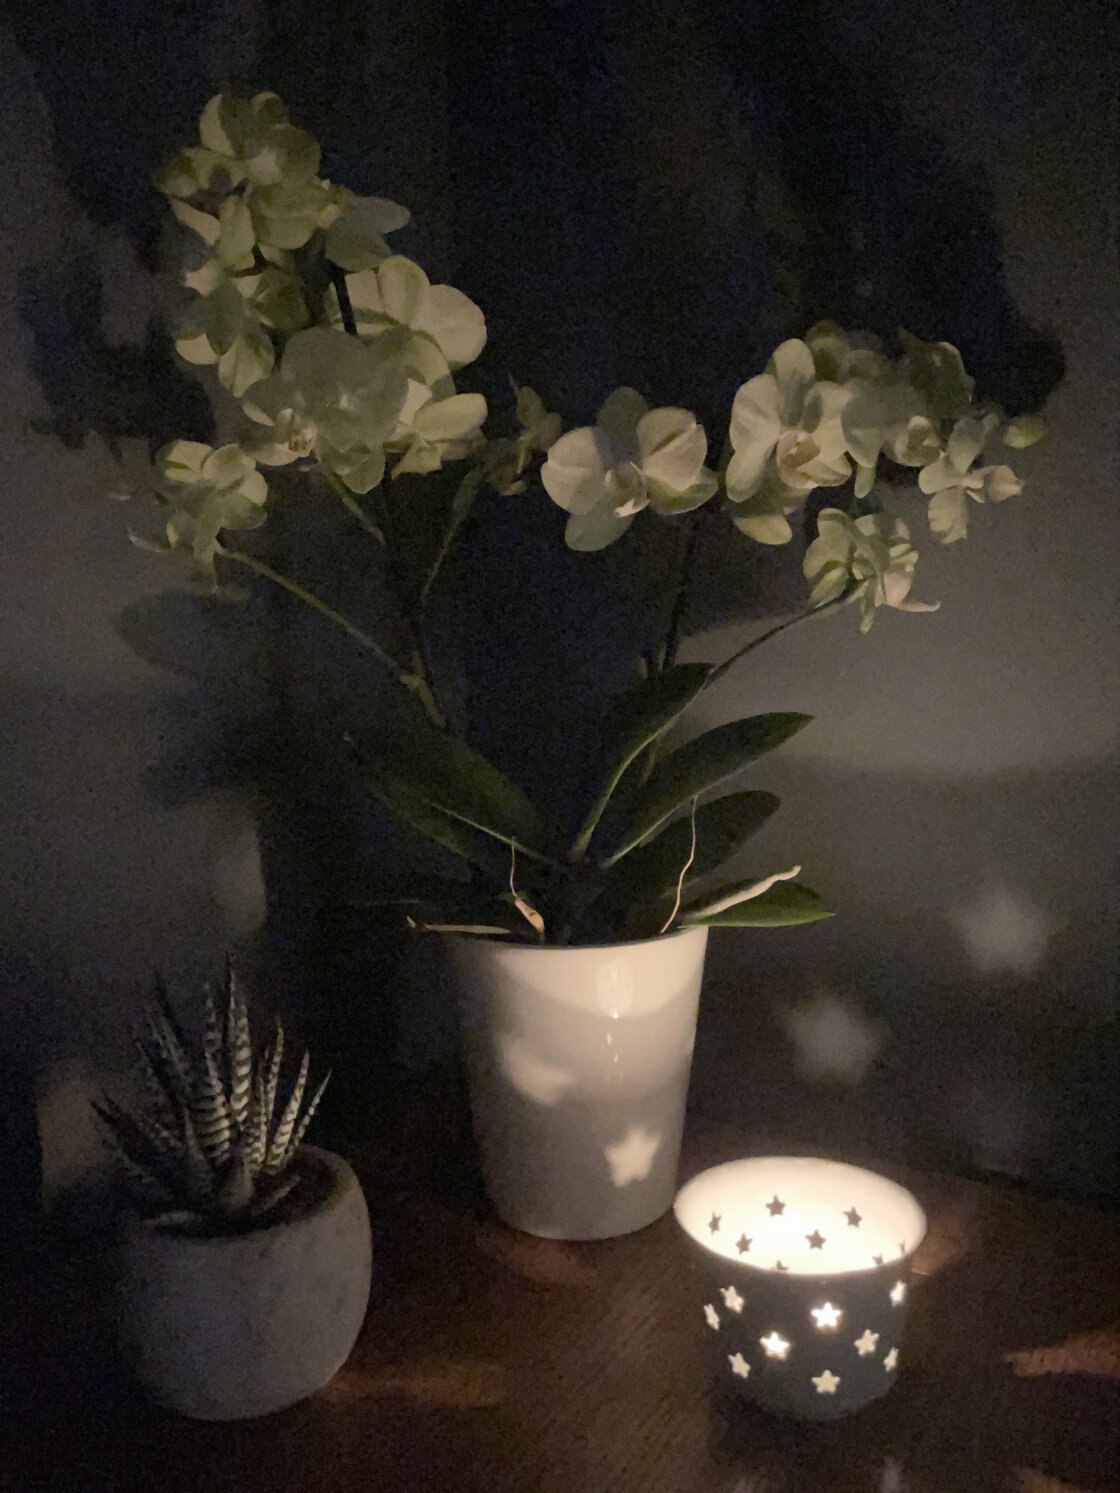
Unfortunately, high ISO settings introduce unwanted grain into your photos (as shown below). The grain is especially visible in the darker areas of the image.
Grain reduces the quality of your photo. So you’ll want to avoid high ISO settings if possible. The photo below was shot with a much lower ISO, and the resulting image is free of grain.

5.2 How To Change The ISO iPhone Camera Setting
The built-in Camera app doesn’t let you change ISO. Instead, it automatically selects an appropriate ISO setting, depending on how much light is in the scene.
In low light, the camera will likely use a high ISO in order to capture more light. That’s why you often end up with grainy photos when shooting in dark conditions.
But there is a way to take control of the ISO iPhone settings yourself. And if you do this, you can choose a lower ISO to avoid getting grainy shots.
So how do you change ISO on iPhone? You use the Camera+ 2 app!
Open Camera+ 2, and select Manual shooting mode at the top of the screen. Then tap the Shutter Speed icon above the shutter button.
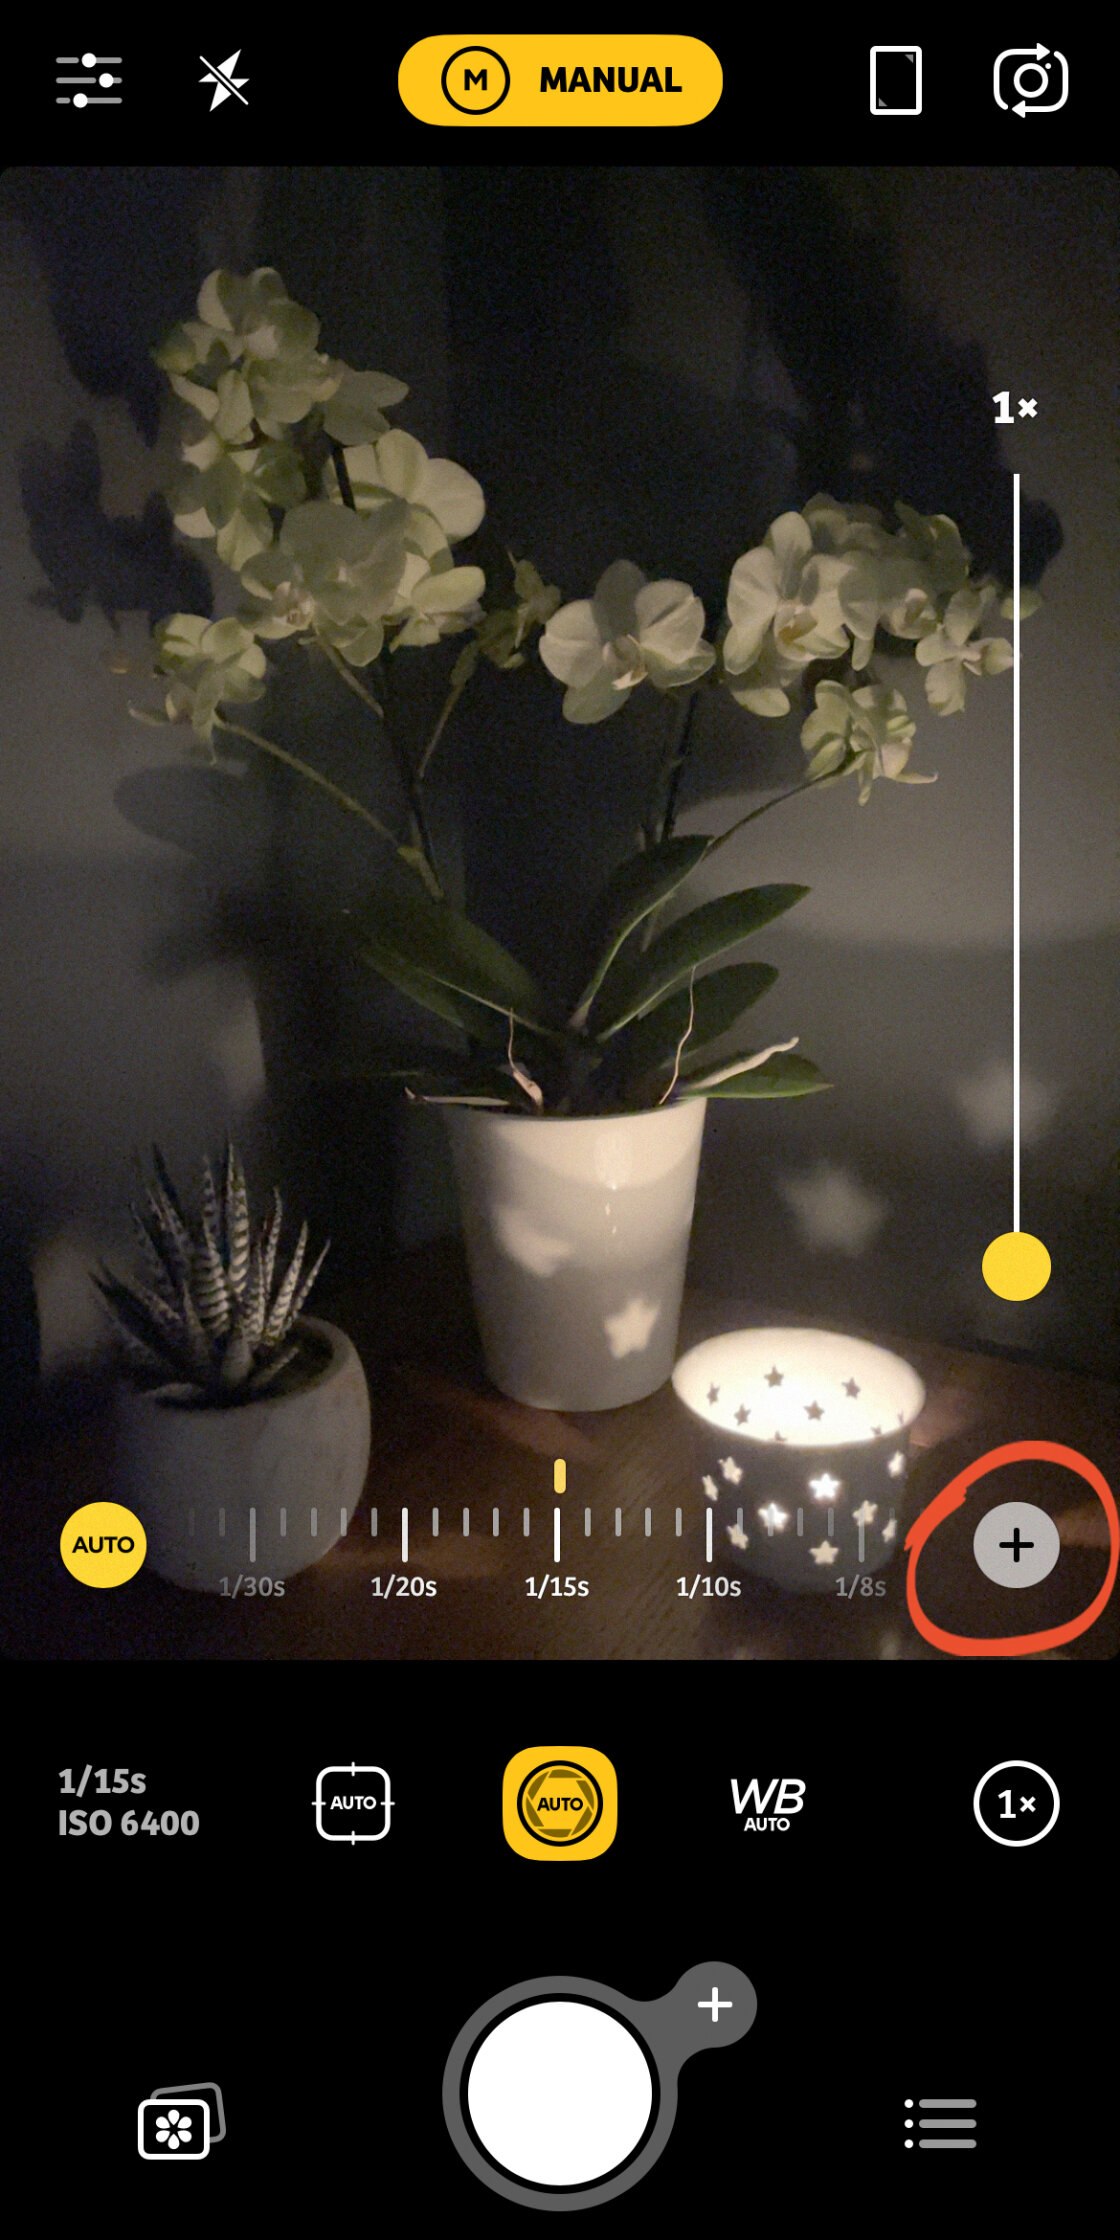
You can see the current shutter speed and ISO values on the left beneath the slider. In the example below, the shutter speed is 1/15s and the ISO is 6400.
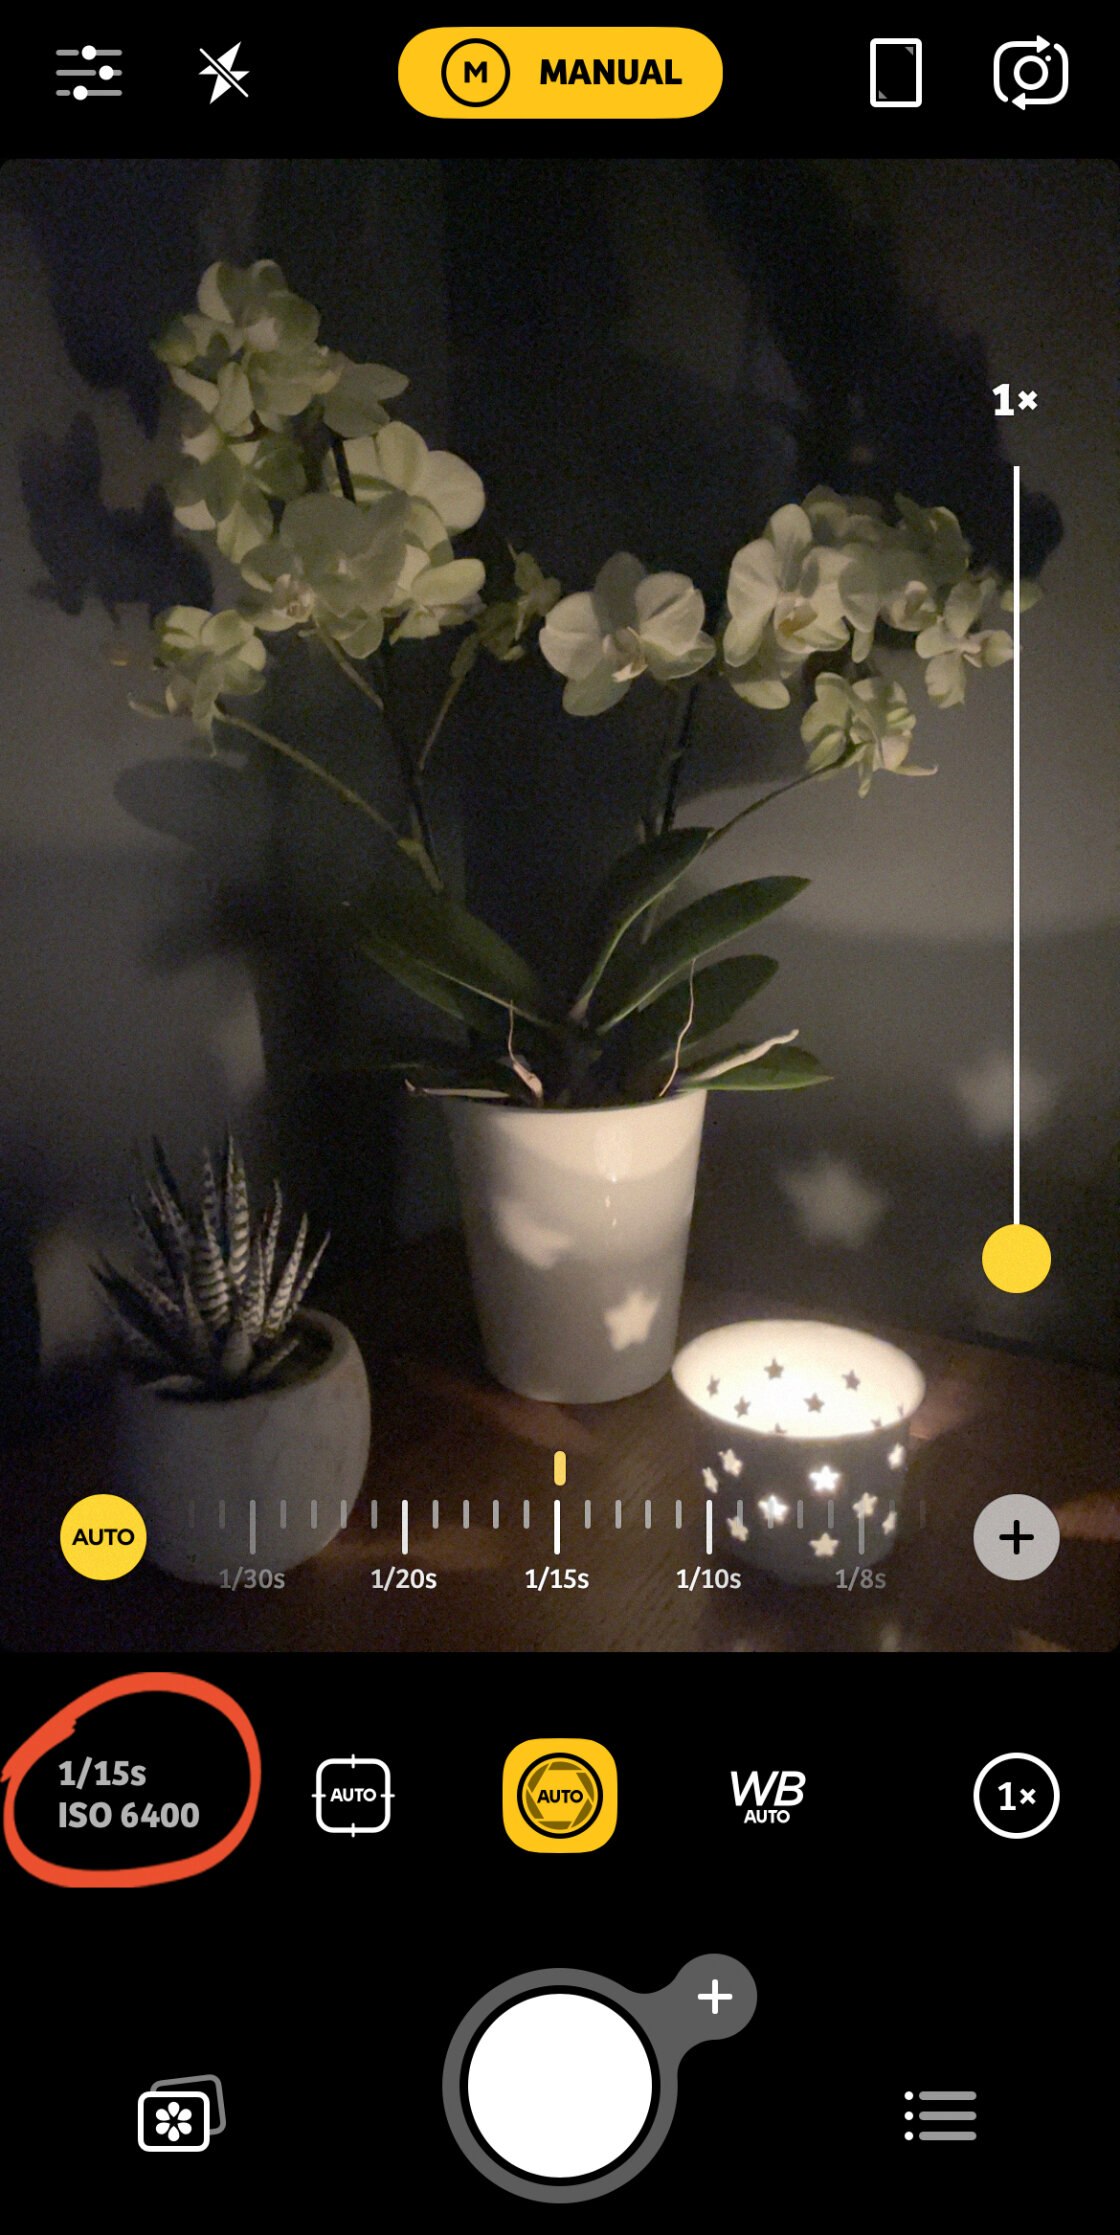
ISO 6400 is the highest ISO value in Camera+ 2. The camera has chosen this high ISO because there was very little light in the scene.
But the high ISO results in an image with a lot of digital noise (grain)… which doesn’t look good.
To change the ISO, tap the + (plus) icon to the right of the shutter speed slider.
You’ll now see two sliders: Shutter Speed on the left, and ISO on the right. Drag the ISO slider to adjust the setting.
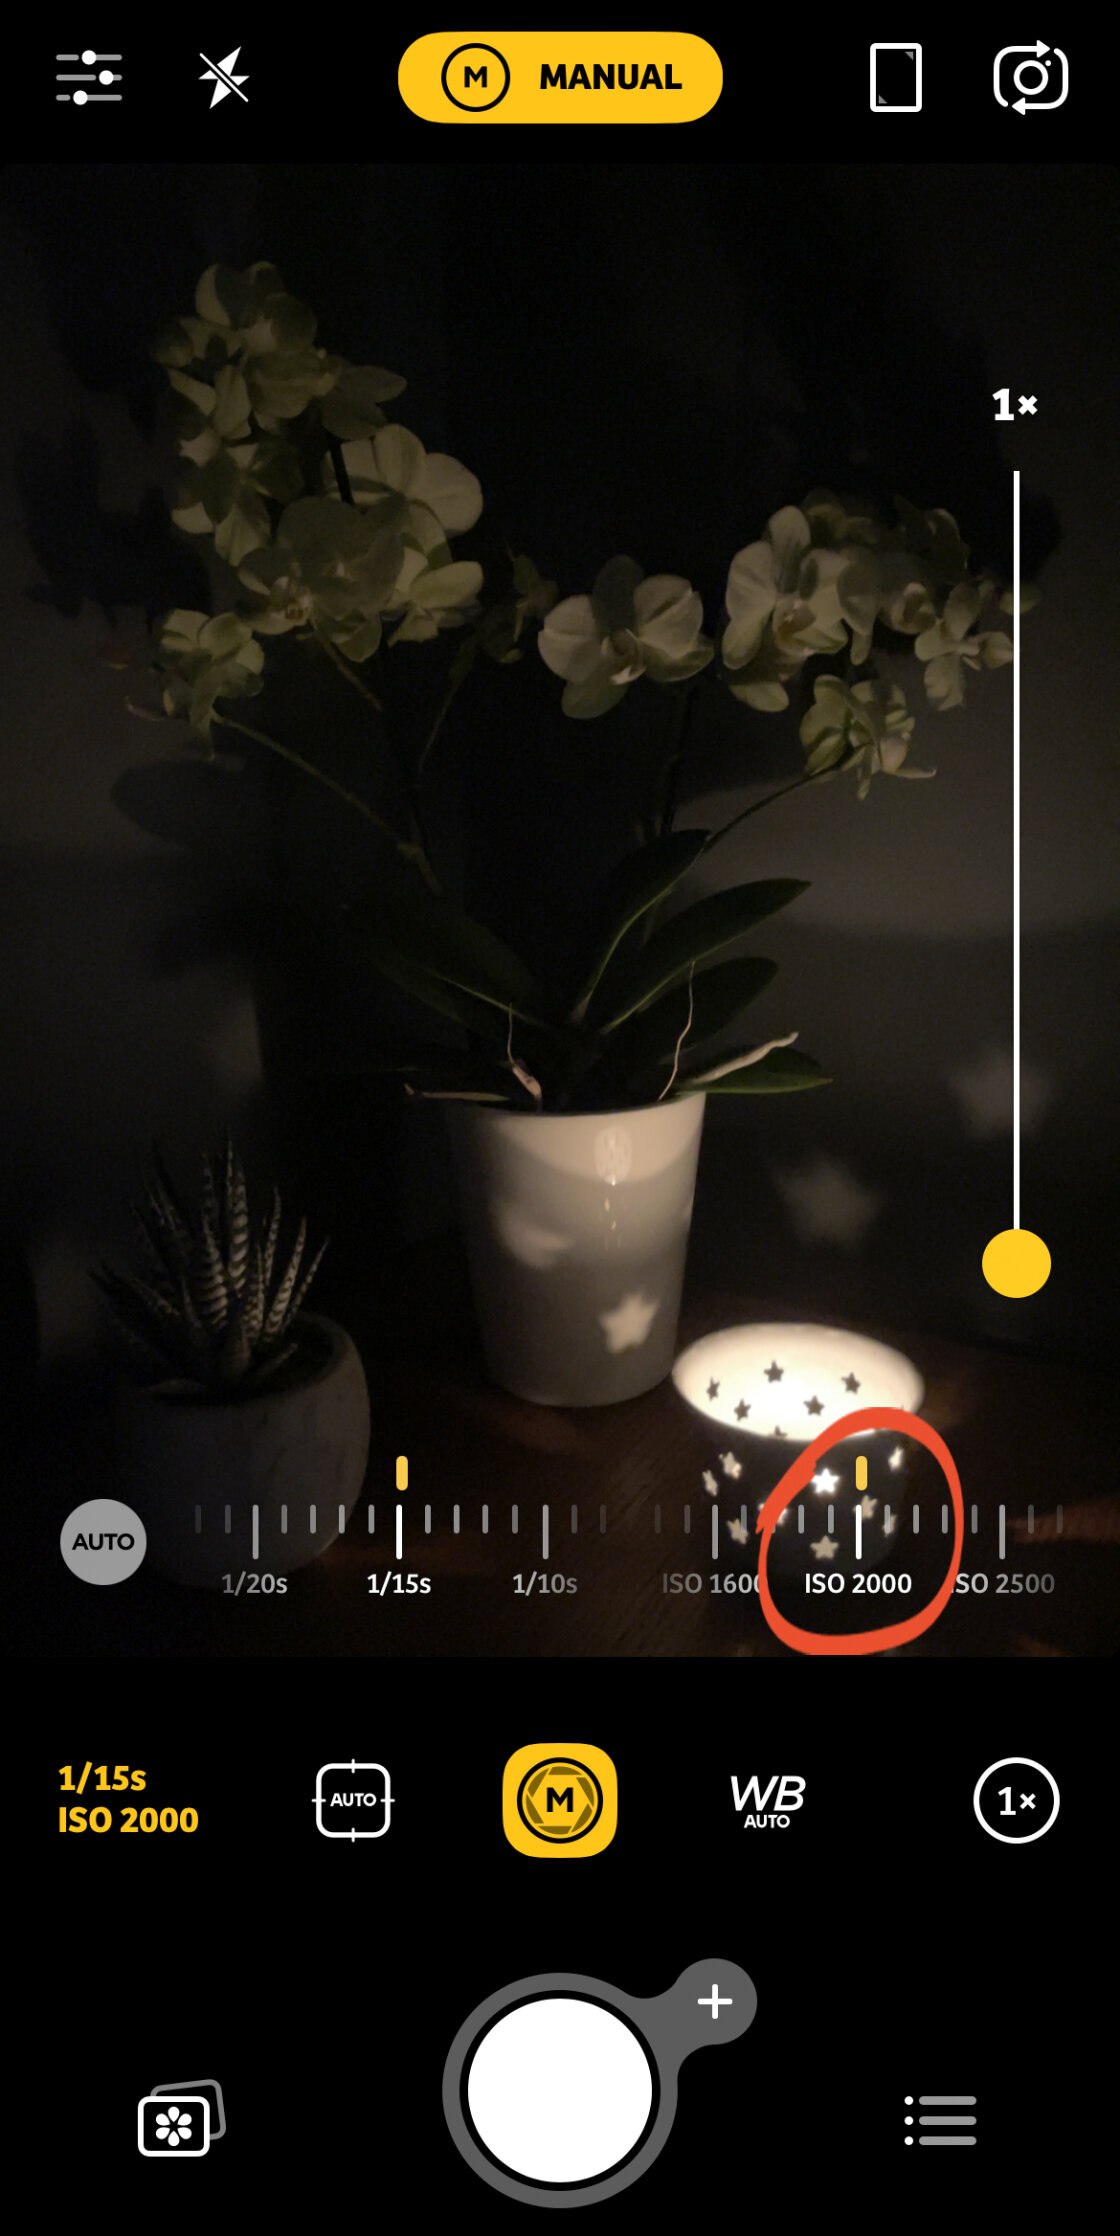
The higher the ISO value, the more light the camera will capture – but the grainier the photo will be. The lower the ISO, the darker the image will appear – but it will have less grain.
So your aim is to choose the lowest ISO setting that still gives you a decent exposure.
But there’s a bit more to it than this…
5.3 Balance Shutter Speed & ISO
If you reduce the ISO to a low value, your image might appear too dark.
However, you can get the camera to capture more light by telling it to use a slower shutter speed. Simply use the Shutter Speed slider on the left.
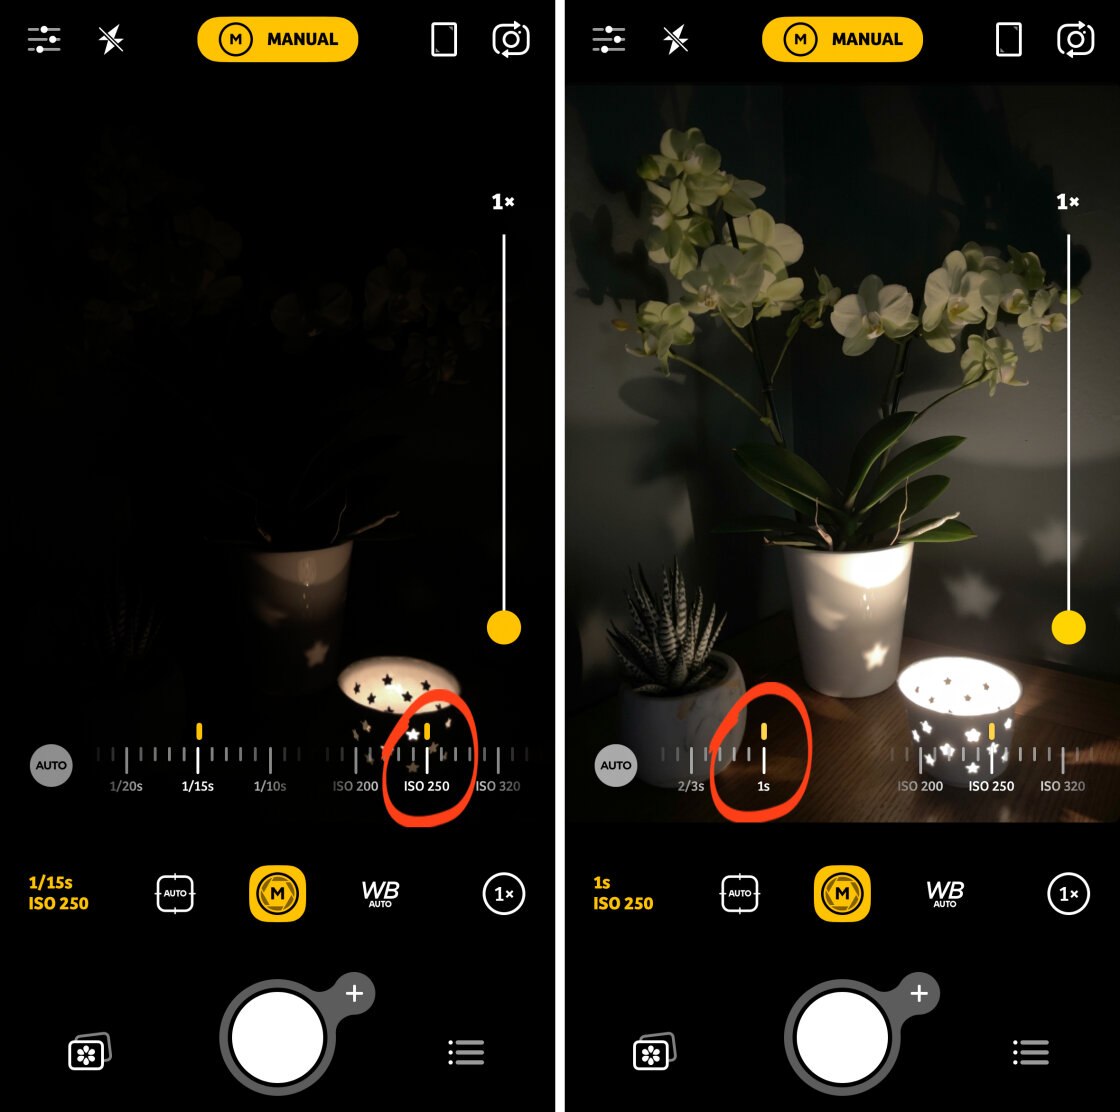
A slower shutter speed (which captures more light) balances the low ISO (which captures less light).
This allows you to use a low ISO (which results in less grain) while still getting a good exposure with enough light.
Of course, if you’re using a slow shutter speed, you might end up with blurred photos caused by camera shake. And if there’s any movement in the scene, it will appear as motion blur.
However, if you can mount your iPhone on a tripod, and your subjects are stationary, it’s fine to use a slow shutter speed. And then you can use a low ISO to avoid grain.
If your only option is to hand-hold the camera, or you have moving subjects that you want to appear sharp, you’ll need a faster shutter speed. And as a result, you’ll have to use a higher ISO setting to get a decent exposure.
Just remember, the higher the ISO, the grainier the image will be.
As with all iPhone manual camera controls, you often have to take a few shots using slightly different settings before you get a good result.
But this all adds to the fun! And you’ll learn a lot in the process.
6. White Balance: How To Capture Perfect Colors In Your Photos
In general, the iPhone does a great job of capturing colors accurately. But in certain situations, the colors might not look quite right.
And that’s when you need to adjust the white balance.
6.1 What Is White Balance?
White balance allows you to capture colors more accurately in your photos.
It ensures the white parts of the photo appear white. And in turn, the other colors in your picture will be captured correctly.
So, when are you likely to end up with strange colors in your pictures?
One situation is when you shoot indoors with the lights on. You might notice a yellow or orange color cast in your photo. This is caused by the warm-colored light emitted from light bulbs.
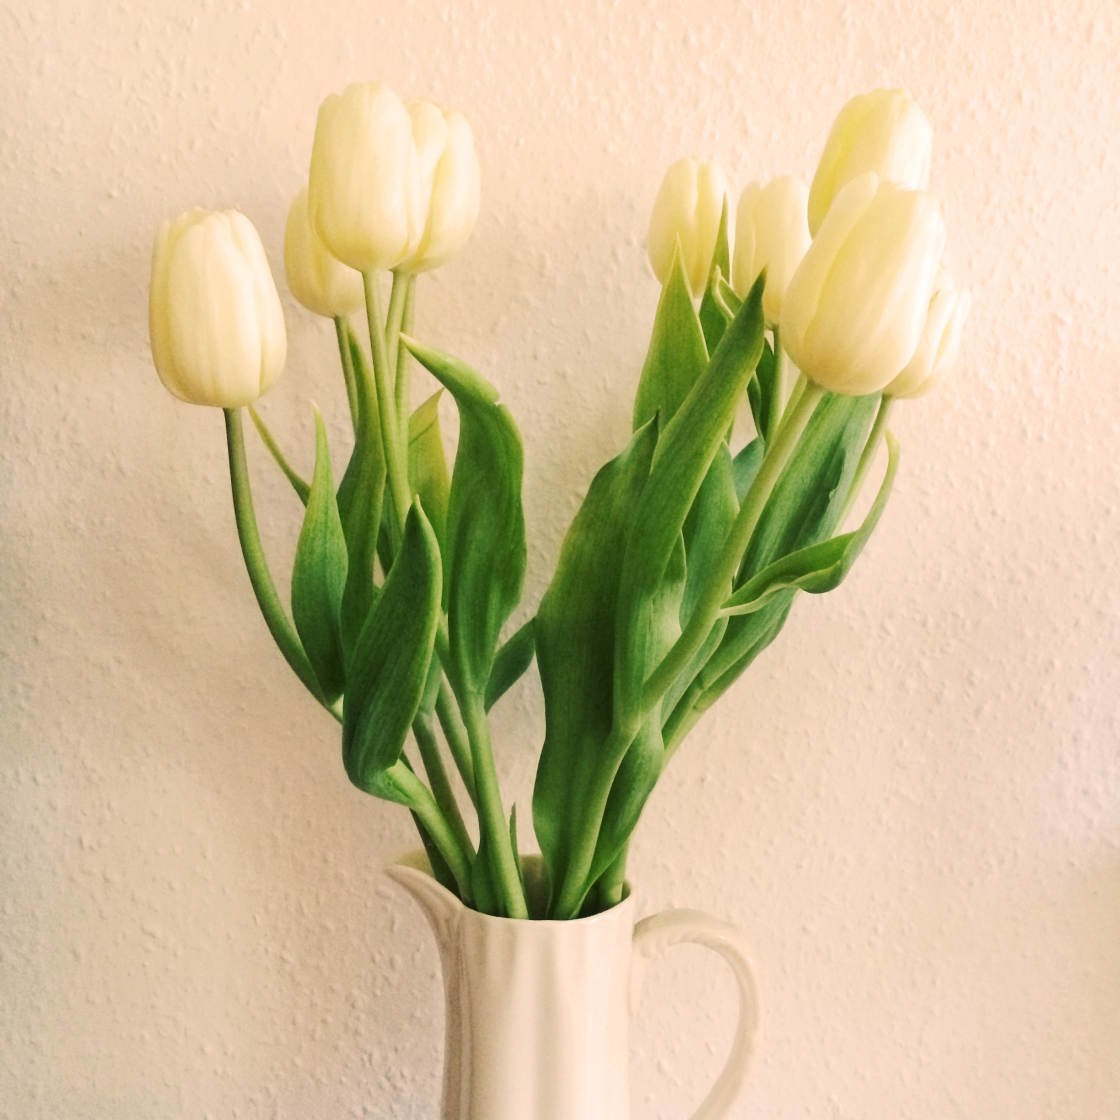
Color casts are especially noticeable in the white areas of a scene, such as the white jug, wall, and flowers in the photo above.
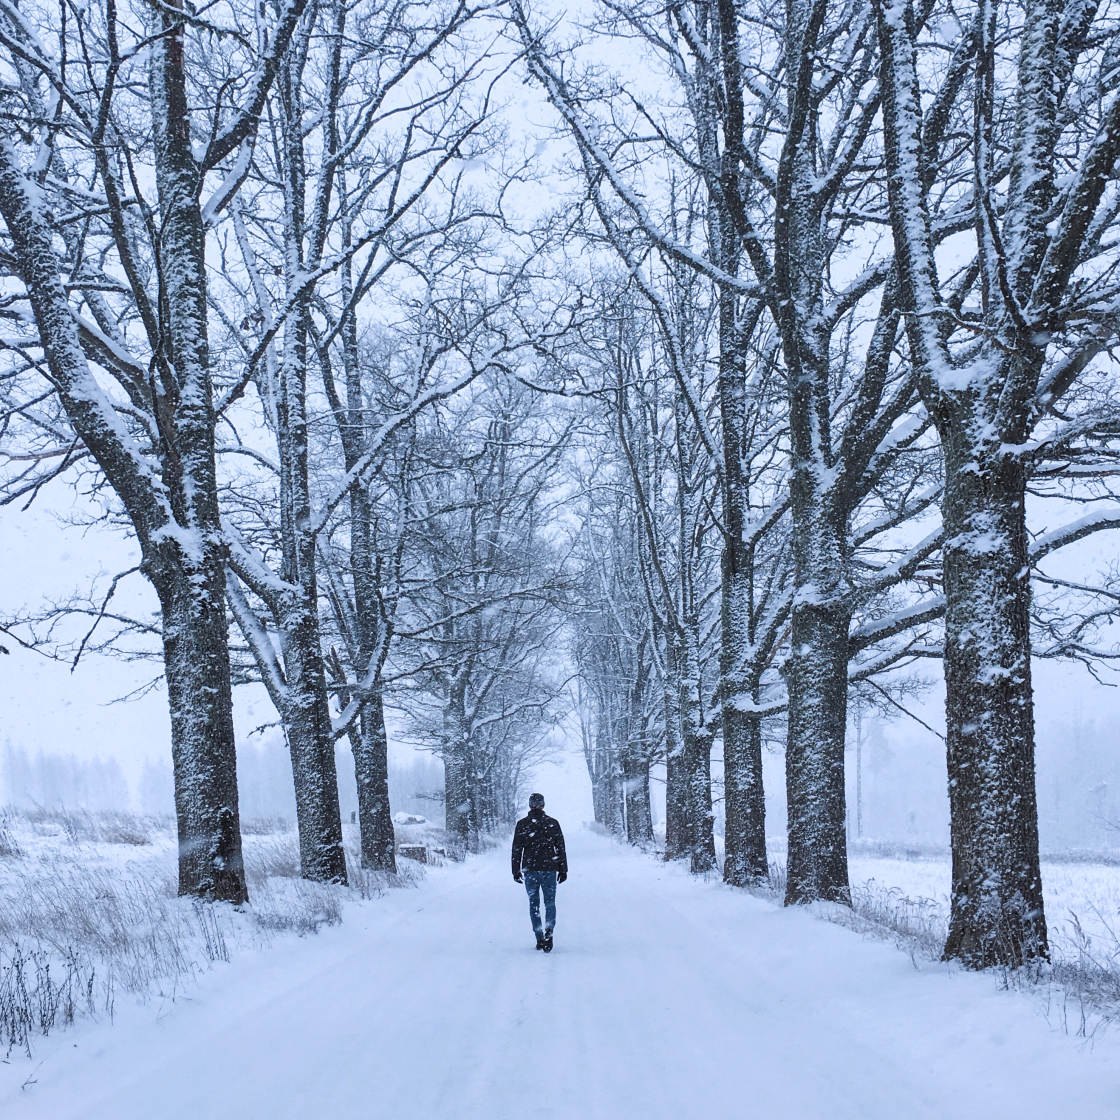
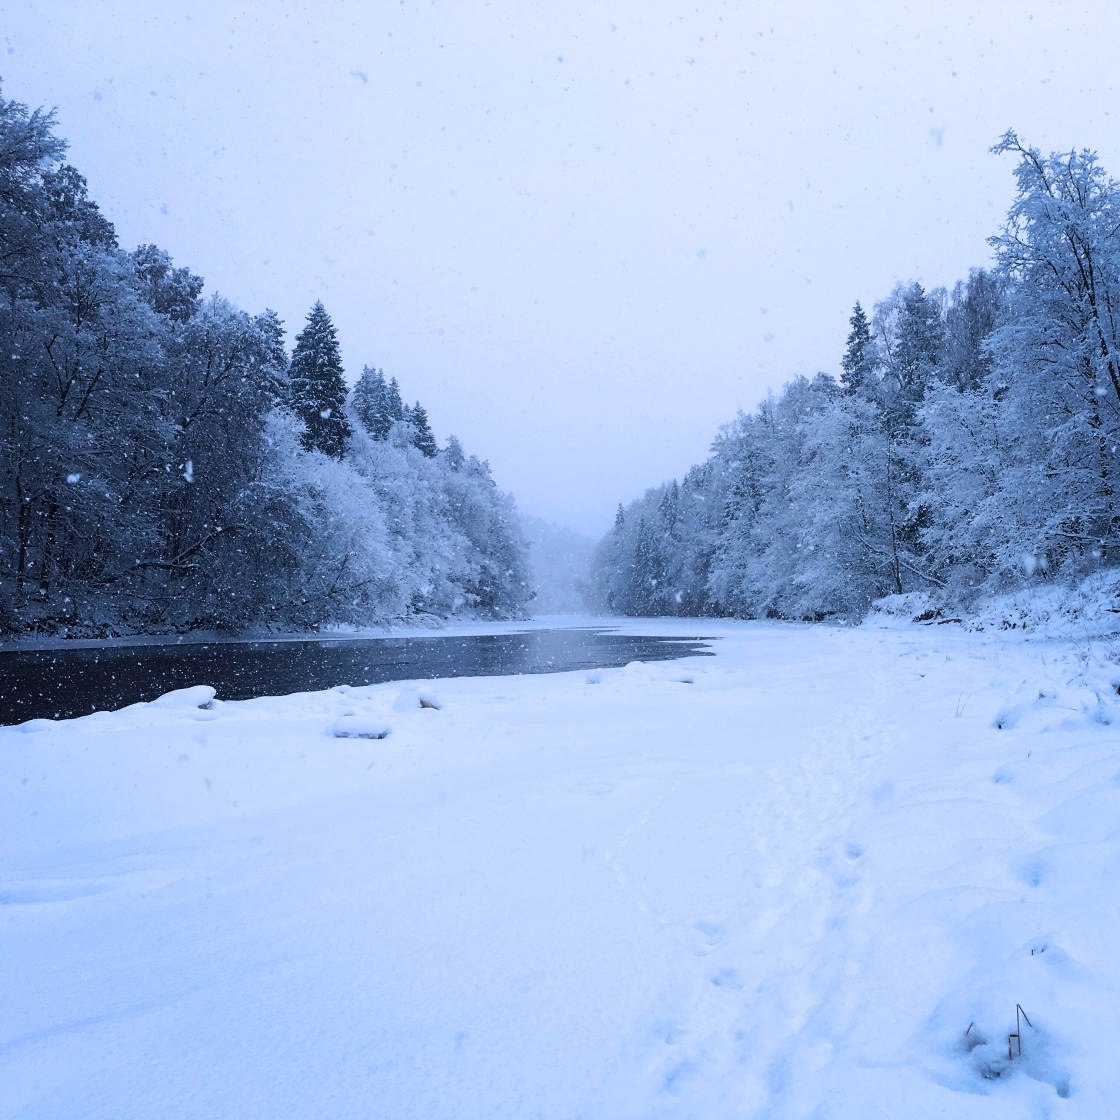
You can also get unnatural colors when you shoot outdoors in the shade or under cloud cover. In these situations, your photos can end up with a cool blue color cast. This is especially apparent when photographing snow.
So, how can you eliminate these color casts at the time of shooting?
You simply adjust the camera’s white balance!
White balance works by cooling down or warming up the colors in your photo. This neutralizes the color casts from certain types of light, resulting in more accurate colors.
Selecting the appropriate white balance setting will ensure your whites appear white!

6.2 How To Change White Balance On iPhone
The built-in Camera app doesn’t let you change the white balance. Instead, it automatically adjusts white balance in an attempt to remove any warm or cool color casts.
Most of the time, the iPhone camera’s auto white balance does a great job, especially outdoors in natural light.

But if you’re taking pictures in very warm or cool light, you might need to take manual control of the white balance.
So, how do you change the white balance on iPhone?
You guessed it! You use the Camera+ 2 app.
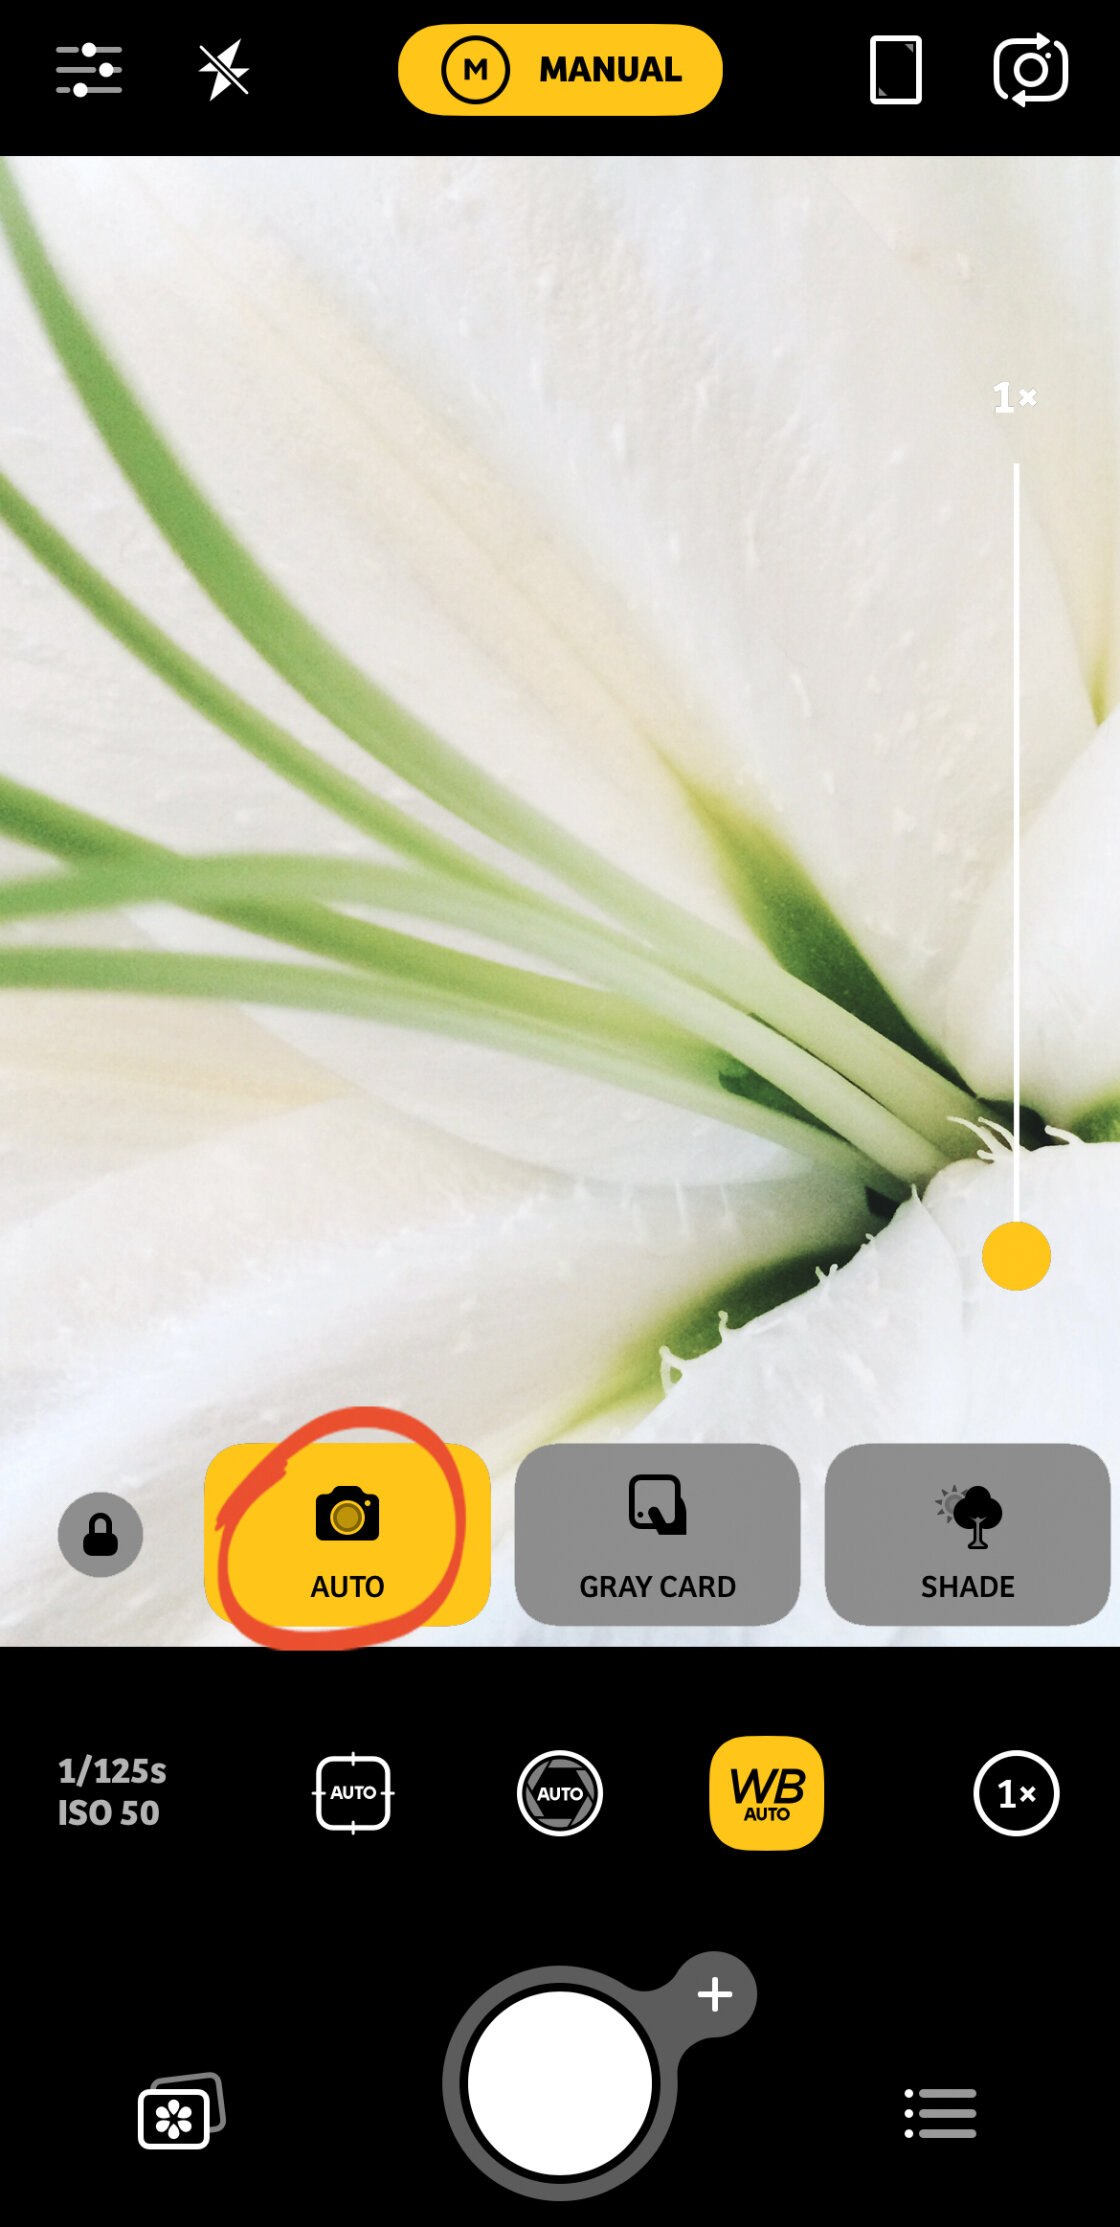
In Camera+ 2, set the shooting mode (yellow icon) at the top of the screen to Manual. Then tap the WB (White Balance) icon near the bottom of the screen.
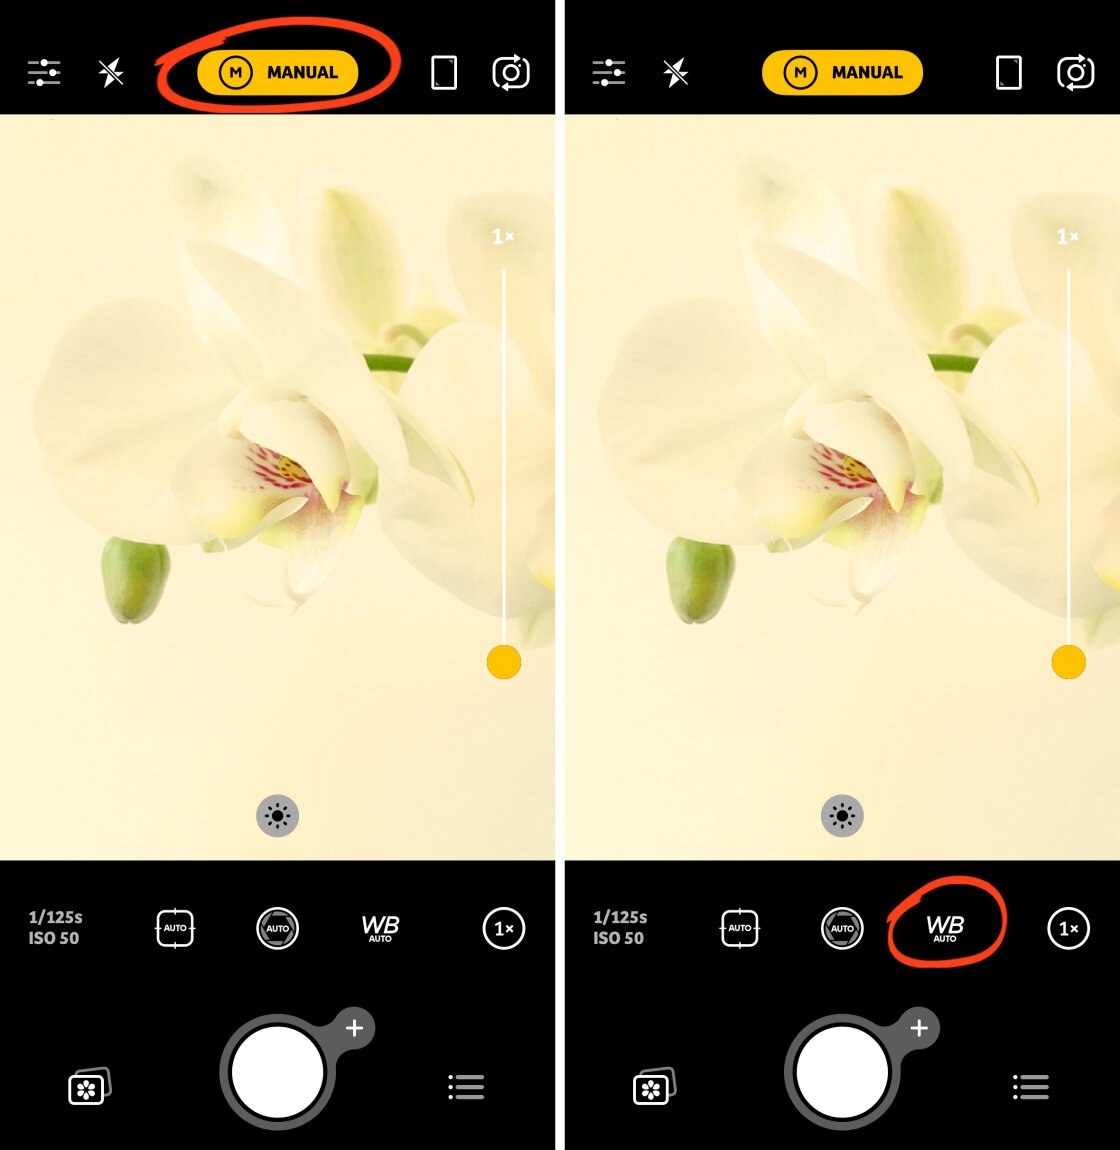
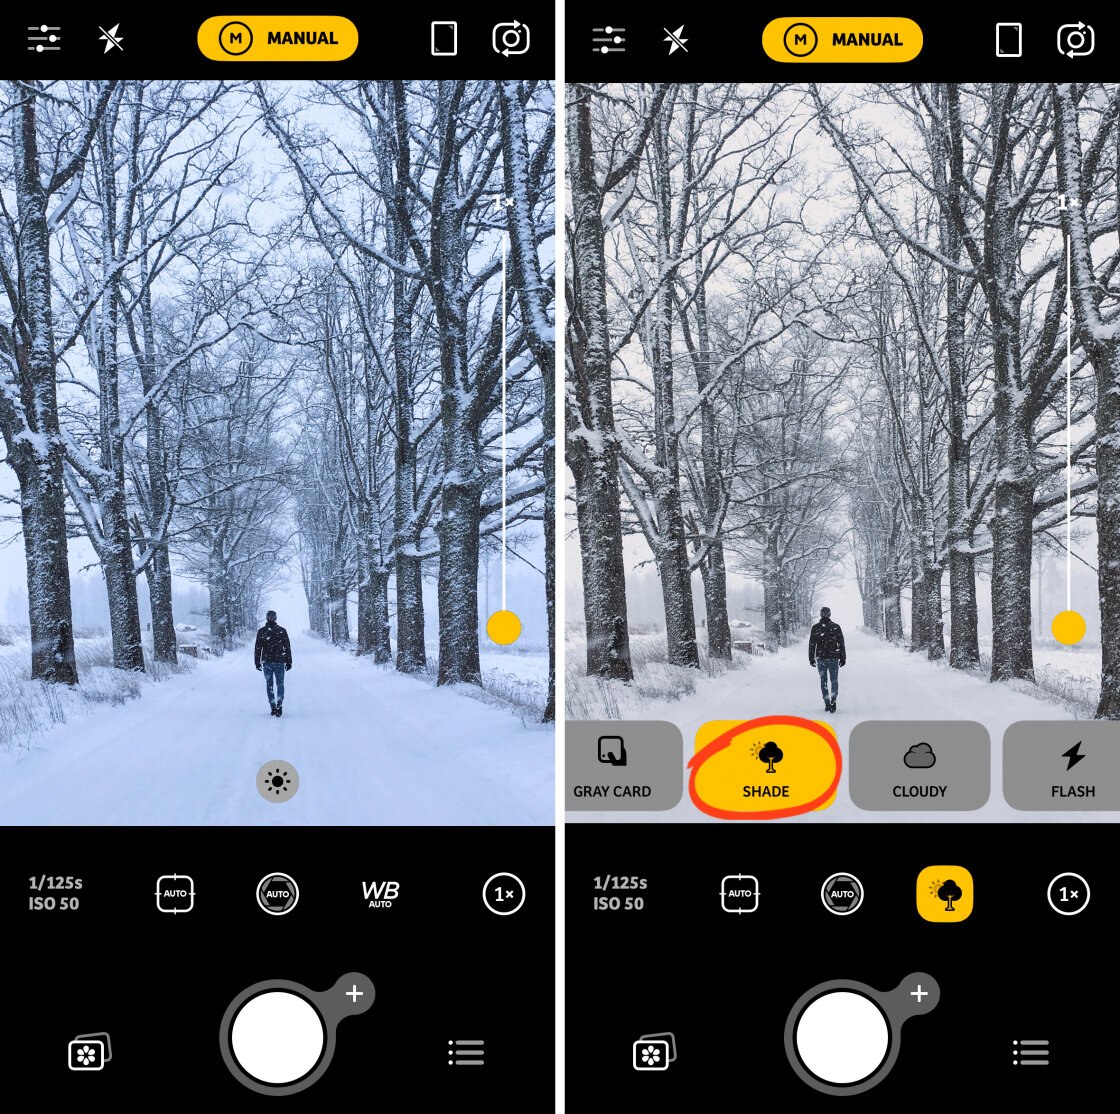
When you tap the WB icon, a row of white balance presets appears at the bottom of the viewfinder. The presets are called Shade, Cloudy, Daylight, etc. Swipe across to see more white balance presets.
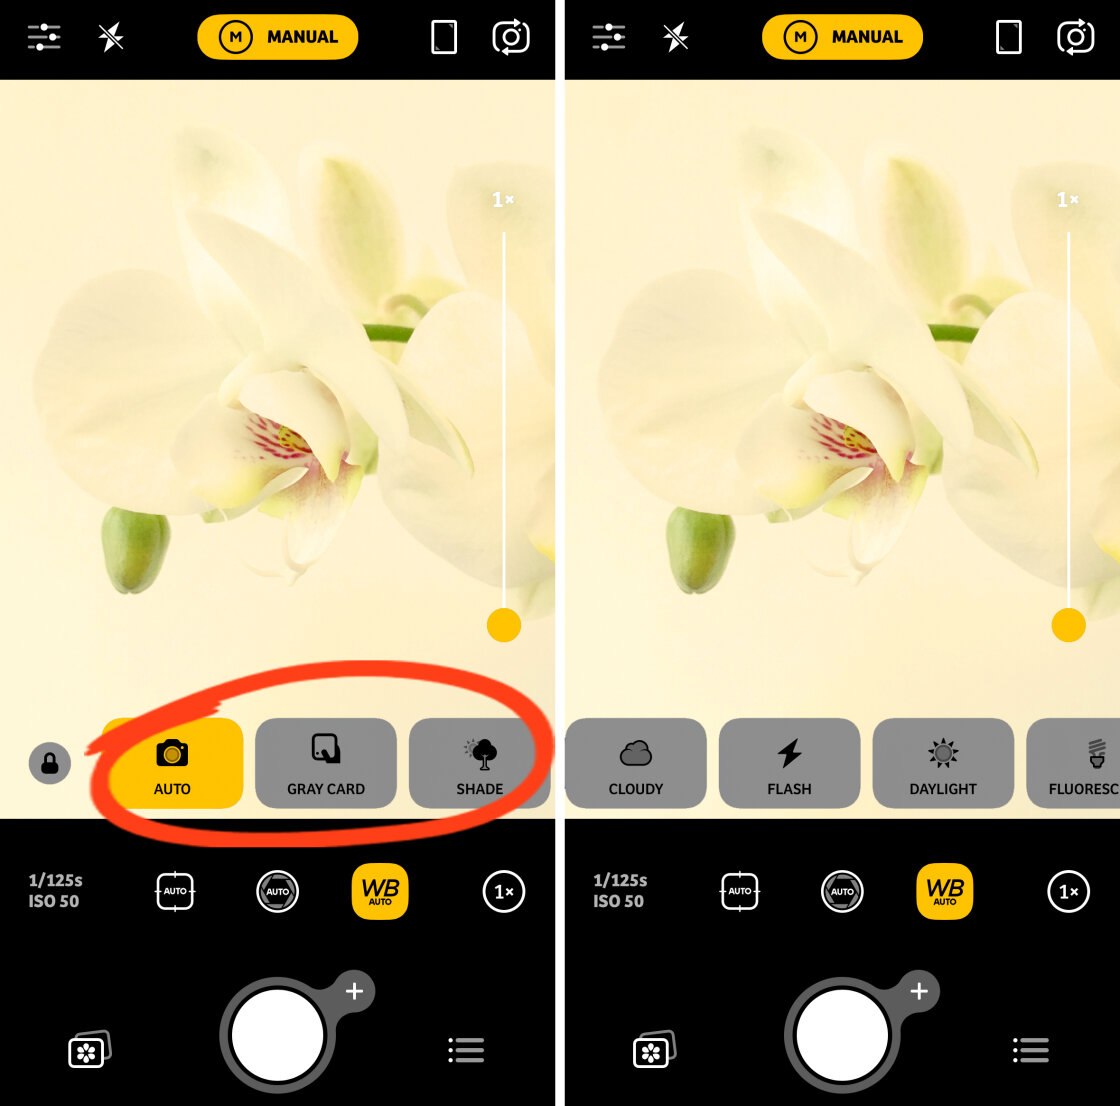
To eliminate a color cast, select the white balance preset that matches the type of light you’re shooting in.
So, if you’re shooting under warm-colored light bulbs, choose Incandescent. This setting cools down the colors, neutralizing the warm color cast from the light bulbs.
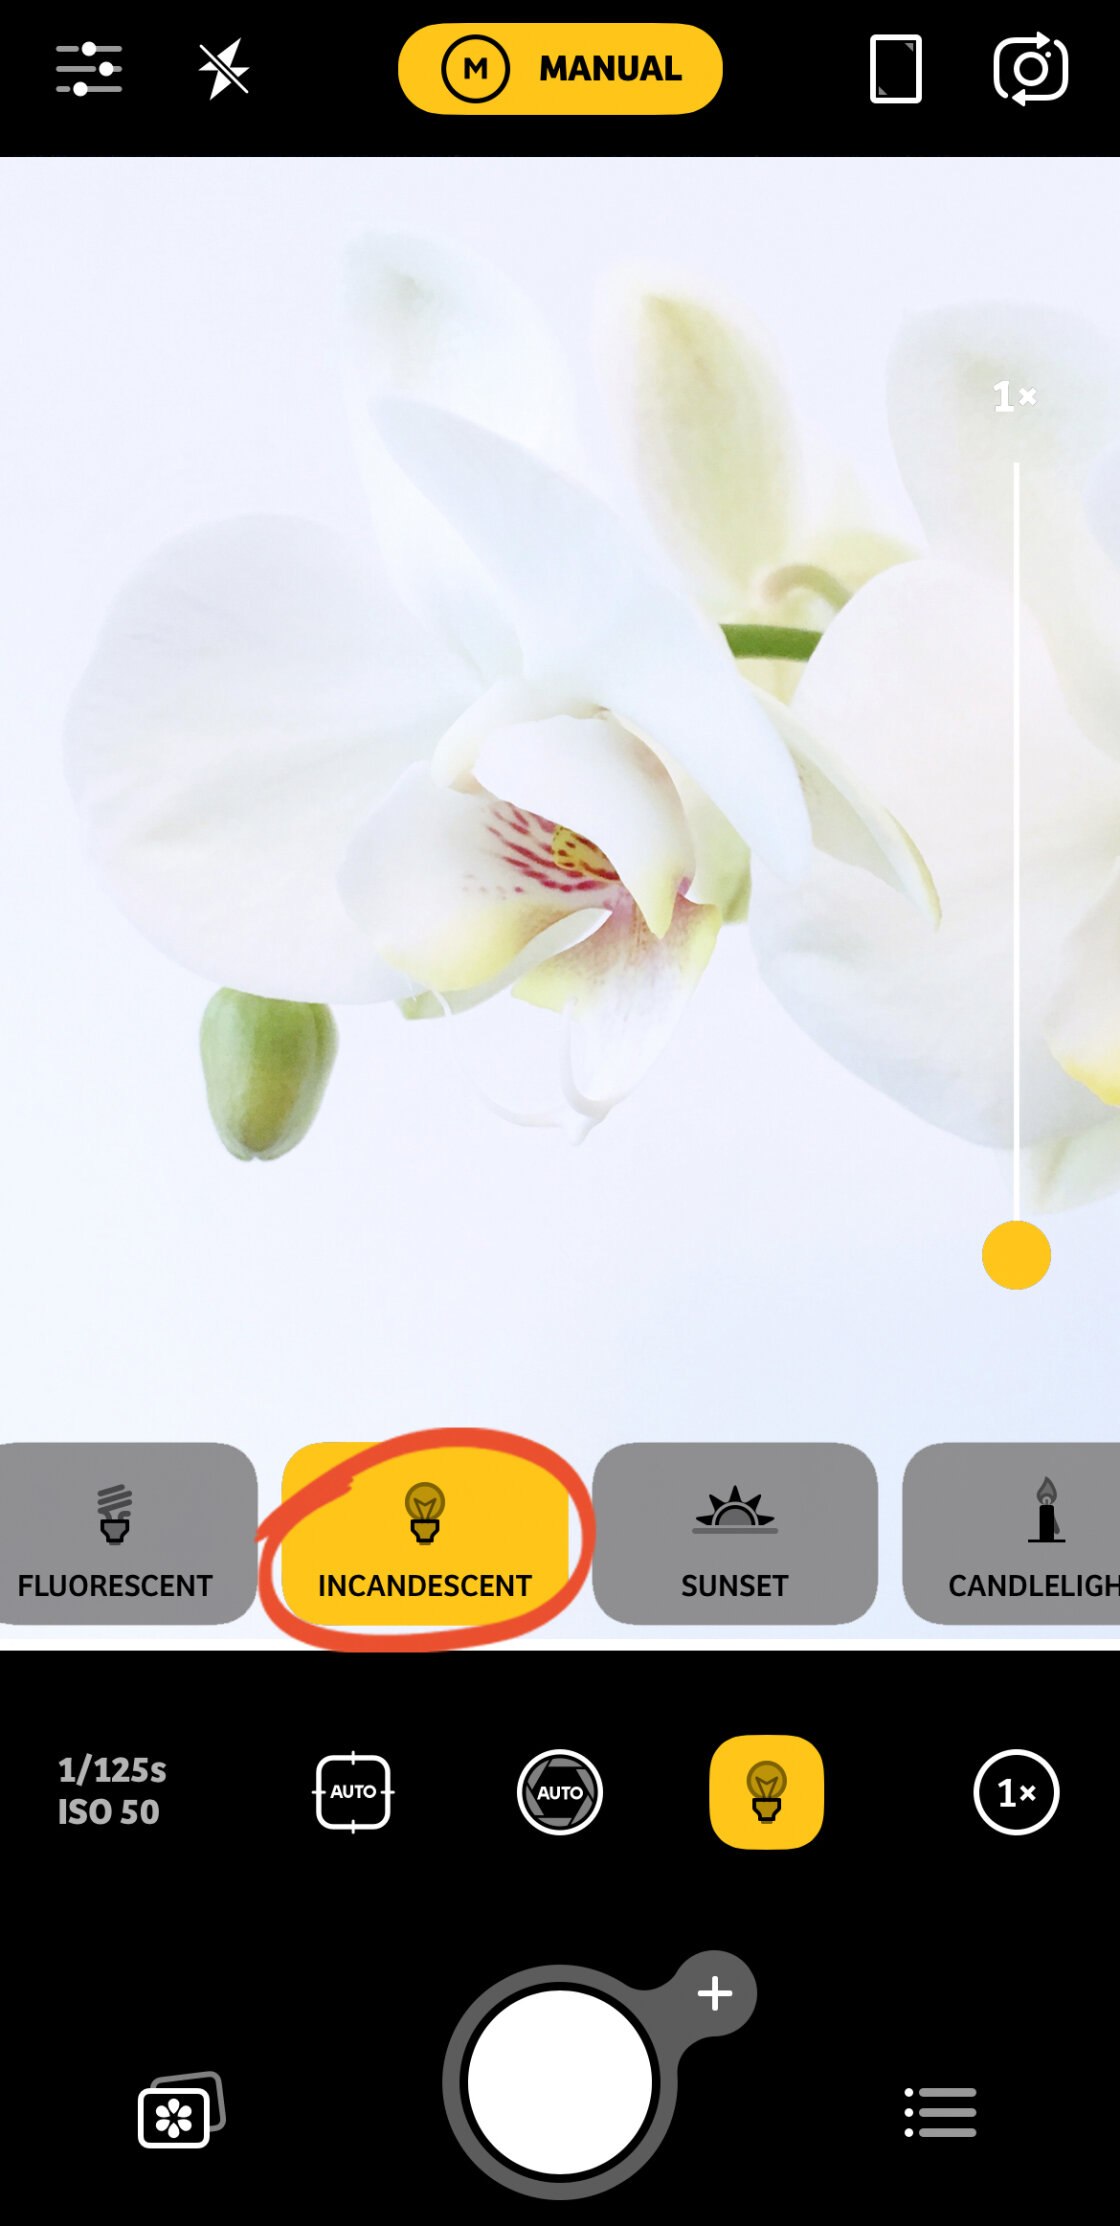
The resulting photo should have more natural colors where the whites look white.
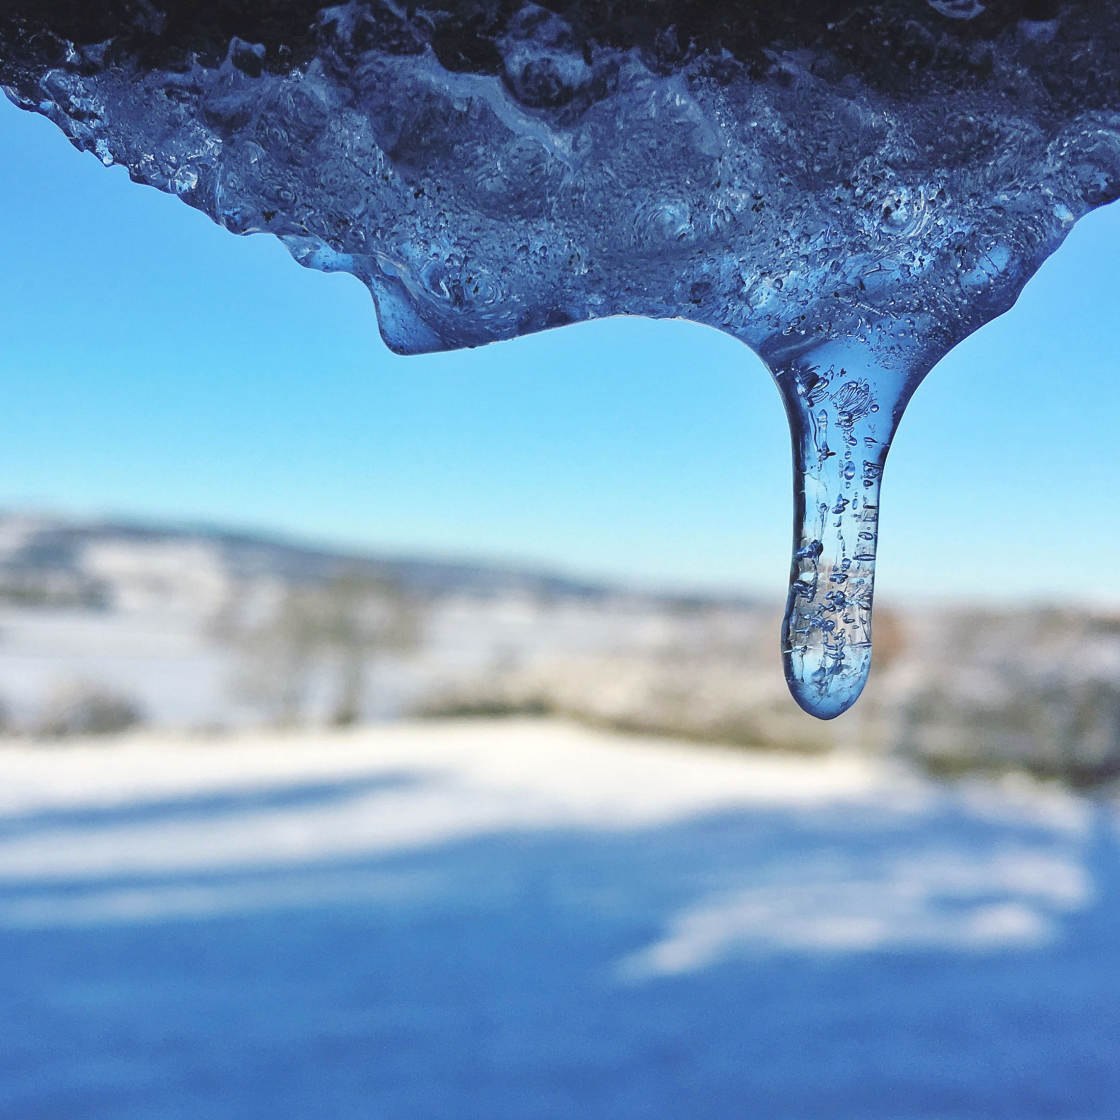
In the example below, the Shade white balance preset was selected. This setting warms up the colors, eliminating the blue color cast and making the snow appear more white.
If you prefer to let the camera decide which white balance setting to use, select the Auto white balance option.
6.3 Use White Balance For Creative Effect
In most cases, you’ll want the colors in your photos to appear as accurate as possible. You’ll want the whites to appear white.
But sometimes a photo can be enhanced by deliberately warming up or cooling down the colors.
For instance, you can emphasize the coldness and bleakness of a winter landscape by cooling down the colors.
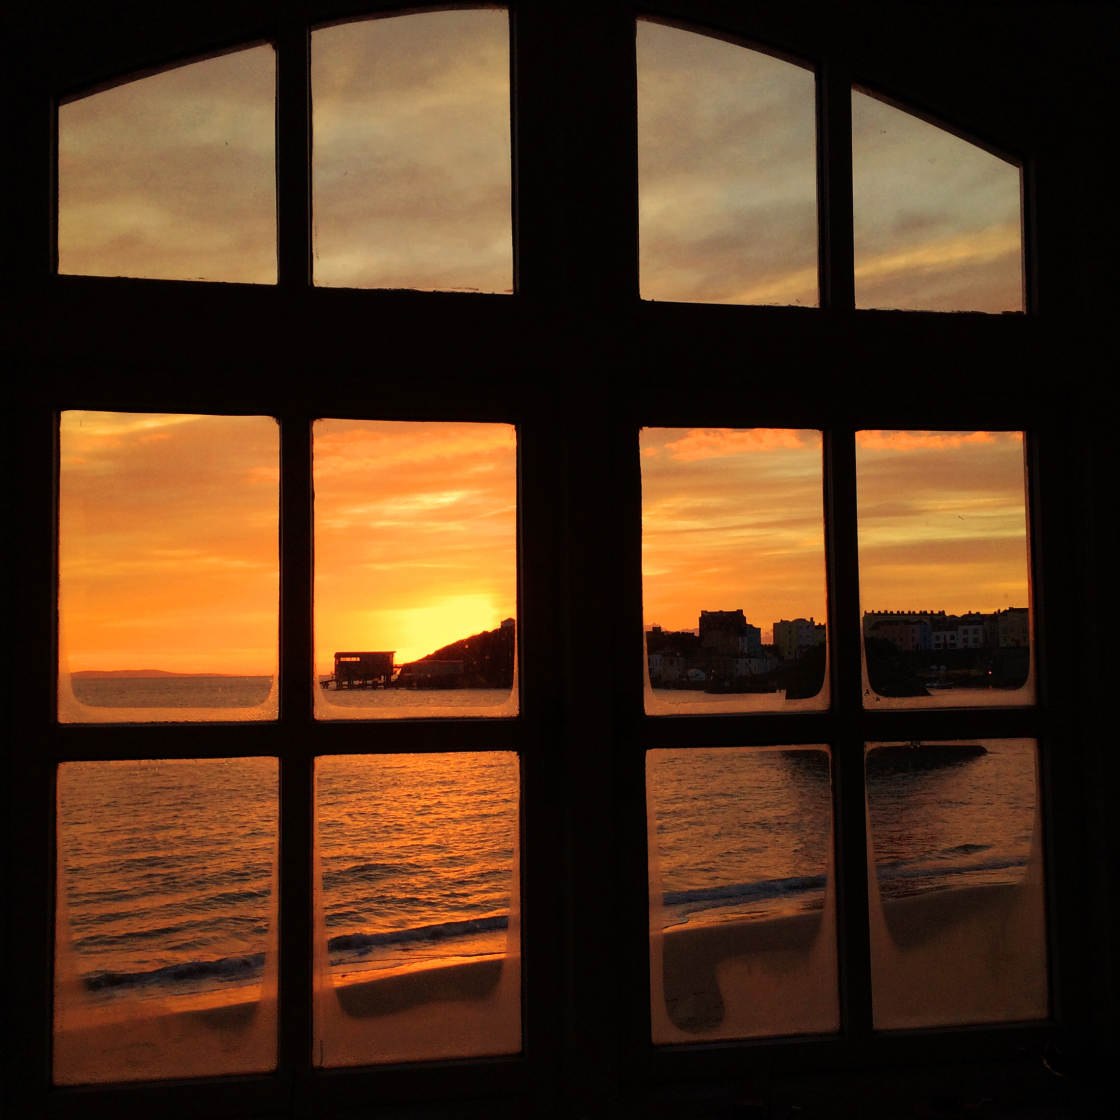
Or you can intensify the colors of a sunset by adding warm orange tones to your image.
Using white balance creatively can help you capture very different moods in your photos. So don’t be afraid to experiment with the white balance settings.
And if you don’t get the white balance quite right at the time of shooting, you can always tweak the colors when editing your photo!
The post 6 Advanced iPhone Camera Controls For Jaw-Dropping Photography appeared first on iPhone Photography School.
About the author

By accepting you will be accessing a service provided by a third-party external to https://kendallcameraclub.org/