By Kendall Camera Club on Monday, 12 December 2022
Category: Photography Blogs

12 Tips for Sharper Landscape Photography

The post 12 Tips for Sharper Landscape Photography appeared first on Digital Photography School. It was authored by Gavin Hardcastle.

Struggling to capture tack-sharp landscape photos? It’s a common problem. (In fact, the question I get asked most frequently during workshops is “How do you get such sharp images?”)

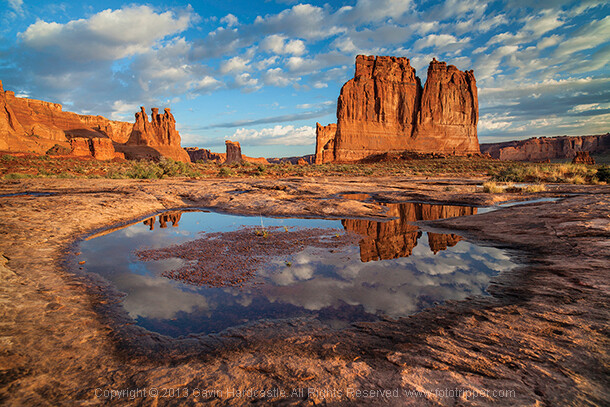
Fortunately, taking crisp, clear, detailed landscape shots isn’t as hard as you might think. Sure, you can spend thousands of dollars on sharper lenses and image-stabilization-equipped cameras, but at the end of the day, it’s mostly just about following three simple steps:

Avoid all movement when the camera shutter is open Focus carefully Choose the right aperture for your creative vision

Of course, each step does require a bit of technical knowledge, which is where this article comes in handy. Below, I share my top tips for sharp landscape photography; by the time you finish reading, you’ll know how to capture beautiful photos with plenty of detail in nearly every situation.

Let’s dive right in!

1. Make sure your tripod is locked down

First things first:

Most landscape photography scenarios require longer shutter speeds, so you absolutely must have a tripod. (And you can’t use a flimsy tripod, either; make sure your tripod is capable of handling your camera and lens without issue.) You also need a good tripod head, one that’s capable of handling your camera and lens. (The heavier your setup, the stronger the required head.)

But even once you have a solid support system, it’s important that everything is clamped down tightly. The head should be locked in place. The quick-release plate that’s screwed onto the underside of your camera should feel solid.

This first tip may seem obvious, but time and time again, I see my students sporting decent tripods, yet they fail to clamp down all the components.

2. Keep your hands off your setup when shooting

In the heat of the moment, it’s easy to leave your hands on your camera or resting on your tripod as you shoot, but this is a major problem.

You may not realize it, but even motionless hands tend to move a little bit – and the vibrations of your hands on the tripod or camera will transfer up to the sensor and blur the shot (especially if you’re capturing a long exposure).

When that shutter opens, your hands should be nowhere near the camera! Speaking of which:

3. Use a remote release or a two-second timer to fire the shutter

Most photographers fire the shutter button using their index finger – and when you’re shooting at, say, 1/500s, that works fine.

But when your shutter speed is set to 1/10s and you press your index finger down on the camera, you’ll create vibrations that cause blur.

Fortunately, landscape shooters use two simple strategies to ensure their landscape photos come out looking sharp:

Rely on the two-second self-timer. The self-timer delays the shutter until two seconds after you press the shutter button, which is generally enough time for any vibrations to fade away. Use a remote release. A remote release lets you trigger the shutter without actually touching the camera. Simply connect the release, press the release button, and watch as your camera takes a photo, hands-free.

Either option can work, though a remote release is far more convenient – and it comes in handy if you need to perfectly time your shots (to coincide with a wave crashing on the beach, for instance).

4. Refocus after rotating a filter

This isn’t such a big deal if you’re using high-end lenses, but I’ve seen it affect plenty of cheaper glass (i.e., kit lenses).

Here’s what happens:

You carefully focus your lens, but because you’re photographing water or foliage, you add a polarizer, which you then rotate. Guess what? As you rotate that filter, the movement causes the lens’s point of focus to change – and when you do go to capture a shot, it turns out blurry.

Once you’re aware of this issue, it’s easy to fix; just remember to refocus after adjusting the polarizer but before hitting the shutter.

5. If you use a DSLR, enable the mirror lock-up setting

DSLRs contain a mirror that allows you to see an accurate image through the viewfinder. However, when you press the shutter button, that mirror will flip up, causing blur-inducing vibrations.

To prevent this problem, you need to enable your camera’s mirror lockup setting, which flips the mirror up in advance so you don’t need to worry about the vibrations affecting your photos. (Note that you’ll no longer be able to see through the viewfinder once mirror lockup has been triggered, so make sure you compose and focus in advance!)

Most DSLRs offer a dedicated mirror lockup option, though you can also get the same effect using your DSLR’s Live View setting.

Keep in mind that mirrorless cameras do not include mirrors and are consequently unaffected by mirror vibrations!

6. Enable your camera’s electronic front-curtain shutter

In the previous tip, I discussed how the camera mirror mechanism can create vibrations – but did you know that your camera’s shutter can create vibrations, too?

That’s why I encourage you to activate your camera’s electronic front-curtain shutter, or EFCS mode. This will cause the sensor to fire electronically – that is, without a mechanical shutter – preventing any vibrations, also known as shutter shock.

Alternatively, if your camera has one, you can always use the dedicated electronic shutter mode.

7. Remove your camera strap before shooting

You may not realize it, but your camera strap can act like a sail in windy situations, causing – you guessed it! – vibrations.

So remove your camera strap before you head out, especially if the conditions are windy. (If you like using a strap, consider purchasing one that clips on and off easily, or figure out a way to lock it down on your tripod.)

8. Add some weight to your tripod

Even relatively sturdy tripods can struggle in wind, rain, rushing water, and so on. The movement will cause vibrations, which will in turn cause blur.

Fortunately, many tripods feature a hook that sits opposite the camera (underneath the head or the central column). When conditions get bad, I recommend hanging something heavy from that hook; it’ll help keep your tripod free of vibrations. In a pinch, you can use your camera backpack, though some manufacturers sell little hammocks that can hold heavy stones.

9. Choose a midrange or narrow aperture

Most landscape photography features sharp focus from foreground to background. If you want to achieve this kind of clarity, you’ll need to select an aperture that gives you a relatively deep depth of field.

The ideal aperture depends on the depth in your scene – if you’re photographing a distant mountain with nothing present in the foreground, you can use a far wider aperture than if you’re photographing a river that leads off into the distance – but it’s generally a good idea to work between f/11 and f/16. Note that narrower apertures will give you more depth of field, but they’ll also introduce blur due to diffraction, so it’s important to strike a balance between a sufficient depth of field and a wider, sharper aperture. (On the other hand, ultra-wide apertures tend to be softer than midrange apertures such as f/8, so make sure you experiment with your lenses and determine their sweet spots in advance!)

One more note: The above advice assumes you want to keep your entire landscape shot sharp, but a shallow depth of field effect can look beautiful when done carefully. If you decide to go the shallow DOF route, you’ll need to use a wide aperture such as f/2.8 and – ideally – a lens that delivers beautiful bokeh.

10. Focus in the middle distance

Where do you focus when you’re capturing a landscape? On the nearest object? On the farthest object? On the sky? Somewhere in between?

Different points of focus will result in different depth-of-field effects – and hence different levels of sharpness – so it’s important you focus carefully. When you’re just starting out, I’d recommend picking an object in the middle distance that has a clear contrasting line and focus on that. You might also consider using a depth-of-field calculator, which will allow you to pick the precise point of focus that will keep your entire landscape photo sharp.

11. Make sure your viewfinder is sharp

If you’ve never checked your camera viewfinder for sharpness, now’s a good time to do it. A blurry viewfinder makes it very tough to focus in the field!

Additionally, viewfinders can be adjusted to work with different eyeglass prescriptions, and this will help you focus more accurately, as well.

12. Magnify the image preview

If you have a camera with a magnifiable live preview, then I encourage you to always check your focus by zooming in on your camera’s LCD screen. (Some mirrorless cameras will even let you view a magnified image in the viewfinder.)

And if you’re really concerned about blur due to focusing error, switch your lens over to its manual focus mode, then zoom in on your camera and set your point of focus using the manual focus ring on your lens.

It also pays to preview each image after firing the shutter button. Magnify the image on the camera LCD, then check all portions of the image to ensure you’ve captured a sharp shot. (And if you haven’t, you can just do a quick retake!)

Tips for sharp landscape photography: final words

I use every single one of these techniques in my workshops, and I teach them to all of my students. If you remember this article each time you shoot landscapes, you’re guaranteed to get far sharper results!

Do you have any tips for sharp landscapes that I missed? Which of these tips did you find most helpful? Share your thoughts in the comments below!

Table of contents

Landscape Photography

GENERAL
The dPS Ultimate Guide to Landscape Photography
10 Most Common Mistakes in Landscape Photography – and How to Overcome Them
Responsibilities of Landscape Photographers
PREPARATION
How to Find and Photograph Wild Landscapes for Epic Images
The Three Dangers of Landscape Photography
How to Plan the Perfect Landscape Photo
How to Find the Best Locations for Landscape Photography
The Importance of Scouting for Landscape Photographers
Why Goal Planning Is the Key to Growing as a Landscape Photographer
What is Your Favorite Landscape Location?
8 Tips to Avoid Crowds at Popular Landscape Locations
SETTINGS
5 Tips for Setting the Focus in Your Landscape Photography
Understanding Aperture and Landscape Photography – Why F16 Isn’t the Only Choice
Guide to Creative White Balance for Landscape Photography
How a Short Versus Long Exposure Will Affect Your Landscape Images
How to Get Super Sharp Landscape Photography Images 1. Make sure your tripod is locked down2. Keep your hands off your setup when shooting3. Use a remote release or a two-second timer to fire the shutter4. Refocus after rotating a filter5. If you use a DSLR, enable the mirror lock-up setting6. Enable your camera’s electronic front-curtain shutter7. Remove your camera strap before shooting8. Add some weight to your tripod9. Choose a midrange or narrow aperture10. Focus in the middle distance11. Make sure your viewfinder is sharp12. Magnify the image previewTips for sharp landscape photography: final words1. Make sure your tripod is locked down2. Keep your hands off your setup when shooting3. Use a remote release or a two-second timer to fire the shutter4. Refocus after rotating a filter5. If you use a DSLR, enable the mirror lock-up setting6. Enable your camera’s electronic front-curtain shutter7. Remove your camera strap before shooting8. Add some weight to your tripod9. Choose a midrange or narrow aperture10. Focus in the middle distance11. Make sure your viewfinder is sharp12. Magnify the image previewTips for sharp landscape photography: final words
Getting Landscapes Sharp: Hyperfocal Distances and Aperture Selection
The Best ISO for Landscape Photography (in Every Situation)
5 Reasons To Should Shoot Your Landscape Images in RAW
How to Work with Different Shutter Speeds for Landscape Photography
LIGHTING
Tips for Using Flash to Enhance Outdoor Nature and Landscape Photography
Landscape Photography: It’s All About the Light
How to Improve Your Landscape Photography By Understanding Portrait Lighting
Painting with Light in the Landscape
COMPOSITION
Aspect Ratios in Landscape Photography
6 Tips for Capturing Dramatic Skies in your Landscape Photography
How to Use Leading Lines Effectively in Landscape Photography
10 Landscape Composition Techniques for Breathtaking Photos (2021)
3 Reasons to Shoot Vertical Aspect Landscapes and 6 Tips on How to Shoot Them
How to Use Juxtaposition for More Compelling Landscape Photography
Using Layers and Foreground Interest for Better Landscape Photography
Include The Foreground For Dramatic Landscapes
How to Photograph a Minimalist Landscape
5 Framing Tricks to Help You Capture Better Landscape Photos
How to Use Balance in Your Landscape Photography Composition
5 Good Reasons to Add People into Your Landscape Photography
Include Clouds In Your Landscapes
Landscape Photography and the Human Element
How to Add a Sense of Scale to Your Landscape Photos
How to Solve 5 Composition Conundrums Faced by Landscape Photographers
The S-Curve: A Landscape Photography Composition Technique
Using Water to Lighten Landscape Photos
GEAR
5 Quick Reasons to Use the Nifty Fifty for Landscape Photography
Using Graduated Neutral Density Filters for Landscape Photography
How to Use Neutral Density Filters to Make Better Landscape Photos
How to Use Wide-angle Lenses for Landscape Photography
Tips for Shooting Landscapes With a Telephoto Lens
Six Tips For Using Filters to Improve Your Landscape Photos
5 Tips for Using a Tripod in Landscape Photography
Six Situations Where Tripods are Essential for Landscape Photographers
Wide Angle Versus Telephoto Lenses for Beautiful Landscape Photography
10 Essential Pieces of Landscape Photography Gear
Why you Need a Telephoto Zoom Lens for Landscape Photography
Circular Polarizers Versus Graduated Neutral Density Filters for Landscape Photography
Comparison – HDR Versus Graduated Neutral Density Filters for Landscape Photography
Polarizing and Neutral Density Filters: Essentials for Landscape Photography
Why I Always Use an L-Plate Bracket for Landscape Photography
Why I Switched From LEE Filters to Formatt-Hitech for Landscape Photography
Review of the Venus Laowa 15mm F/4 Wide Angle Lens for Landscape Photographers
Which Landscape Photography Camera Should You Buy? [video]
Essential Accessories for Landscape Photography
How to Choose the Right Tripod for Landscape Photography
ADVANCED GUIDES
10 Tips for Photographing Wide-Angle Landscapes
8 Tips for Fall Landscape Photography
5 Tips for Better Winter Landscape Photography
5 Ways to Create Dramatic Landscape Photos at Midday
How to Shoot Landscapes at Sunset
Tips for Shooting Landscape Photography Towards the Sun
8 Steps to Great Long Exposure Landscape Photography
15 Tips for Low Light Landscape Photography
The Night Sky In Landscape Photography
How to Make Storytelling Landscape Photos – 4 Steps
A Day At The Beach: Photographing Seaside Landscapes
Tips for Winter Landscape Photography on the Prairie
Landscape Photography – Shooting the Same Location Through the Seasons
3 Tips to Take Better Landscape Photos Regardless of the Weather
Time for Landscape – Weather and Landscape Photography
Tips for Landscape Photography in Exotic Places
Putting You Into Your Landscape Photography
5 Ways to Capture More Diverse Landscape Photos
5 Tips to Discover Intimate vs. Grand Landscape & Nature Photography
Photographing Starry Skies for Nocturnal Landscape Without Breaking the Bank
CREATIVE TECHNIQUES
How to Take Creative Landscape Shots Using Intentional Camera Movement
How to Convert a Camera to Infrared for Black and White Landscape Photography
Tips for Making Dramatic Black and White Landscape Photos
6 Ideas for More Creative Landscape Photography
How to Create Glass Ball Landscapes – 6 Techniques
How to Get Landscapes Sharp with Focus Stacking
How to do Landscape Panoramic Photography
POST-PROCESSING
5 Easy Steps to Exposure Blending for High Contrast Landscapes
A Super Simple Way to Make Landscape Photos POP Using Lightroom
Making the Best Use of HDR in Landscape Photography
Landscape Editing Techniques for Fine Art Photography Using Lightroom
How to Use Adobe Camera Raw and Photoshop to Make Your Landscape Images Pop
Editing Gently: 3 Tips for Processing Realistic Landscape Photos
The Power of Post-processing for Landscape Photography
How to Use Neutral Tones to Craft Realistic Edits for Landscape Photos
Top 5 Nik Collection Filters to Improve Your Landscape Photos
How to Edit Landscape and Nature Photos with the Lightroom Gradient Tool and Range Mask Features
Lightroom Quick Post-Processing Tips for Landscape Photography
Tips for Processing Winter Landscapes in Lightroom
How to Use the Lightroom HSL Panel for Landscape Photo Editing
How to Process a Black and White Landscape Photo Using Lightroom
How to Give Your Landscape Photos Extra Punch in One Easy Step
Tips For Editing the Colors in Landscape Photos Using Lightroom (video)
Tips for Processing Landscape Photos – from Basic Edits to Artistic Interpretation
5 Tips For Mastering Contrast In Your Landscape Photos (video)
Using the Lightroom Adjustment Brush to add Dimension to a Landscape Photo
OPINION: Why Photoshop is Ruining Landscape Photography
INSPIRATION
An Interview With Landscape Photography Legend Art Wolfe – Part 1
27 Black and White Landscape Images
A Collection of Stunning Landscape Photographs
9 Striking Landscapes That Break the ‘Rules’
These Inspiring Landscape Photographers will Make You Want to Take Better Photos
var dpsTopics = { id: 67219, titles: [{"id":"make-sure-your-tripod-is-locked-down","permalink":"https:\/\/digital-photography-school.com\/how-to-get-super-sharp-landscape-photography-images\/","title":"1. Make sure your tripod is locked down"},{"id":"keep-your-hands-off-your-setup-when-shooting","permalink":"https:\/\/digital-photography-school.com\/how-to-get-super-sharp-landscape-photography-images\/","title":"2. Keep your hands off your setup when shooting"},{"id":"use-a-remote-release-or-a-two-second-timer-to-fire-the-shutter","permalink":"https:\/\/digital-photography-school.com\/how-to-get-super-sharp-landscape-photography-images\/","title":"3. Use a remote release or a two-second timer to fire the shutter"},{"id":"refocus-after-rotating-a-filter","permalink":"https:\/\/digital-photography-school.com\/how-to-get-super-sharp-landscape-photography-images\/","title":"4. Refocus after rotating a filter"},{"id":"if-you-use-a-dslr-enable-the-mirror-lock-up-setting","permalink":"https:\/\/digital-photography-school.com\/how-to-get-super-sharp-landscape-photography-images\/","title":"5. If you use a DSLR, enable the mirror lock-up setting"},{"id":"enable-your-cameras-electronic-front-curtain-shutter","permalink":"https:\/\/digital-photography-school.com\/how-to-get-super-sharp-landscape-photography-images\/","title":"6. Enable your camera's electronic front-curtain shutter"},{"id":"remove-your-camera-strap-before-shooting","permalink":"https:\/\/digital-photography-school.com\/how-to-get-super-sharp-landscape-photography-images\/","title":"7. Remove your camera strap before shooting"},{"id":"add-some-weight-to-your-tripod","permalink":"https:\/\/digital-photography-school.com\/how-to-get-super-sharp-landscape-photography-images\/","title":"8. Add some weight to your tripod"},{"id":"choose-a-midrange-or-narrow-aperture","permalink":"https:\/\/digital-photography-school.com\/how-to-get-super-sharp-landscape-photography-images\/","title":"9. Choose a midrange or narrow aperture"},{"id":"focus-in-the-middle-distance","permalink":"https:\/\/digital-photography-school.com\/how-to-get-super-sharp-landscape-photography-images\/","title":"10. Focus in the middle distance"},{"id":"make-sure-your-viewfinder-is-sharp","permalink":"https:\/\/digital-photography-school.com\/how-to-get-super-sharp-landscape-photography-images\/","title":"11. Make sure your viewfinder is sharp"},{"id":"magnify-the-image-preview","permalink":"https:\/\/digital-photography-school.com\/how-to-get-super-sharp-landscape-photography-images\/","title":"12. Magnify the image preview"},{"id":"tips-for-sharp-landscape-photography-final-words","permalink":"https:\/\/digital-photography-school.com\/how-to-get-super-sharp-landscape-photography-images\/","title":"Tips for sharp landscape photography: final words"},{"id":"make-sure-your-tripod-is-locked-down","permalink":"https:\/\/digital-photography-school.com\/how-to-get-super-sharp-landscape-photography-images\/","title":"1. Make sure your tripod is locked down"},{"id":"keep-your-hands-off-your-setup-when-shooting","permalink":"https:\/\/digital-photography-school.com\/how-to-get-super-sharp-landscape-photography-images\/","title":"2. Keep your hands off your setup when shooting"},{"id":"use-a-remote-release-or-a-two-second-timer-to-fire-the-shutter","permalink":"https:\/\/digital-photography-school.com\/how-to-get-super-sharp-landscape-photography-images\/","title":"3. Use a remote release or a two-second timer to fire the shutter"},{"id":"refocus-after-rotating-a-filter","permalink":"https:\/\/digital-photography-school.com\/how-to-get-super-sharp-landscape-photography-images\/","title":"4. Refocus after rotating a filter"},{"id":"if-you-use-a-dslr-enable-the-mirror-lock-up-setting","permalink":"https:\/\/digital-photography-school.com\/how-to-get-super-sharp-landscape-photography-images\/","title":"5. If you use a DSLR, enable the mirror lock-up setting"},{"id":"enable-your-cameras-electronic-front-curtain-shutter","permalink":"https:\/\/digital-photography-school.com\/how-to-get-super-sharp-landscape-photography-images\/","title":"6. Enable your camera's electronic front-curtain shutter"},{"id":"remove-your-camera-strap-before-shooting","permalink":"https:\/\/digital-photography-school.com\/how-to-get-super-sharp-landscape-photography-images\/","title":"7. Remove your camera strap before shooting"},{"id":"add-some-weight-to-your-tripod","permalink":"https:\/\/digital-photography-school.com\/how-to-get-super-sharp-landscape-photography-images\/","title":"8. Add some weight to your tripod"},{"id":"choose-a-midrange-or-narrow-aperture","permalink":"https:\/\/digital-photography-school.com\/how-to-get-super-sharp-landscape-photography-images\/","title":"9. Choose a midrange or narrow aperture"},{"id":"focus-in-the-middle-distance","permalink":"https:\/\/digital-photography-school.com\/how-to-get-super-sharp-landscape-photography-images\/","title":"10. Focus in the middle distance"},{"id":"make-sure-your-viewfinder-is-sharp","permalink":"https:\/\/digital-photography-school.com\/how-to-get-super-sharp-landscape-photography-images\/","title":"11. Make sure your viewfinder is sharp"},{"id":"magnify-the-image-preview","permalink":"https:\/\/digital-photography-school.com\/how-to-get-super-sharp-landscape-photography-images\/","title":"12. Magnify the image preview"},{"id":"tips-for-sharp-landscape-photography-final-words","permalink":"https:\/\/digital-photography-school.com\/how-to-get-super-sharp-landscape-photography-images\/","title":"Tips for sharp landscape photography: final words"}] };

The post 12 Tips for Sharper Landscape Photography appeared first on Digital Photography School. It was authored by Gavin Hardcastle.

Original link
(Originally posted by Gavin Hardcastle)
Leave Comments