KENDALL CAMERA CLUB BLOG FEED
The Ultimate Miami Photography Club Since 1977
The idea of commercial use permits is ubiquitous in nearly every country. If you want to perform a commercial activity in a public space, you need permission, and probably a fee, to do so. [ Read More ]Original link(Originally posted by Scott Donschikowski)
One cinematographer takes the majority of commonly used, video-centric or cinema cameras, and assembles them in a tier list from "God Mode" (of which there is only one), to "The group that shall not be named". Do you agree with the rankings? [ Read More ]Original link(Originally posted by Robert K Baggs)
GuruShots is a photography site that hosts "The World’s Greatest Photo Game,” In their latest challenge, they invited participants to submit their best photos of "Beach Time." There was such a great variety of seascapes and ideas incorporated into the challenge set. There were thousands of entires and millions of votes but the winners of the challenge were decided. Check out the three winners as well as hundreds of top rated images below. [ Read More ]Original link(Originally posted by David Strauss)
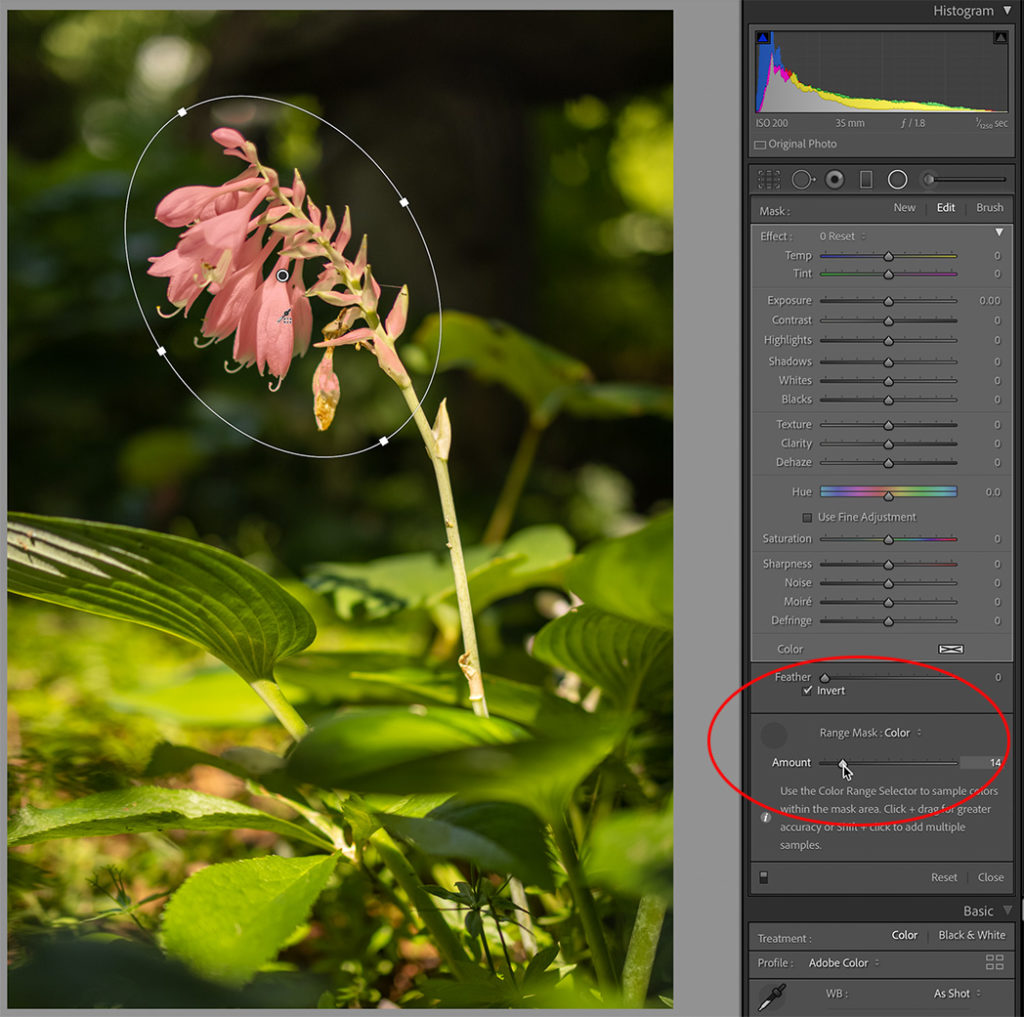
The new/upgraded Masking functionality in Lightroom Classic (and friends) has been very positively received so far. There’s one aspect, Intersect Mask, that seems be a little harder to understand on first look, so I thought it would make a good topic for a deeper dive. However, let’s first take a step back to the previous version, Lightroom Classic 10.4, to see if that can help us as we move forward. Previously we had Range Masks In the prior version of Lightroom Classic (10.4), within either the Graduated Filter, Radial Filter, or Adjustment Brush, we could refine the affected area by applying a Color or Luminance Range Mask. Here’s a simple example, let’s say I wanted to affect just the flowers of...

Whether your next shoot is deep in the woods, high atop a mountain or somewhere in between, now you can bring the power capabilities of the studio with you. With its 1000Wh capacity, 10 outlets, solar charging capability and ergonomic handle, the 70mai Power Station Tera 1000 is an innovative, clean-energy solution designed to keep you charged and connected – even in the most remote locations. Reliable Power for All Your Remote Photography Needs With a 1000W capacity and ability to power up to 10 devices at once, the Tera 1000 can charge a 20W camera 38+ times, a 100W drone up to 9 times and a 600W AARI light for up to 1.6 hours. It’s also a great back-up for...

It’s a simple question with a (not so) simple answer: can Adobe Lightroom on the iPad give you everything you need to edit your photos? [ Read More ]Original link(Originally posted by James Madison)
Photo By Bob Faucher Today’s Photo Of The Day is “White River Valley” by Bob Faucher. Location: Badlands National Park, South Dakota. “From this vantage point, on the Rim Road in Badlands National Park, one can see the expanse of the river valley as well as the rim on the other side of the valley,” describes Faucher. EF 70-200mm at 125mm. Exposure: 1/160 sec, Ï/16, ISO 320. Want to get your images in the running for a Photo of the Day feature? Photo of the Day is chosen from various galleries, including Assignments, Galleries and Contests. Assignments have weekly winners that are featured on the website homepage, Facebook, Twitter and Instagram. To get your photos in the running, all you have to do is submit...
A wedding photo booth can be one of the most entertaining and memorable activities at your wedding. They can also be a total dud and waste of money. In this video, I share my top tips for building a successful photo booth for my wedding! [ Read More ]Original link(Originally posted by Patrick Hall)
The Fstoppers community is brimming with creative vision and talent. Every day, we comb through your work, looking for images to feature as the Photo of the Day or simply to admire your creativity and technical prowess. In 2021, we're featuring a new photographer every month, whose portfolio represents both stellar photographic achievement and a high level of involvement within the Fstoppers community. [ Read More ]Original link(Originally posted by Alex Cooke)
The post Choosing Pictures: 7 Strategies to Pick Your Best Photos, Fast appeared first on Digital Photography School. It was authored by Melinda Smith. Are you tired of taking forever to pick your best pictures? Do you want to know how to choose photos, fast? When I first started out as a photographer, I’d get hung up on the picture-choosing process after every photoshoot. I’d spend way too much time agonizing over every photo (and I worried deeply about accidentally discarding a good one…). But over time, I developed several strategies. Strategies that: sped up my workflowmade the culling process far less painfulhelped me focus on actual photo editing Below, I share seven of these strategies, all of which are guaranteed...

When it comes to freezing motion, shutter speed is normally the parameter of choice. However, if you are shooting in the studio and you have full control of the light, using flash can actually be the better choice. This excellent video tutorial will show you how to freeze motion using flash. [ Read More ]Original link(Originally posted by Alex Cooke)
Docking stations have become irreplaceable in the workflows of modern photographers. Just think of the last time you had to dump footage from several memory cards on several drives. Efficient hardware is critical when it comes to managing files. The Kingston Workflow station is great, with brilliant potential. [ Read More ]Original link(Originally posted by Illya Ovchar)
It used to be that lens design was generally a tradeoff between convenience and excelling at a specialized purpose. However, in recent years, we have seen some absolutely remarkable lenses that upend the traditional defining factors that characterize prime and zoom lenses. One such lens is Tamron 35-150mm f/2-2.8 Di III VXD, and this excellent video review takes a look at the sort of performance and image quality you can expect from it in practice. [ Read More ]Original link(Originally posted by Alex Cooke)
User experience greatly affects the quality of the cameras we use. How has this changed for the new Sony a7 IV? [ Read More ]Original link(Originally posted by Nicco Valenzuela)
Buying your first camera is one of the most exciting and important things you will do on the road to becoming a photographer, but with so many options out there, it might be a little overwhelming to try to choose the right one for you. If you are wondering where to start, check out this fantastic video tutorial that will show you everything you need to know to make the right decision. [ Read More ]Original link(Originally posted by Alex Cooke)
In a few days, Activision will launch the 18th installment of Call of Duty, returning players to the Second World War. To market the game’s new photography mode, two conflict photographers were immersed inside the virtual world and tasked with photographing it. The resulting commercial portrays mankind’s most brutal act of self-destruction as little more than a game of football. [ Read More ]Original link(Originally posted by Andy Day)
The highly anticipated Sony a7 IV is finally here, and the company's do-it-all camera brings with it a variety of new features and improvements in its fourth iteration that make it a compelling option. This great video review takes a look at the camera from a video perspective and shows off the kind of performance and quality you can expect from it in use. [ Read More ]Original link(Originally posted by Alex Cooke)
Photo By inkphotography Today’s Photo Of The Day is “Lingmoor Fell Inversion” by inkphotography. Location: England. Want to get your images in the running for a Photo of the Day feature? Photo of the Day is chosen from various galleries, including Assignments, Galleries and Contests. Assignments have weekly winners that are featured on the website homepage, Facebook, Twitter and Instagram. To get your photos in the running, all you have to do is submit them. The post Photo Of The Day By inkphotography appeared first on Outdoor Photographer. Original link(Originally posted by Staff)
With all the excitement about the Nikon Z 9 and how it compares to cameras like the Canon EOS R3 and Sony a1, it can be easy to forget that Canon actually still has another high-level camera coming, the flagship EOS R1. A bit more info has emerged on the camera, including an expected release date. [ Read More ]Original link(Originally posted by Alex Cooke)
If you have been using your digital camera for astrophotography, you’re probably aware that there are special astro variants of some of the more popular cameras. But how exactly are these special variants different, and can you modify yours? [ Read More ]Original link(Originally posted by Scott Donschikowski)